Update 8/2/19: After receiving hundreds of questions about this topic over the years, I made an updated version over here: Check it out.
When it comes to home decor, vintage is definitely in. But if you have ever done some DIY woodworking projects, you’ll know it can be hard to obtain that aged wood look. You can either buy pricey “barn wood” from a boutique lumber supplier or let your new lumber from Home Depot sit in the backyard, exposed to the elements for a couple of midwest winters – or perhaps you may want to use this easy, inexpensive method for aging your wood in just under a week.
What You’ll Need
For this project you’ll need a few household items from your pantry and garage:
- unfinished, untreated, and sanded wood
- white vinegar
- 0000 grade steel wool
- 24 oz. mason jar
- Black tea, approx 10 bags for the solution
- disposable paint brushes
- 400 grit sandpaper
- some type of finish to seal and protect the wood


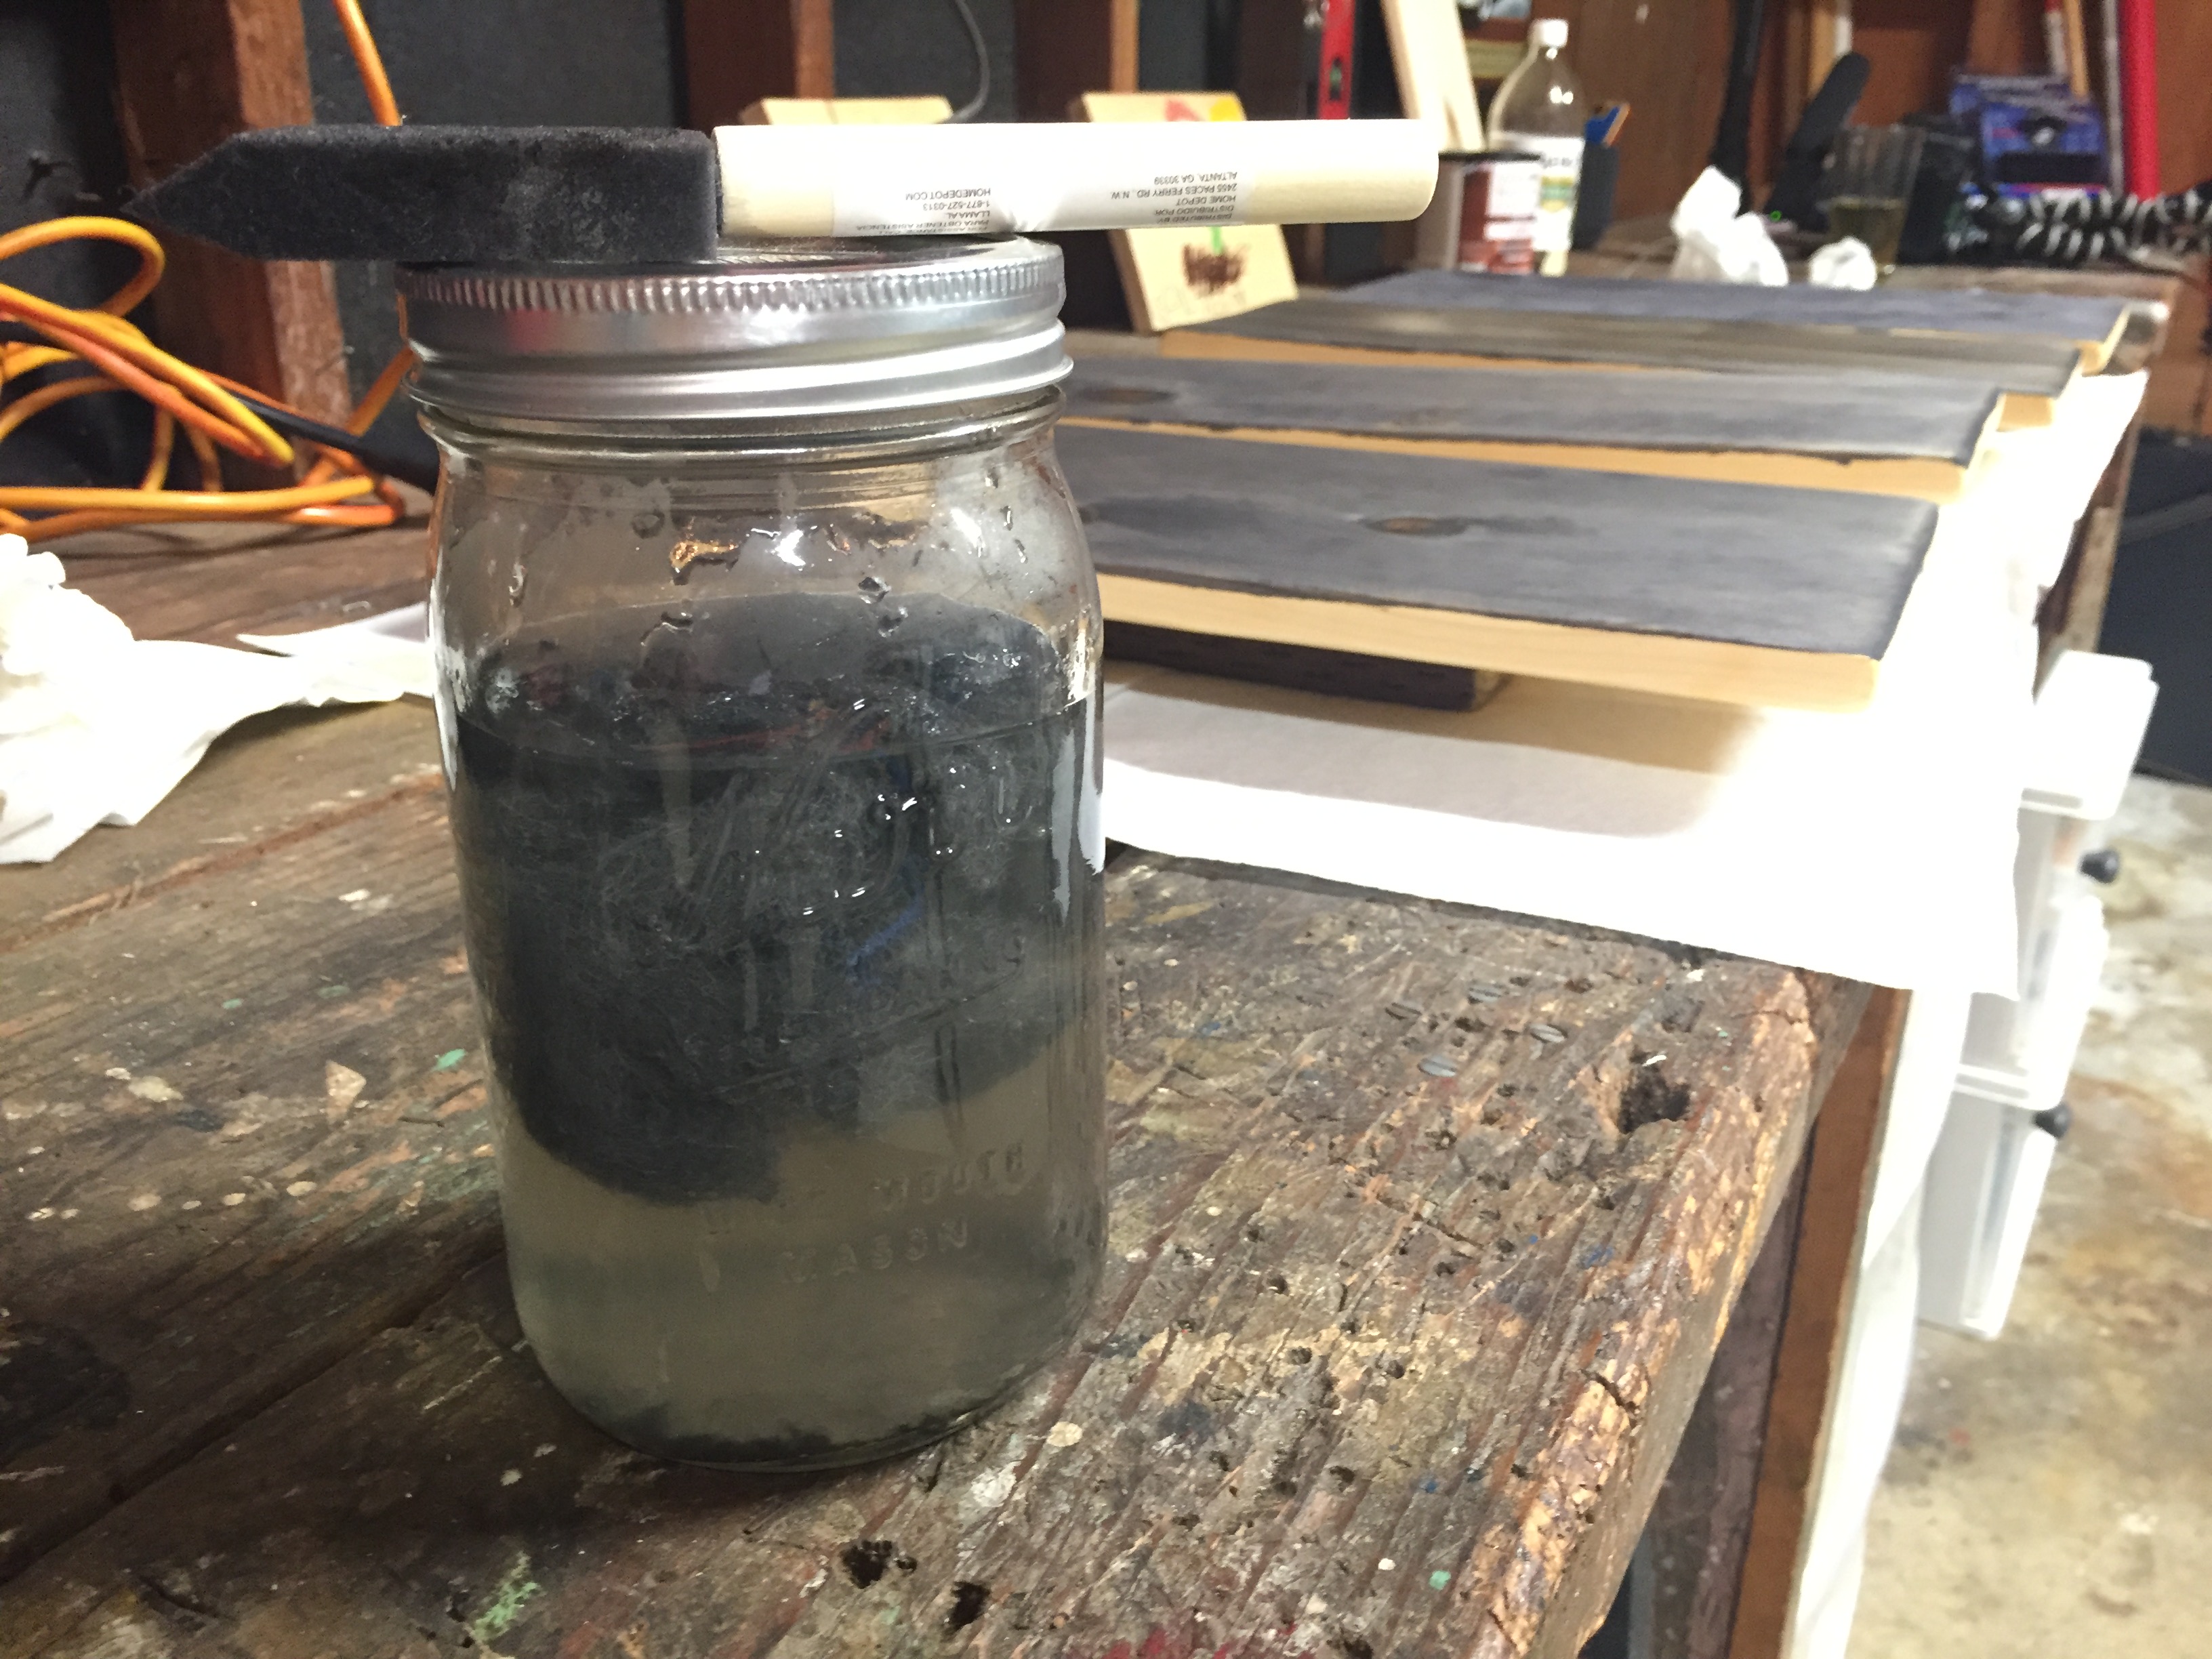
Step 1: Make Your Oxidation Solution
Creating your oxidation solution is straightforward. Take a roll of steel wool and tear off bits into your glass jar. Pour in the vinegar until your jar is full and cap the jar with the lid. Oxidation of the steel wool will take about 4-5 days in my experience. In general, the longer your solution can oxidize, the darker your wood color will be. I tested my solution on some pale pine wood after 3 days and it had a nice dark yellow hue to it. After about 6 days of sitting, the solution produced a dark gray. Because every wood will react differently, I would recommend testing your solution on scrap wood to see what kind of hue you’ll get.
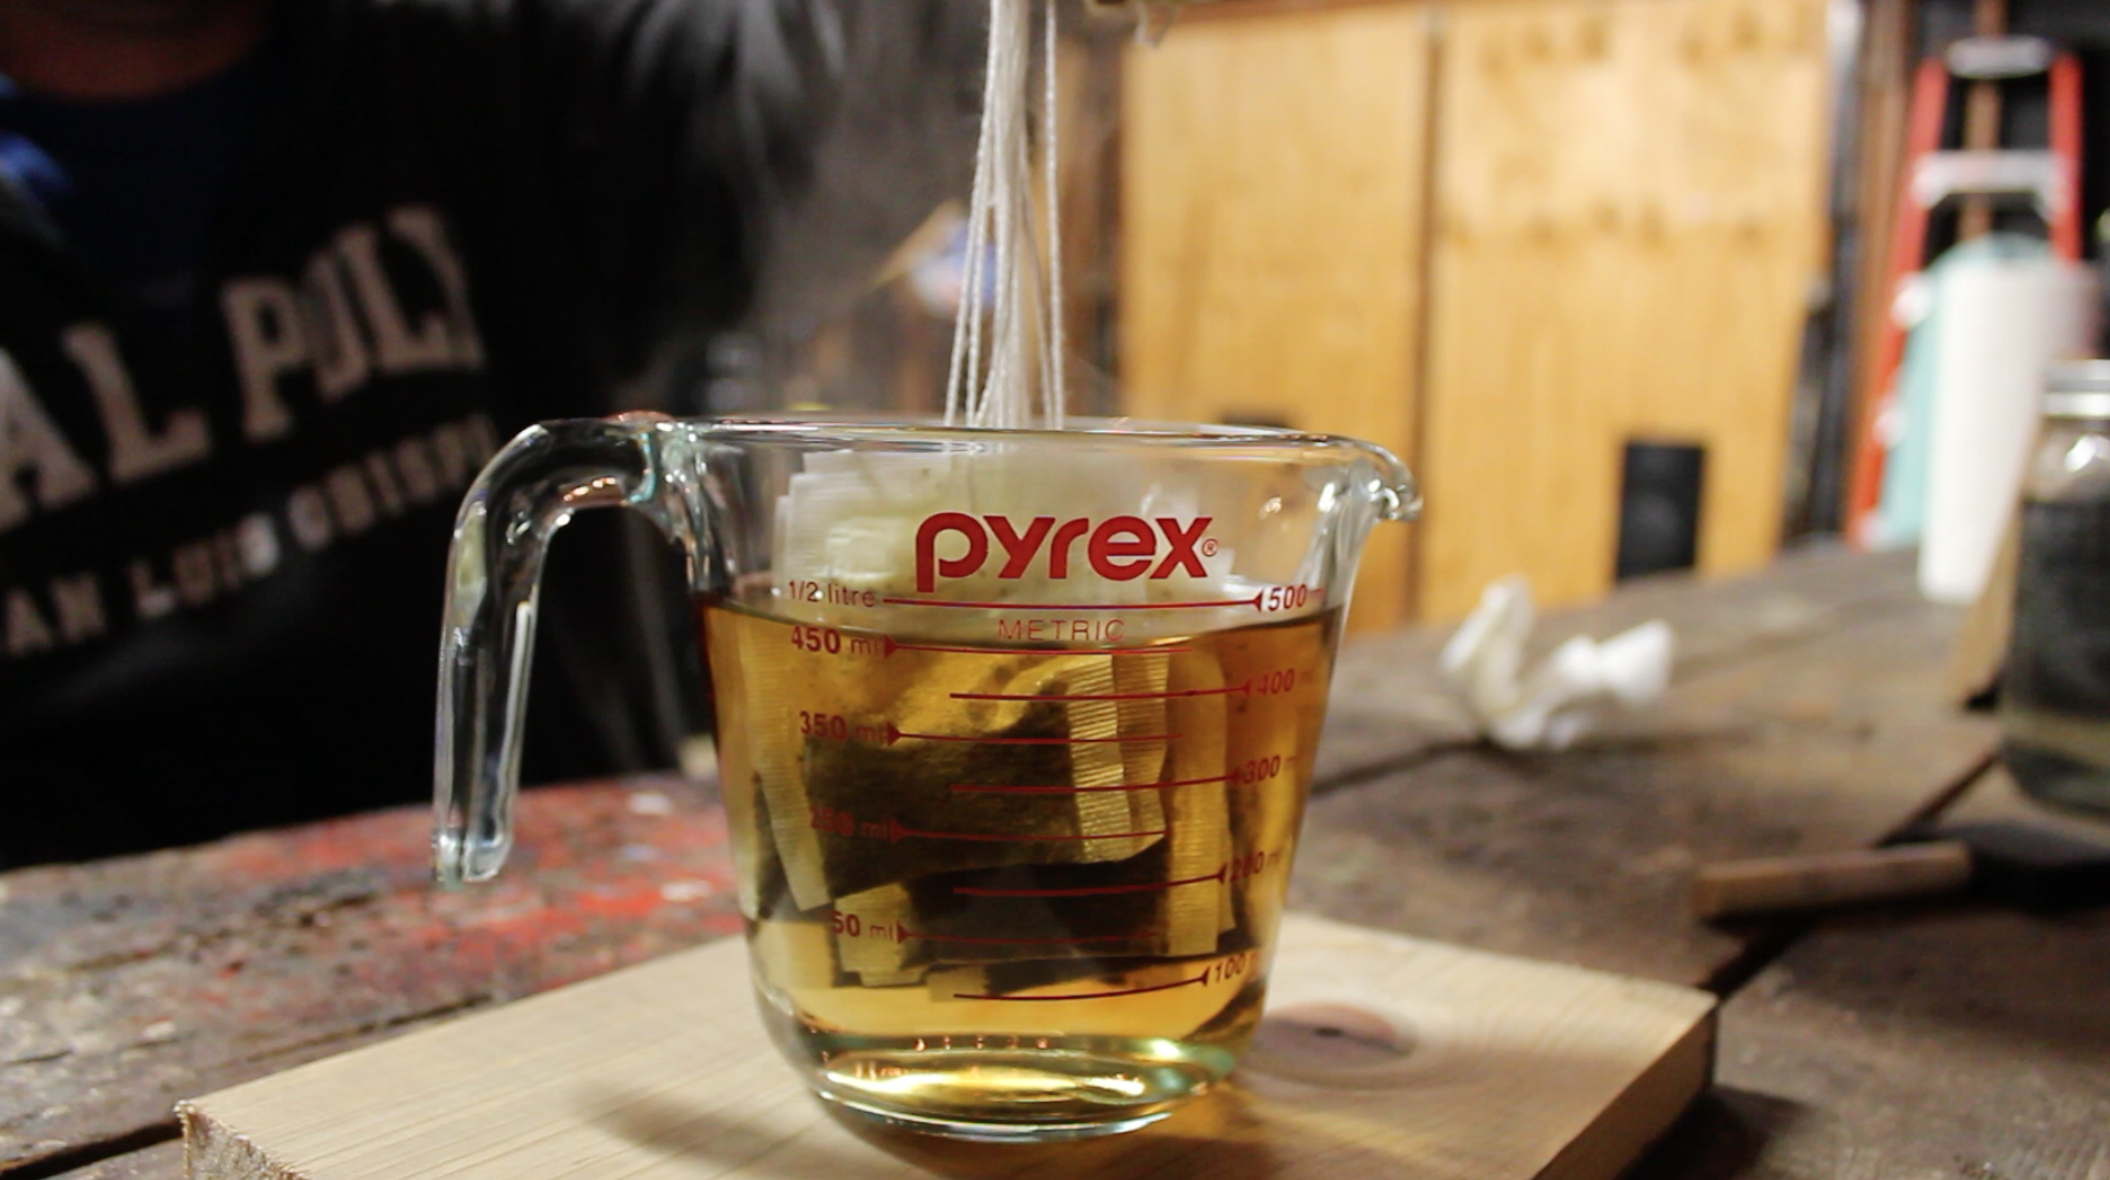
Step 2: Give Your Wood Some Tannins
To help give your wood more definition and properly prep it, you’ll want to brush it with some strong black tea. I brewed some rather strong tea with 10 bags in 2 cups of boiling water. As you can imagine, the tea will slightly stain your wood, but it will also give your wood grain more of a pop. I also discovered that the black tea gives the wood a nicer finisher when you finally apply your oxidation solution. If you skip the tea step, and just use oxidation solution, the wood will end up looking dirty and not aged. There’s just something about that tea that gives the wood a more refined look – sort of how British accents make things seems more sophisticated.
Step 3: Oxidize Your Wood
When your wood is dry from high tea, and after the oxidation solution has sat for 4-5 days, your wood will be ready to get “the look”. When you crack open (not literally) your jar, there will probably still be steel wool floating in the solution – that’s ok. If you leave the solution sitting long enough, eventually all steel wool remnants will dissolve. And you can save the solution for future projects. Using a foam brush, paint on the solution. The wood will almost instantly turn gray, and over the next 10 minutes, it will get even darker.
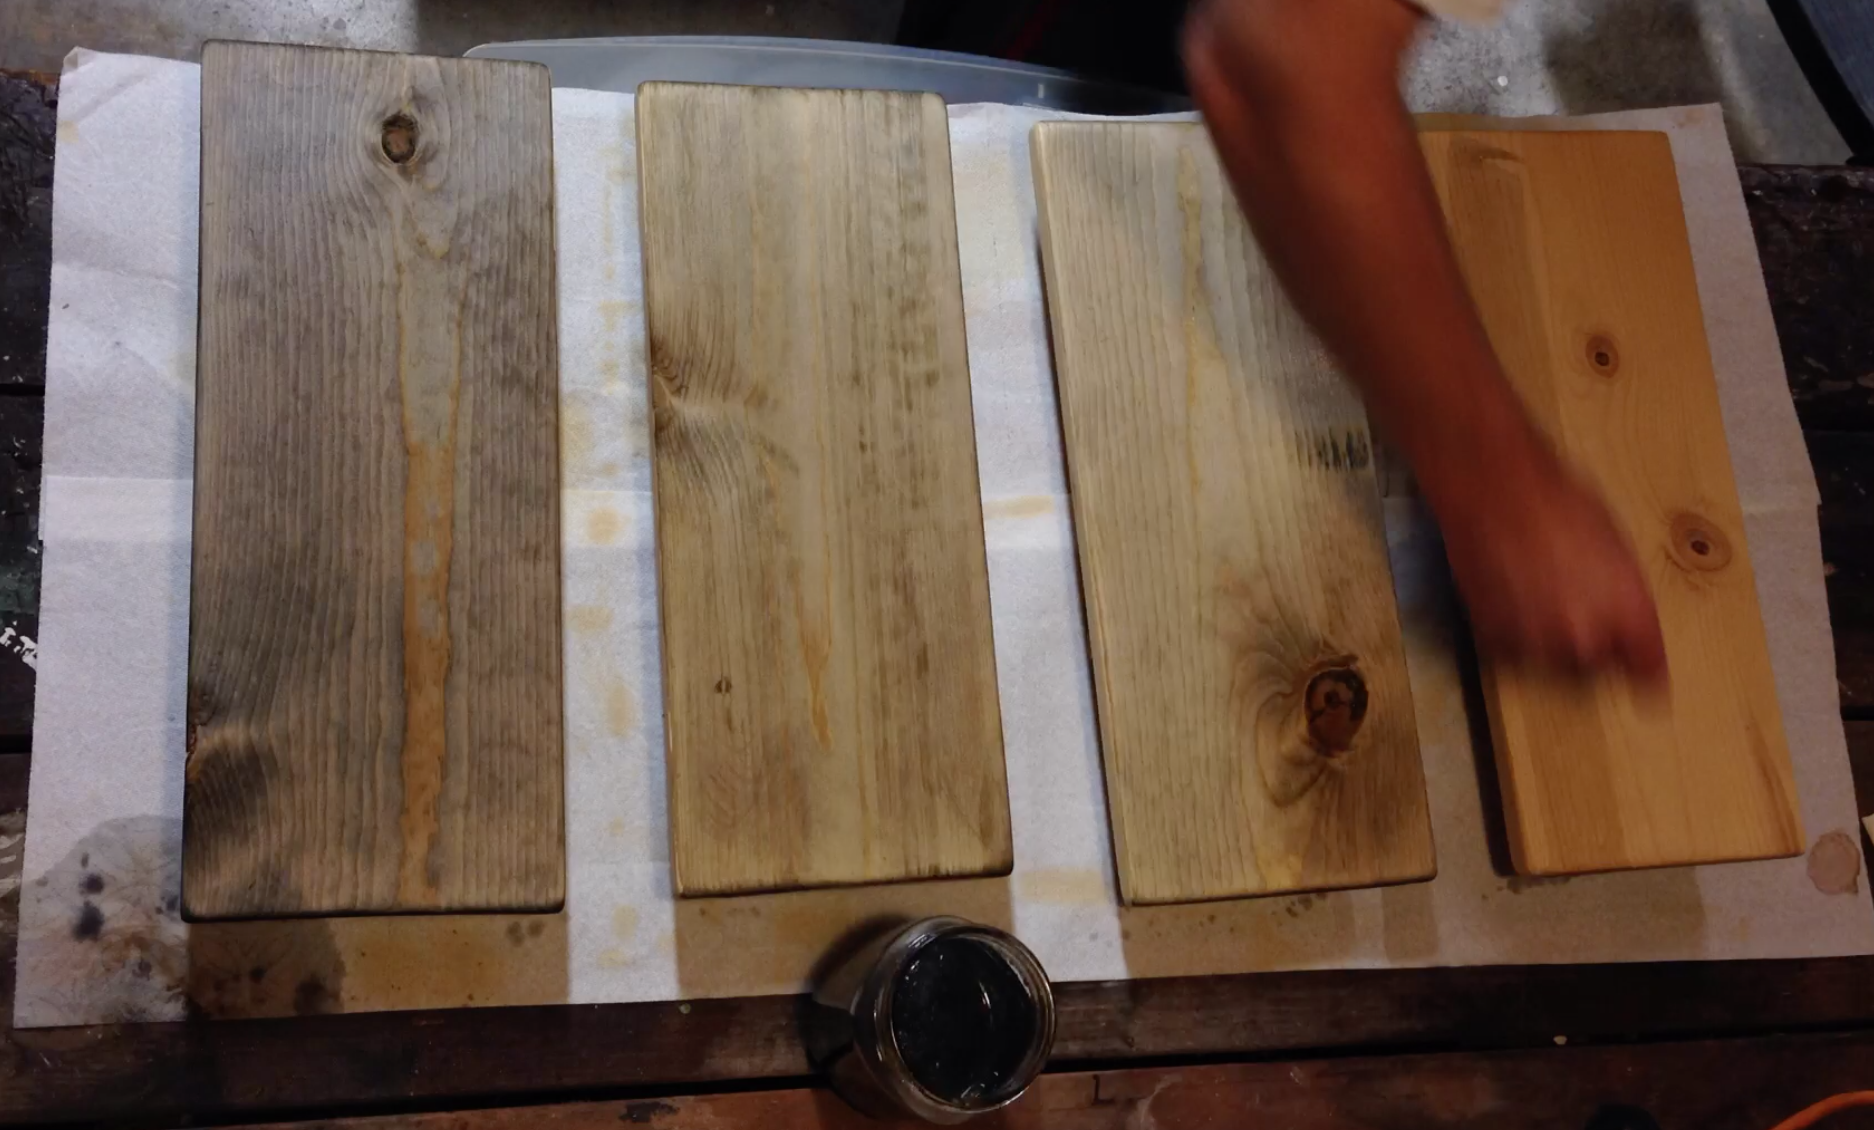
Step 4: Sand & Finish
After the wood has dried, give it a light sanding with 400-grit sandpaper. This will help lighten up the stain and even out the color. The more you sand the wood, the more you’ll remove the stain (obviously), but it can produce some unique variations in the grain – up to you, but again, be sure to experiment on some scrap wood before applying to your final project.

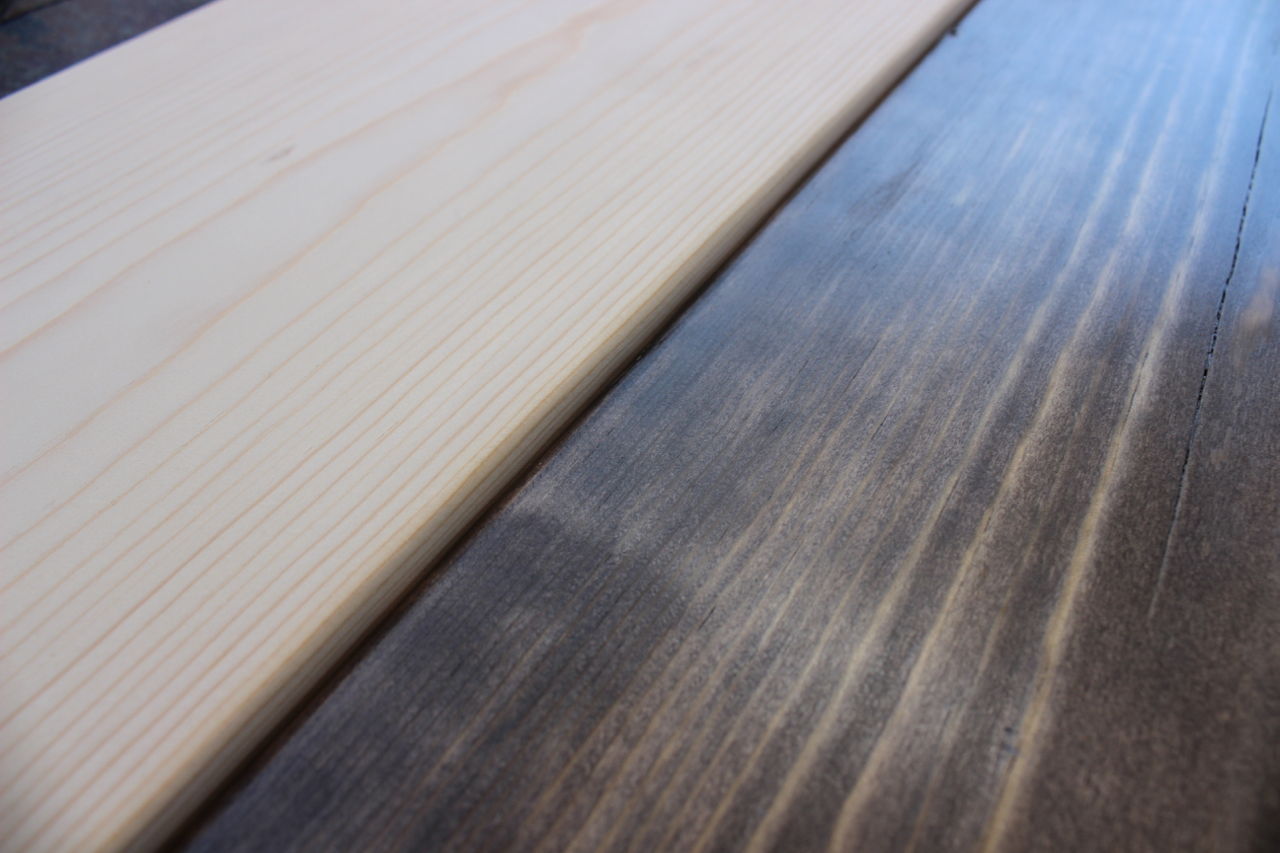
For the finish, I use a clear semi-gloss Poly Whey Furniture Finish from Vermont Natural Coatings. This is a really easy-to-use finish with low odor, quick dry time, and it feels great to the touch. I can’t recommend it highly enough, and you have it shipped right to you from Amazon. I like to lightly sand with 400-grit sandpaper after each coat to keep that super smooth feel, and I would recommend applying 3 coats of this finish. Be aware that the finish will change the color of the wood slightly to give it a warmer, almost tarnished hue.
Below is a side-by-side of how far we’ve come with the unfinished pinewood (left) to wood with the tea-stain and oxidation solution (middle) to the wood with 3 coats of finish.

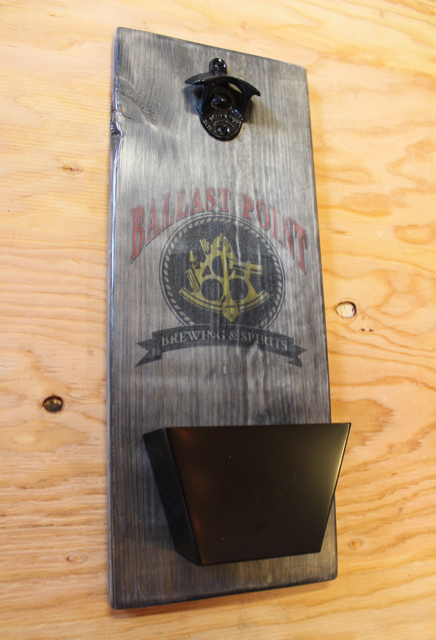
So what will you build now that you know how easy it is to get this vintage wood look? I’ve got a few projects up my sleeve, and when you think about it, the sky’s the limit. Imagine building your own farm table or a little box for holding those bathroom towels that you’re not suppose to use – whatever! Below is a wall-mount bottle open I made. My goal was to make it look like the plank of wood came from an old crate from the brewery.
Let me know if you have any ideas in the comments below, and I would love to see what you build.
And a special thank to Hillary at Friendly Home for all the inspiration for his post.

Have you tried using red cedar?
LikeLike
Any idea how this would work on Burma Teak? I’m about to try on a sample anyways. Also, if you’ve tried this on any veneered plywood. Thank you.
LikeLike
Have not tried that. Let me know how your test turns out.
LikeLike
Do you think this would work on plywood? We are wanting to use plywood for “board and batten” look in our pool room.
LikeLike
It should work on plywood, but always test it first.
LikeLike
Would this work for an exterior wood? I want an aged gray look, but don’t want to wait. Is this actually a stain or is the wood really oxidizing? Thanks!
LikeLike
Hi Claire. This would work on almost any bare wood – the look will just depend on the wood species (i.e. pine, redwood, cedar, etc.). You’ll want to make sure to apply a finish on top of the stain to protect it. And yes – this is really oxidizing the wood by speeding up the chemical reaction that naturally happens over time.
LikeLike
Hey Ray, I made an updated video about aging wood, and I tested it on plywood. Check it out over here: https://gadgetsandgrain.com/2019/08/02/how-to-oxidize-age-wood-in-a-matter-of-minutes/
LikeLike
Does the black tea keep it gray
LikeLike
Slightly, but the oxidation solution does most of the tinting here.
LikeLike
Heat the vinegar for 5 mins in microwave then add wool. It will be ready in 24hours instead of waiting a week. Can add a teaspoon of hydrogen peroxide the next day if you want it dark dark.
LikeLike
Thank you for the great video. …❤️ your little helper!!!
I tried the vinegar solution (no tea) and my chairs are dark…
please let me know how to make them a lighter colour ( grey with golden wood tones)
It takes for ever to sand them and still a very light grey colour remains.
Any easy technique besides sanding? Thank you…😊
LikeLike
Adding finished to the project usually adds the golden/brown tone you might be looking for. You can also lighten the color by sanding the wood. Hope that helps.
LikeLike
I made an updated video about aging wood over here: https://gadgetsandgrain.com/2019/08/02/how-to-oxidize-age-wood-in-a-matter-of-minutes/ It turns out that controlling the amount of steel wool will have the greatest effect on how light or dark you want the final color to be. Hope that helps.
LikeLike
Hi There, do you reapply the tea for each coat?
LikeLike
No – Just apply to tea once.
LikeLike
Thanks for the awesome advice! We’ve just had pine decking and sleeper seats installed in our pool area. I wanted pine (or cypress, but no luck) so it could fade to grey. Being the impatient soul that I am, I decided to find out if I could speed up the process. Am definitely going to give your method a try. I have one question: the pine I have is H3 treated, so it has a slight green tinge (which I know will fade), but will your method work, do you know. I have offcuts, so I’ll give it a whirl, but thought maybe you had some experience with treated pine.
LikeLike
Good question, Angus. I haven’t tried this on treated lumber, so like you said, test it out to see how it looks.
LikeLike
Back again. Tried it on two batches of treated pine. One section had the green/bluish tint associated with treated pine and the other section was treated but did not have any colour apart from natural pine. The tannin/ferric acid mix (guessing that’s what steel wool dissolved in vinegar actually is – sounds posh, anyway) worked a treat on both. The green/blue pine still has that colour coming through the dark finish – you can tell the two areas apart merely by their respective colours. Am thinking another coat or two and it might be a better match. Thanks for this idea – it really works, is so simple to do and comes up a treat. Having tried it on a small area, I’m now game enough to go big – pool-side seating – 400mm high hob wall with treated pine ‘sleepers’ along the top.
LikeLike
Hey Angus, I ended up making a new video about this and tested the solution on treated lumber: https://gadgetsandgrain.com/2019/08/02/how-to-oxidize-age-wood-in-a-matter-of-minutes/ It turns out that it doesn’t take the solution very well in my experience.
LikeLike
Hello, I’m going to attempt this on my new $2500 front door. I’m going to try it on a bit of the matching molding of the same wood type first. I was wondering if you could shoot me your email address so I can send you a picture of the door and get any quick bits of advice you may have. Much appreciated!
LikeLike
jeremy@gadgetsandgrain.com
LikeLike
Jeremy
I was wondering what kind of tea did you use? I’m building and enterainment center for my daughter and she wants the deck where the TV sets to have that old weathered look. The deck is red oak.
Is there a way to control how dark of a gray it takes on?
LikeLike
Hi David. I used black tea, and you try to control how dark the wood gets by adding different amounts of steel wool. The more steel wool in the solution, the darker the stain. You can also sand the wood after the stain to lighten the color. Good luck and shoot me a picture of the project when it’s finished.
LikeLike
Hi David, I made an updated version of this video here: https://gadgetsandgrain.com/2019/08/02/how-to-oxidize-age-wood-in-a-matter-of-minutes/ Hope that helps.
LikeLike
Have you tried it on red cedar?
LikeLike
I have not, but I hope to make an updated video on this topic and experiment with many other types of wood.
LikeLike
Hello ! what a fantastic video !! I came here from youtube and also asked you a question there as well 🙂 Is this a permanent stain ? or will it lighten with time ? I am thinking of applying this method to my lathe turned pens. do you think It would be fine ? Thanks !
LikeLike
As long as the wood is seal with some finish after the stain is applied, the stain should be permanent.
LikeLike
Jeremy ~
Love the info here. My husband and I are remodeling 2 upstairs bedrooms. We plan to have a pine wood ceiling and 2 pine wood accent walls. We’ll be using your method to stain.
I plan to do some with tea (gray tone), some with coffee (brown tone) and some with only the vinegar solution (light gray). I’m hoping for a variety of tones to then alternate the boards for a slightly uneven, weather wood look.
Any other suggestions for varying the tones?
I appreciate your straight forward video, written directions then the follow up here.
Thank you.
Molly
LikeLike
Very cool idea, Molly. Please send me some photos when you finish the project. As for varying the tones, you might want to try (test) green tea or cola to achieve some different colors. Steve Ramsey from Woodworking fro Mere Mortals has some other creative stain ideas as well: https://www.youtube.com/watch?v=4EmtYa93KEU and https://www.youtube.com/watch?v=PhjXC8A-cRs
LikeLike
I would like to try this on 3/8 inch plywood. The idea is to create a ship lap wall with browns and grays. Your using solid wood boards. Can you get the same effect with one side good plywood?? And thanks again for your video. Very cool.
LikeLike
Thanks for watching. You should be able to get this same effect on plywood, but test it first before committing. Good luck and send me a photo of the wall when it’s done.
LikeLike
Hey Troy. I made an updated video on this topic here: https://gadgetsandgrain.com/2019/08/02/how-to-oxidize-age-wood-in-a-matter-of-minutes/ Some woods go grey and some go brown. The plywood I used turned more brownish, but I also tested some other techniques to get that grey finish. Take a look at the new video and let me know if that helps.
LikeLike
I want to try this on 11/32 plywood. Going to shiplap a wall. Do I need to presand the plywood strips first. Any suggestions?
LikeLike
If you’re using good quality plywood, you shouldn’t have to sand them before applying the stain. Since plywood can react differently than milled boards, try testing the stain first. Good luck and shoot me a photo of the project when it’s done.
LikeLike
Thanks for the excellent video titled: Oxidize! Getting A Vintage Wood Look. Your video and detailed instructions has inspired me to attempt this process on white pine boards I’m using for bookshelves. I’ll let know how it turns out.
LikeLike
Looking forward to seeing it! Thanks, Darlene.
LikeLike
Distilled white vinegar?
LikeLike
Yep.
LikeLike
Great tutorial, I think the step with the tea is what all the others are missing. Going to try this out on some projects this week. How did you get the print on those bottle opener boards? Very cool.
LikeLike
Hey Joel. Yes – for some woods, especially pine, the strong black tea pre-stain is what makes this work.
To do the brewery logos on the bottle openers, I used this technique, and googled the images: https://gadgetsandgrain.com/2016/06/05/how-to-print-on-wood-sort-of/
Let me know if you have any more questions.
LikeLike
Hi, this is the exact look i am wanting for my bath cabinets. I attempted using a gray gel stain, as many websites suggested, but it did not turn out right. If i sand them down, do you think this would work?
LikeLike
Hi Ash. It really depends on the type of wood your cabinets are made out of – would you happen to know? You can try to sand down a small, inconspicuous spot on your cabinets and test it.
LikeLike
Thank you for the quick response! Yes, they are oak cabinets.
LikeLike
I used a propane torch to pop color around knots first, then followed your procedure….worked great on pine. I will be doing it again soon
LikeLike
Distilled white vinegar? It seems after 30 minutes its wanting to pop the top off. Should i leave the lid loose?
LikeLike
Yes – leave the lid loose and do not tighten. The hydrogen gas needs to escape.
LikeLike
Hello thank you for your effort’s in sharing this information I am currently finishing a 10 foot five 4 1/4 foot yellow pine farmhouse table my question is have you every tried this method on a large area my concern would obviously be consistency And volume
LikeLike
Hey Vinny. I haven’t tried this on really large projects like a table. Because this a chemical process for staining, the end result can vary even if you’re using the same species of wood. But some folks like having a varied look – it gives the project some character. If you want to try this, first, test it some scrap yellow pine. And as far as producing enough solution for a large project like your table, you’ll probably be fine with using 1 bundle of steel wool with 16 oz of vinegar. Hope that helps. Good luck!
LikeLike
Hi, I really enjoy your videos, which are full of wonderful ideas, but having tried the steel wool and vinegar technique last week, I thought I should post a word of warning – my jar containing the steel wool and vinegar exploded violently, sending glass and vinegar flying into every part of the kitchen. If someone had been in the kitchen at the time of the explosion they would certainly have been seriously injured. The wooden counters and parts of the floor are now indelibly stained with a thousand black splodges from the vinegar and steel wool, but I’m just grateful that nobody was hurt. I thought maybe you could give more detailed information on the do’s and dont’s of combining steel wool and vinegar, as it is a potentially dangerous combination.
All the best, and thanks again for all the great videos.
LikeLike
Thanks for sharing Patricia, and so sorry that happened to you and your counter tops. Was the jar sealed at the time?
LikeLike
Yes, the jar was sealed – the lid was on too securely. I hadn’t realised that there would be such a build up of gas, and of course, gas needs to escape. Anyway, I think I’ll give it another try now.
LikeLike
Thanks again for sharing this tip, Patricia. I included this advice in my latest video on aging wood: https://gadgetsandgrain.com/2019/08/02/how-to-oxidize-age-wood-in-a-matter-of-minutes/
LikeLike
I’m using 0 steel wool. Do you think this will alter the outcome?
LikeLike
Hey Steven. I’m not sure. Since #0 is not as fine as #0000, it will not dissolve as fast in the vinegar and will give you a solution that produces a lighter color – that’s just my guess.
LikeLike
For some reason my stain has always came out brown after the tea and one coat of oxidation. Any idea why is that? Really looking to get that grey coat.
LikeLike
Hey Chris. It really can depend on the type of wood you’re using. I just made an updated version of this video here: https://gadgetsandgrain.com/2019/08/02/how-to-oxidize-age-wood-in-a-matter-of-minutes/ Let me know if that helps.
LikeLike
Love the project idea. Followed everything so far and I just did the steel wool/vinegar solution (sat for 5+ days). Wood is drying but it’s all blotchy and not looking like yours does. Very worried. Any suggestions?
LikeLike
Hey Antony. It really depends on the type of wood you’re using as well. I also added some new steps and background in and updated video over here: https://gadgetsandgrain.com/2019/08/02/how-to-oxidize-age-wood-in-a-matter-of-minutes/ Check it out and let me know if you have any questions.
LikeLike
Hi! So the finished product is the far-right bored? I noticed that it is more Brown than grey. That is the look I’m going for. Did you accomplish that by using that specific finish? Or will a different finish do the same thing ?
LikeLike
Hi Bailey. The final color does have a lot to do with the finish, which I think was water-based whey formula. I did a new video on this process, and it might be worth checking out over here: https://gadgetsandgrain.com/2019/08/02/how-to-oxidize-age-wood-in-a-matter-of-minutes/
LikeLike