Updated 11/28/18 – After receiving some great feedback in the comments section, I have added detailed plans and a cut list for all the boards used in the basic workbench. Let me know if you need anything else.
I tirelessly searched YouTube and Pinterest for workbench designs, and after taking into account the tools I have and the types of project I work on, there were essentially three main features I needed:
- Mobility – Hauling tools in and out of a garage is tiring and it eats up time during a build. Plus, if you’re like me, your garage is not quite a full-time woodshop, so being able to store a workbench to the side is a must.
- Size – I needed a workbench that could accommodate the largest material I might find myself working with: a 4’x8′ sheet of plywood. It takes a large workbench to act as a decent out-feed table for a table saw or to provide an adequate work area when assembling larger projects.
- Modular – A good workbench should be able to change with your needs, so I designed this workbench to either be two smaller halves or one big work area. I also built-in a slot to accommodate a variety of fixed tools such as a miter saw, pocket hole jig, router table, etc.
Before I start with the instructions, I have to give credit to Steve Ramsey at Woodworking for Mere Mortals and Bob at I Like to Make Stuff for the inspiration behind this design. I love the simplicity of Steve’s workbench, and the genius use of magnets with Bob’s work tables . I highly recommend checking out their videos (and their YouTube channels).
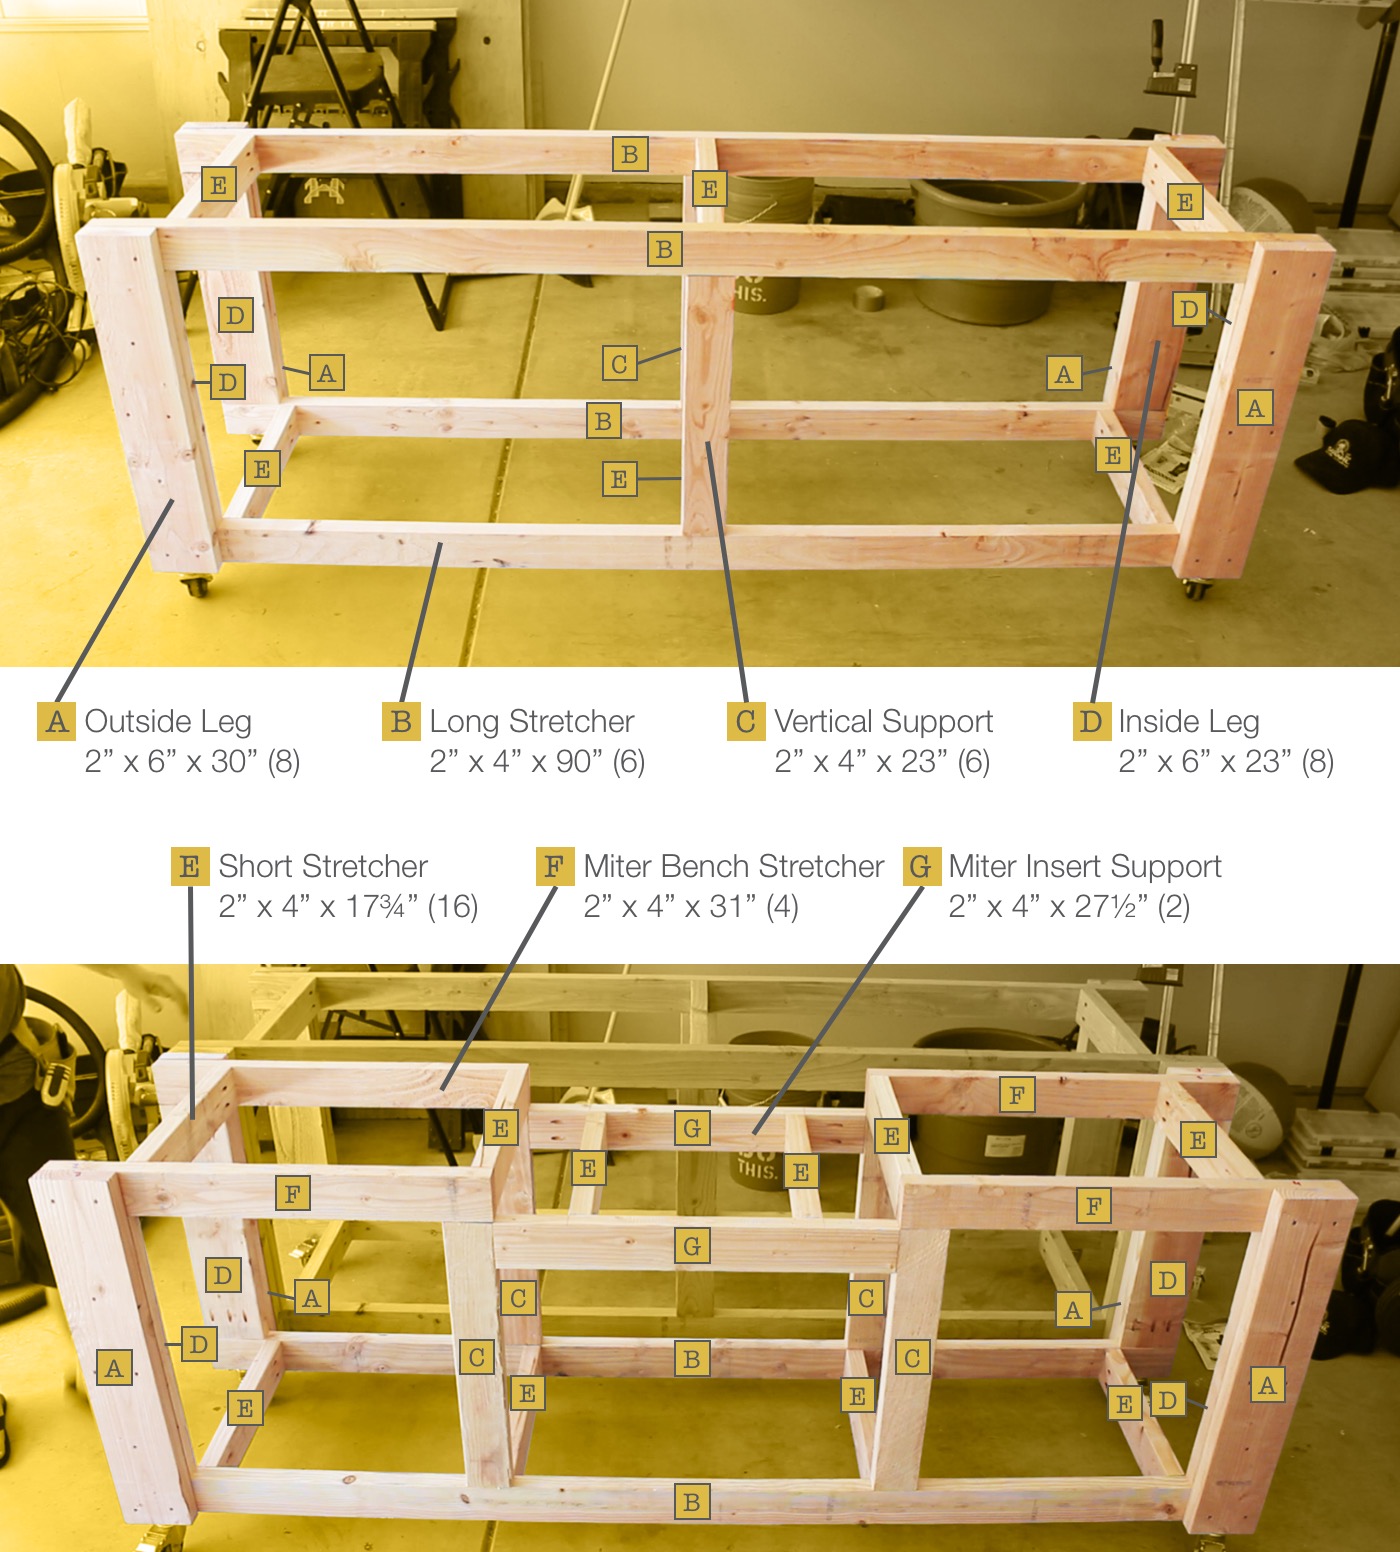
Workbench Plans & Cut List
Here are the measurements that I used to build the workbench you see in the video, but by all means, use these as a reference point to build your own bench. Perhaps you’ll want to tae your bench shorter, taller or longer – just tweak the respective measurement to suit your needs.
Workbench Frames
Workbench Tops, Side and Bottom Shelves
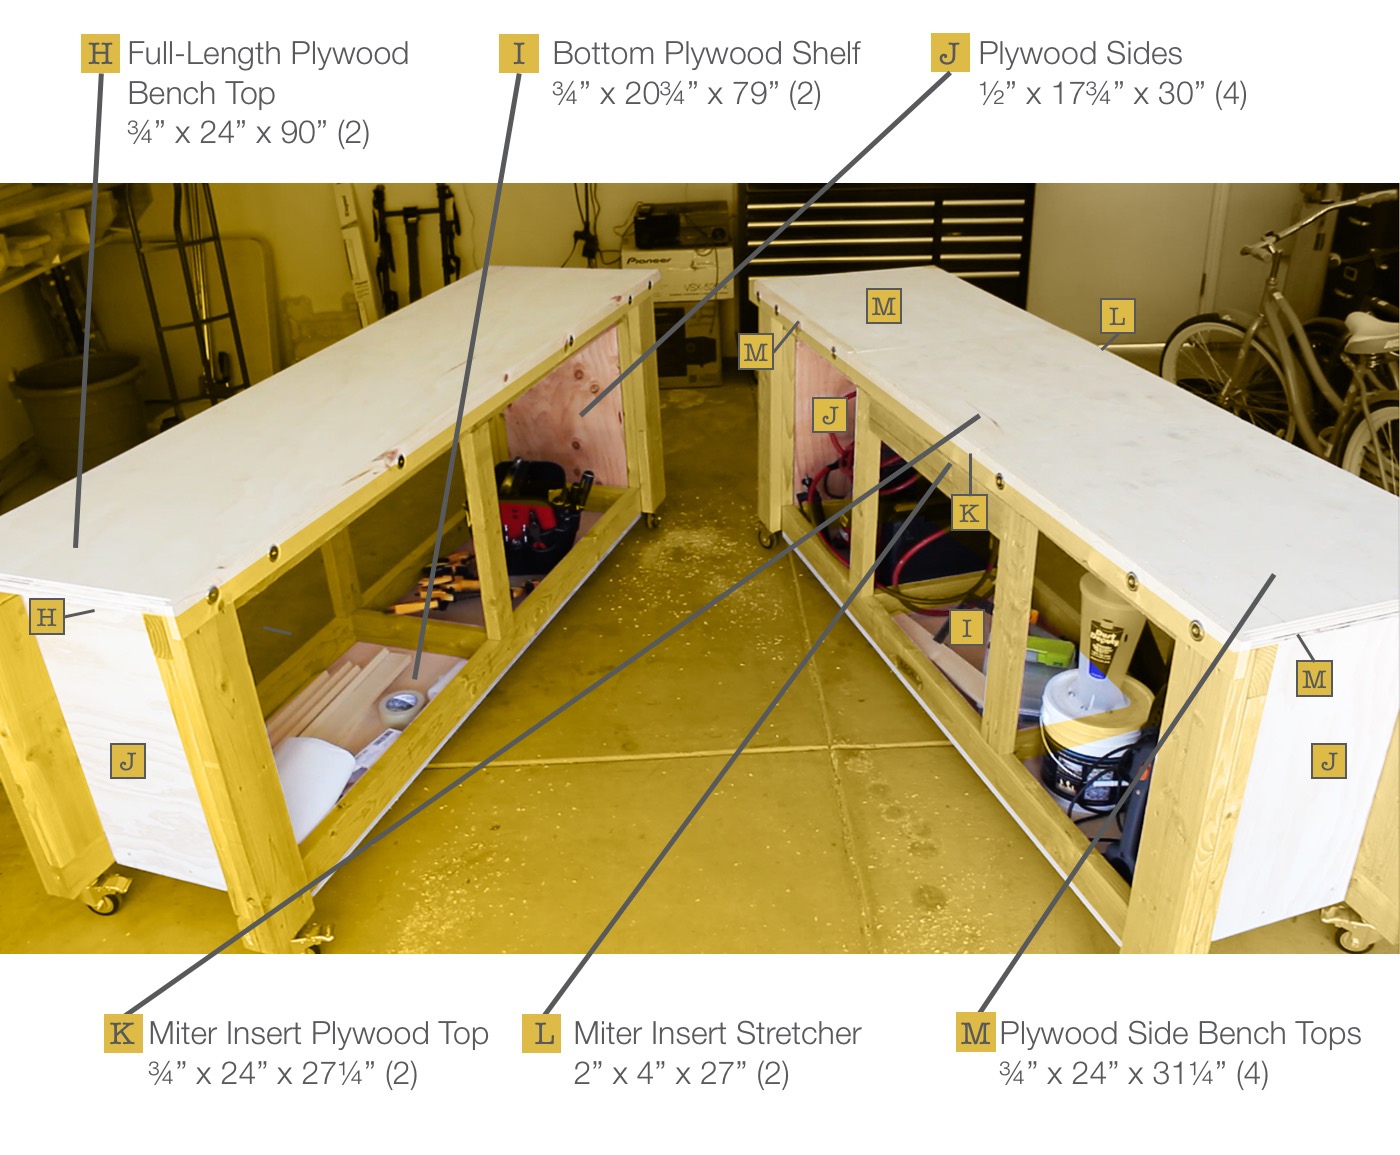 Cut List

Workbench Shopping List
Skip this part if you already have everything you need of this project, but if you would like a little help stocking up or some ideas for new equipment, below are links to the tools, materials and supplies used in this video. Just a heads up that I get a small commission from these links, so any support is much appreciated.
Tools & Equipment
- Sliding miter saw
- Cordless drill
- Speed square
- Pocket hole jig
- Parallel bar clamp
- Face clamp
- Circular saw
- Circular saw guide
- Trigger clamps
- Glue bottle
- Brad nailer
- Forstner drill bits
- Air compressor
- Bluetooth headphones
Supplies & Materials
- Pocket screws
- Wood glue
- Brad nails
- Pocket hole screws
- Poleurethane (Satin Finish)
- Foam Brushes
- Neodymium magnets
- 4-inch locking casters
Step-by-step Instructions
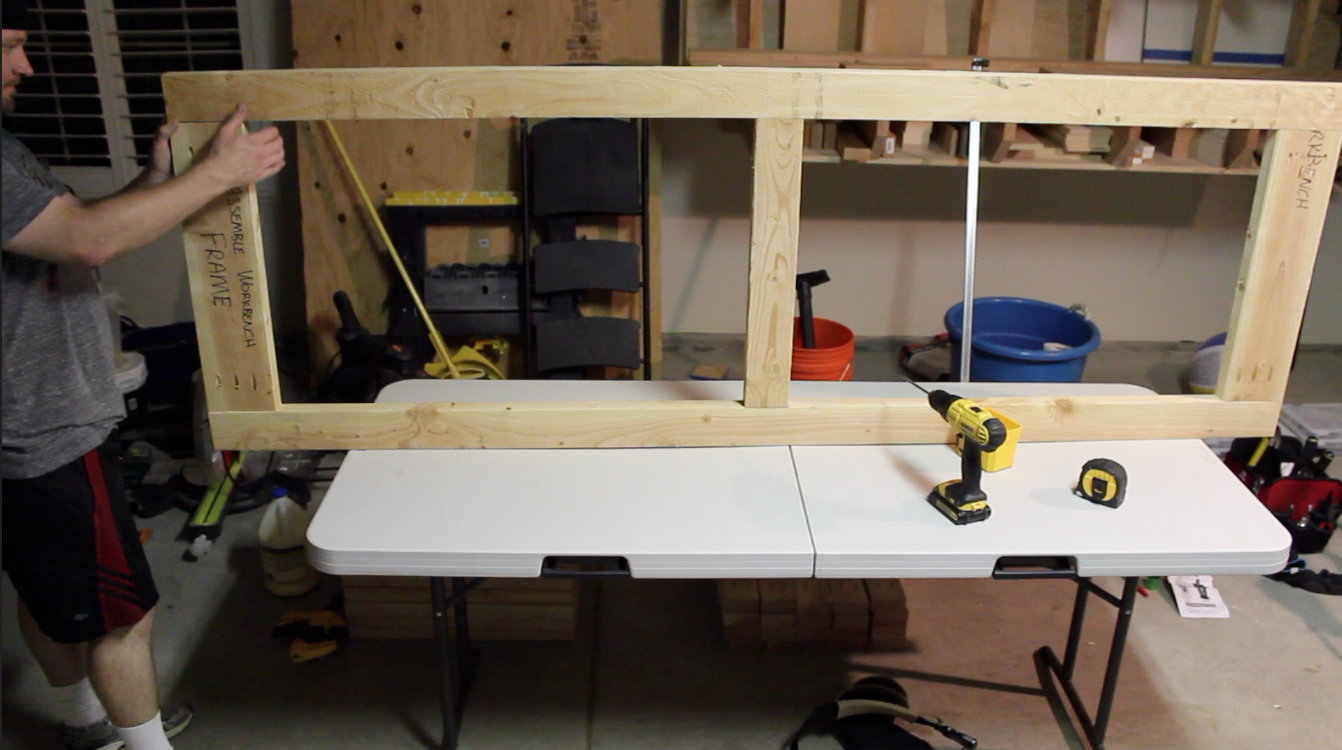
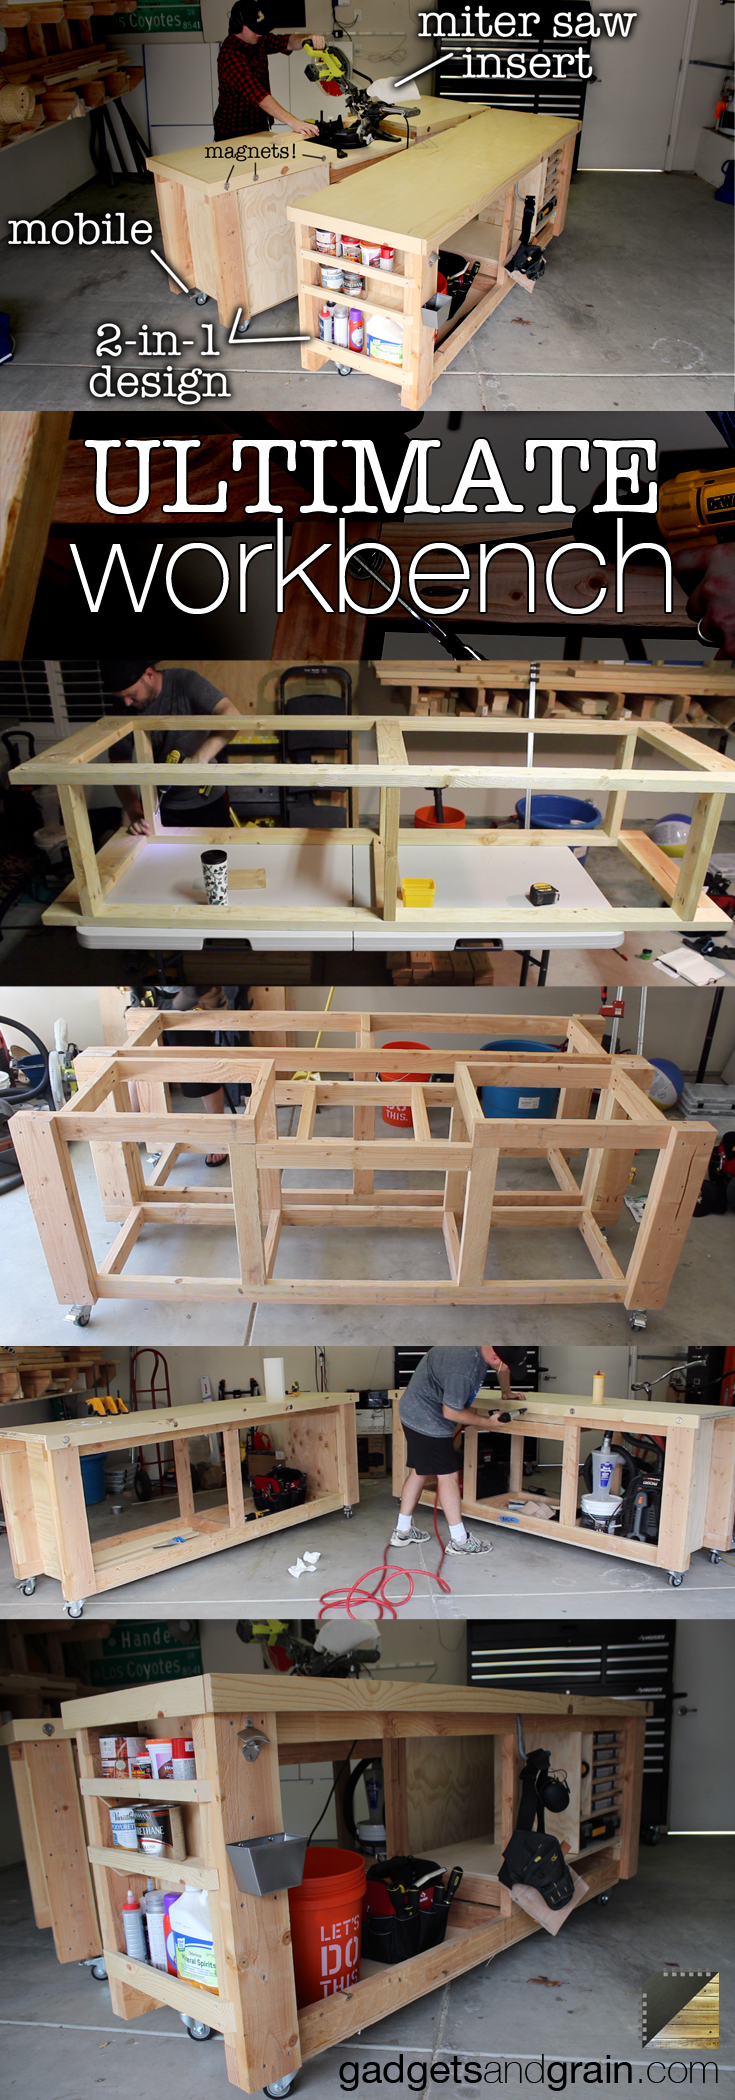
1. Build the Workbench Frame
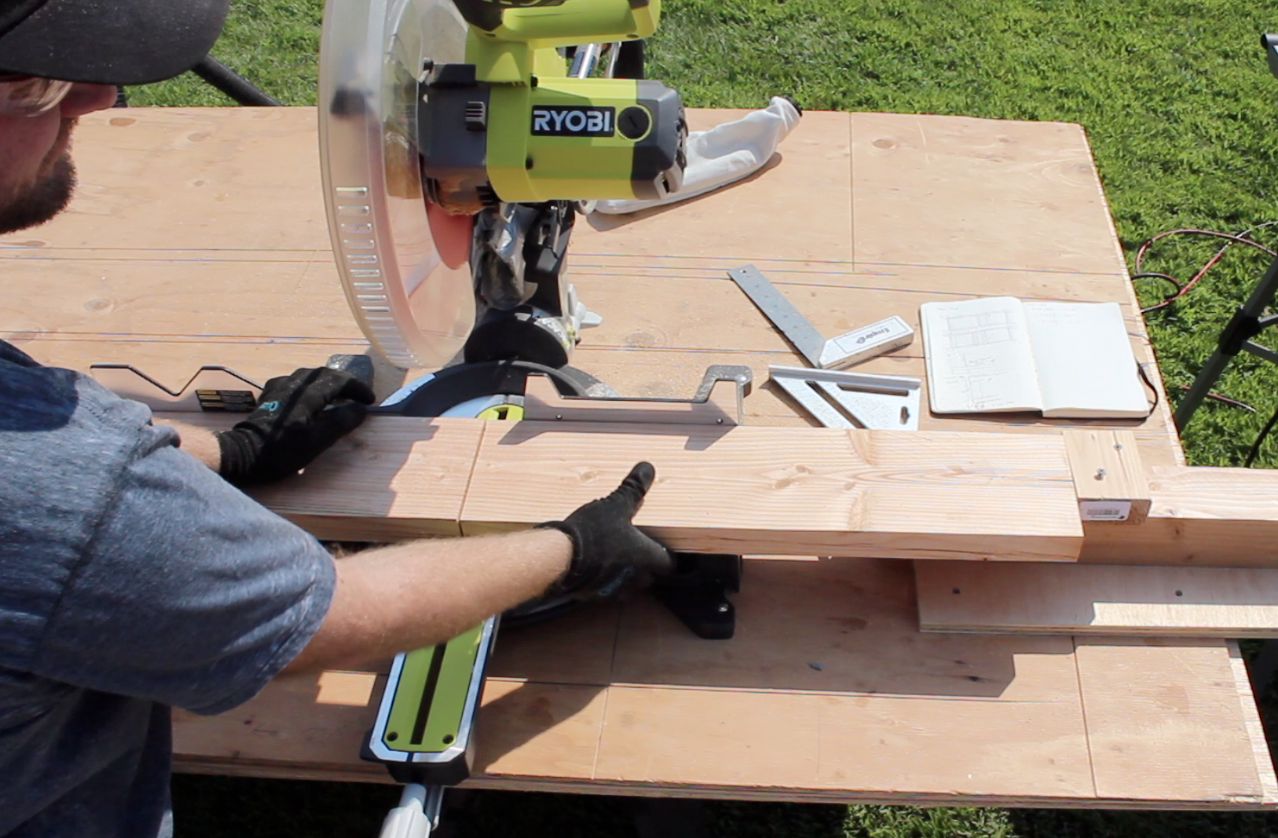
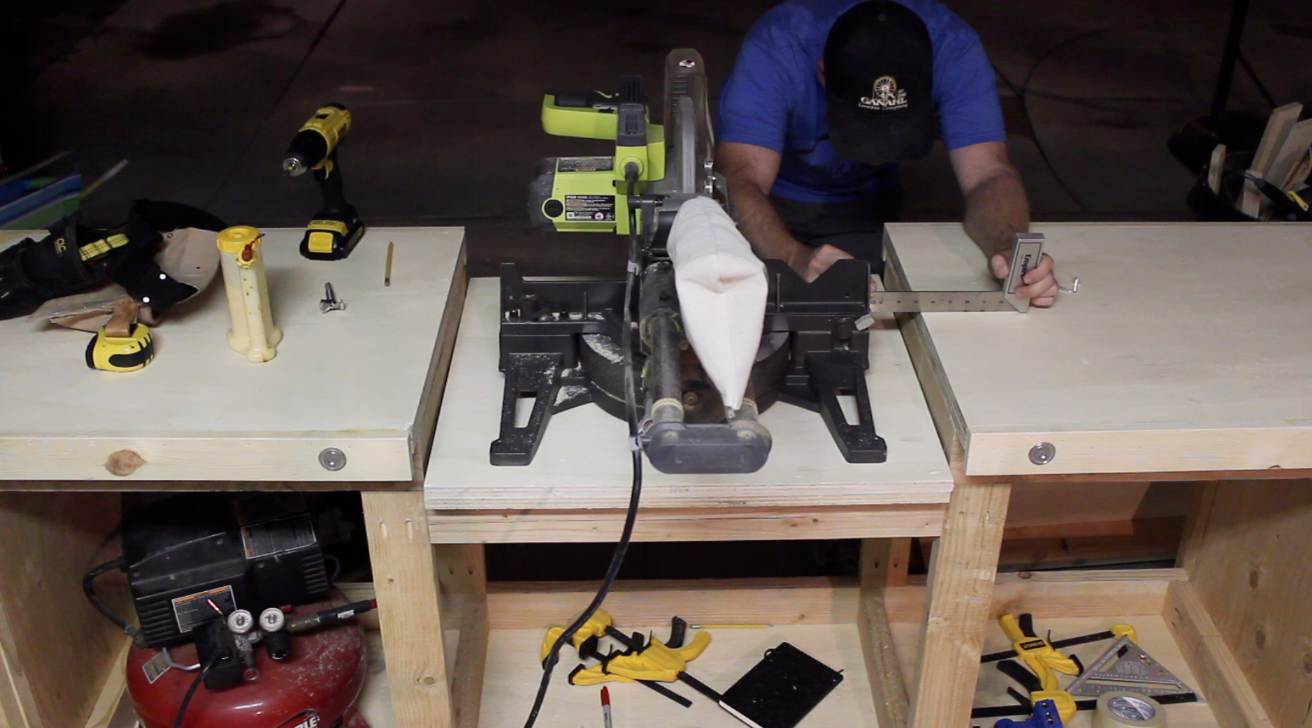
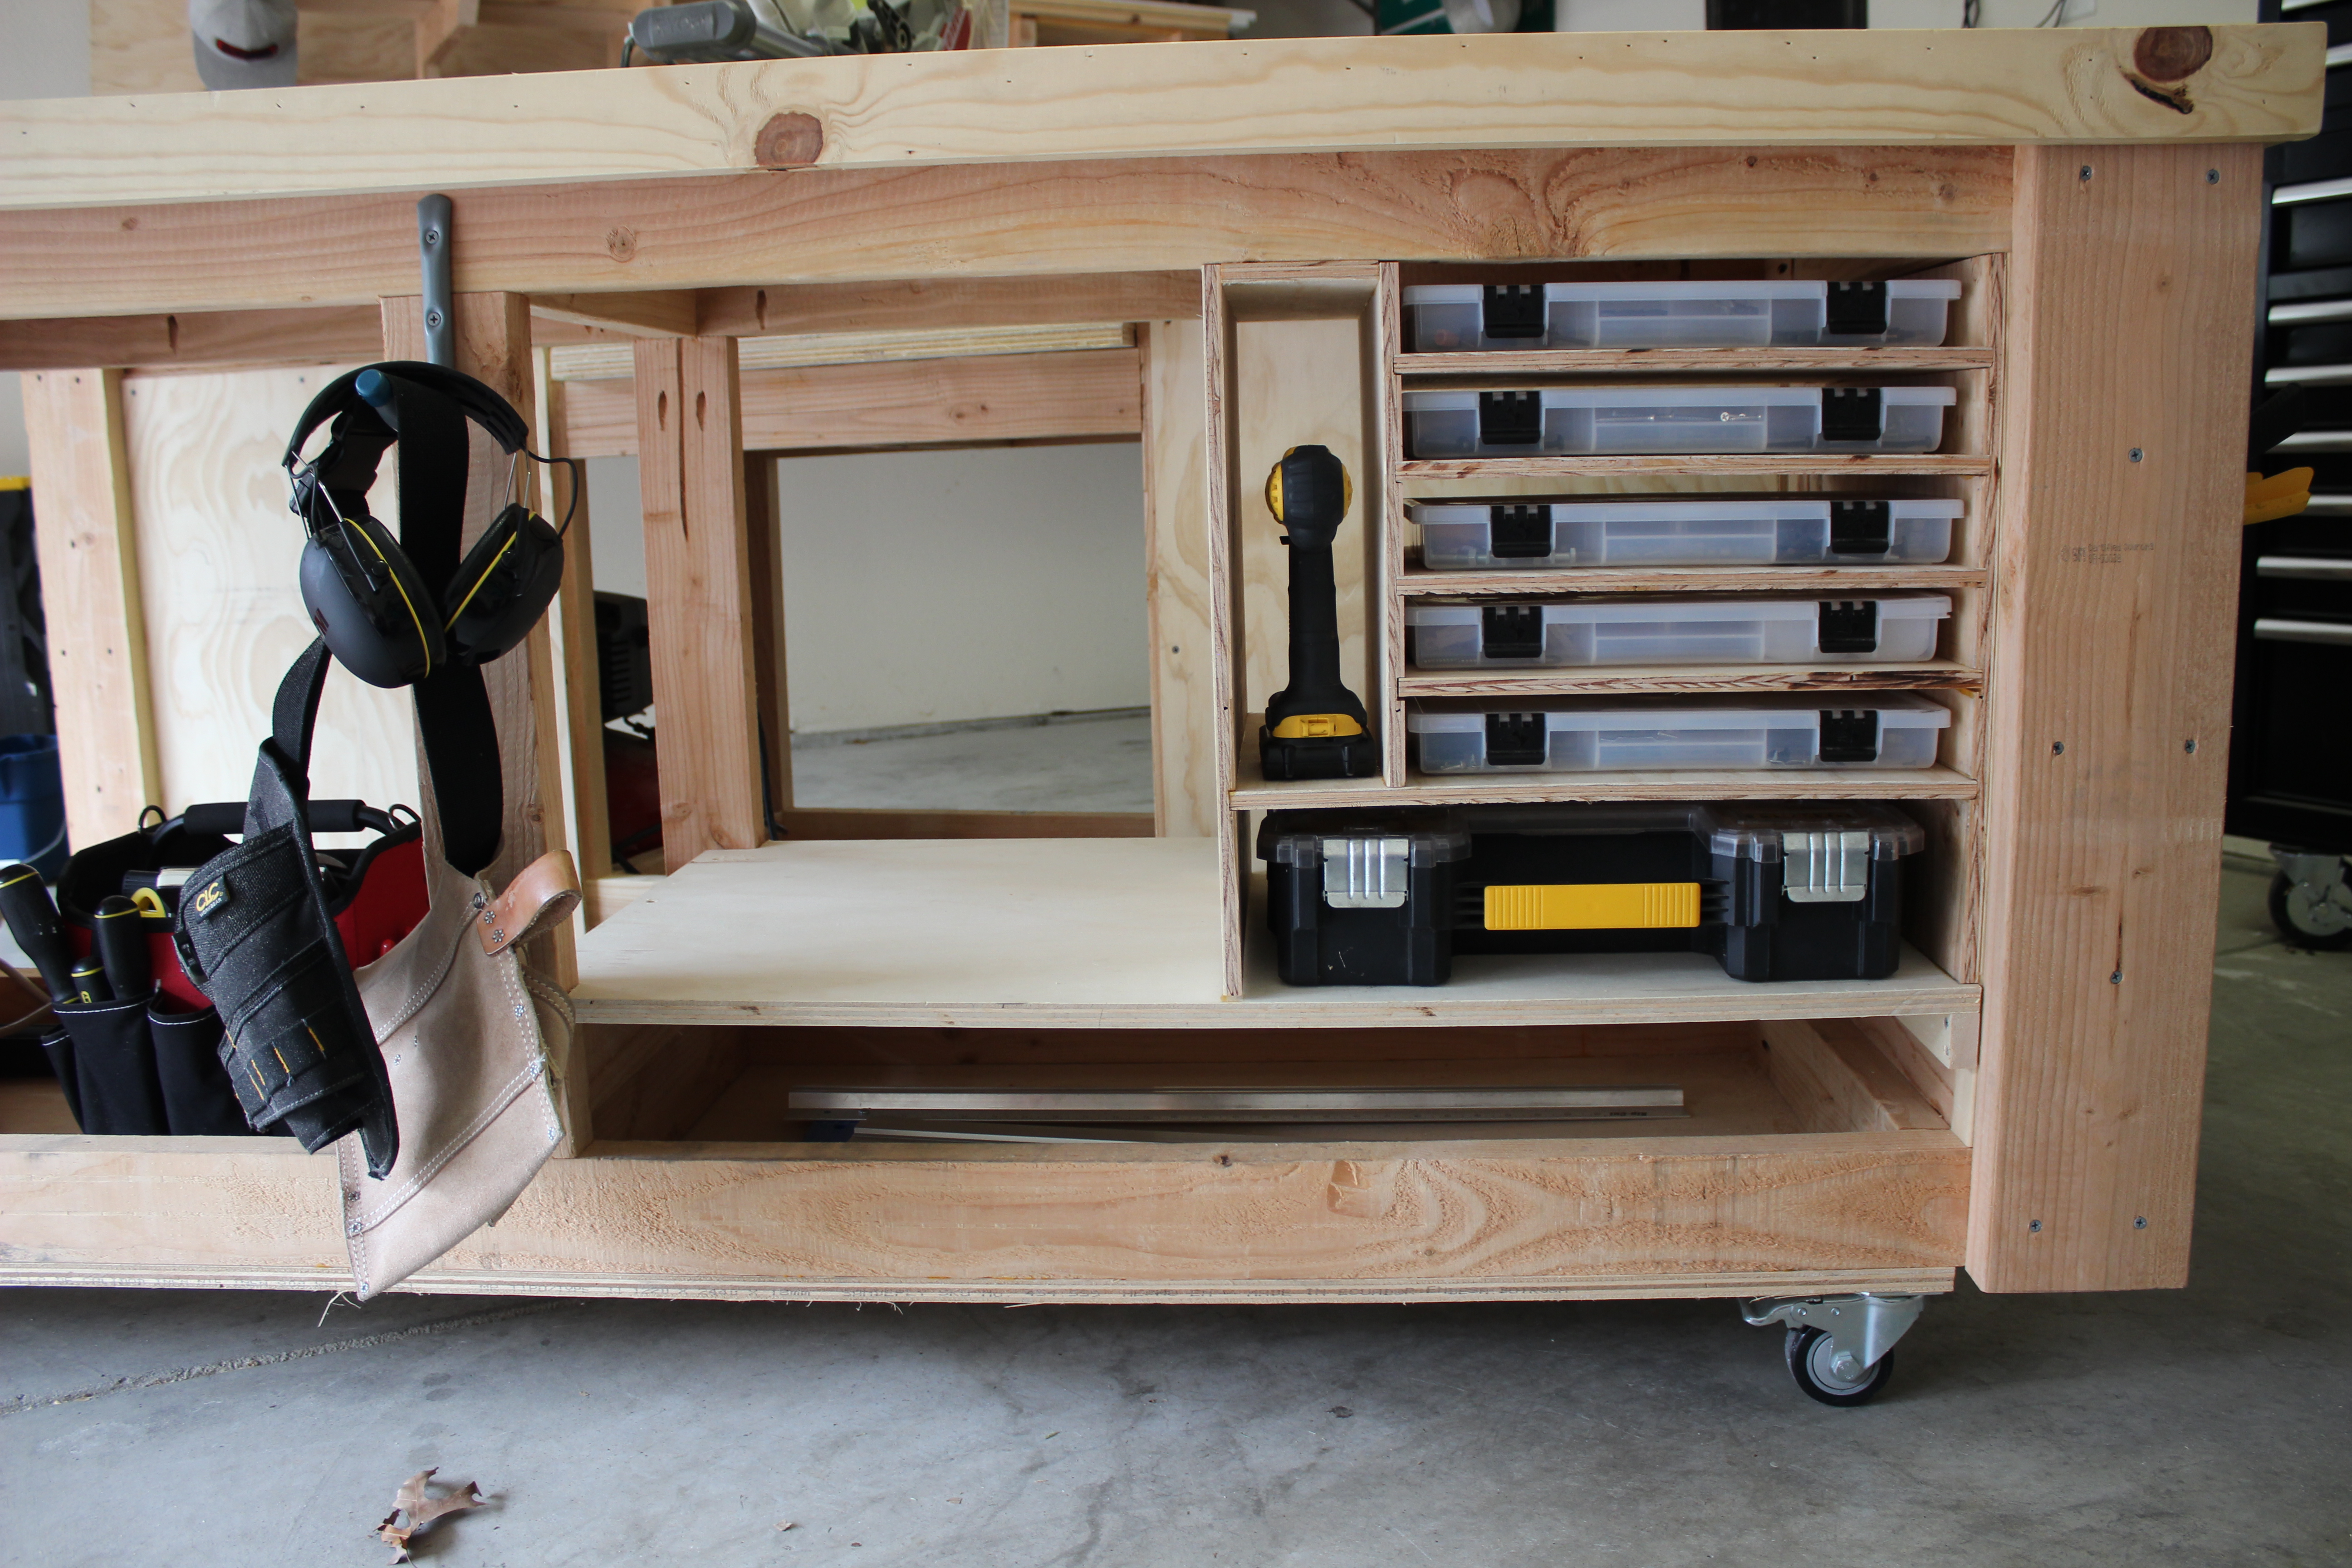
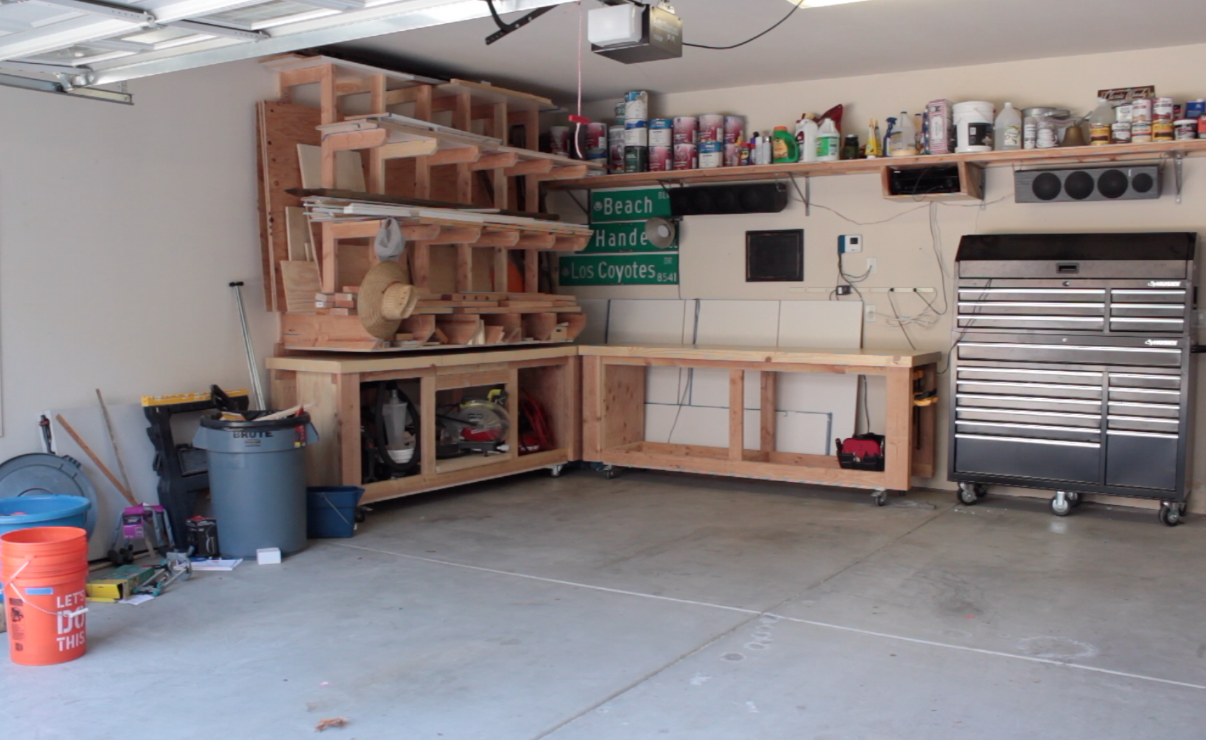
The frame of the workbench is comprised of 2×4 and 2×6 boards. I used 2×6 boards for the ends of the frame to add extra stability to the workbench, and also to create deep recesses for shelves for storing tools, cans of finish, clamps, etc. The overall height of the workbench is about about 36-inches, so take into account the thickness of the tabletop, height of the casters, and the cut boards for the frame accordingly. As pictured below, using a stop-block makes cutting consistent lengths much easier.
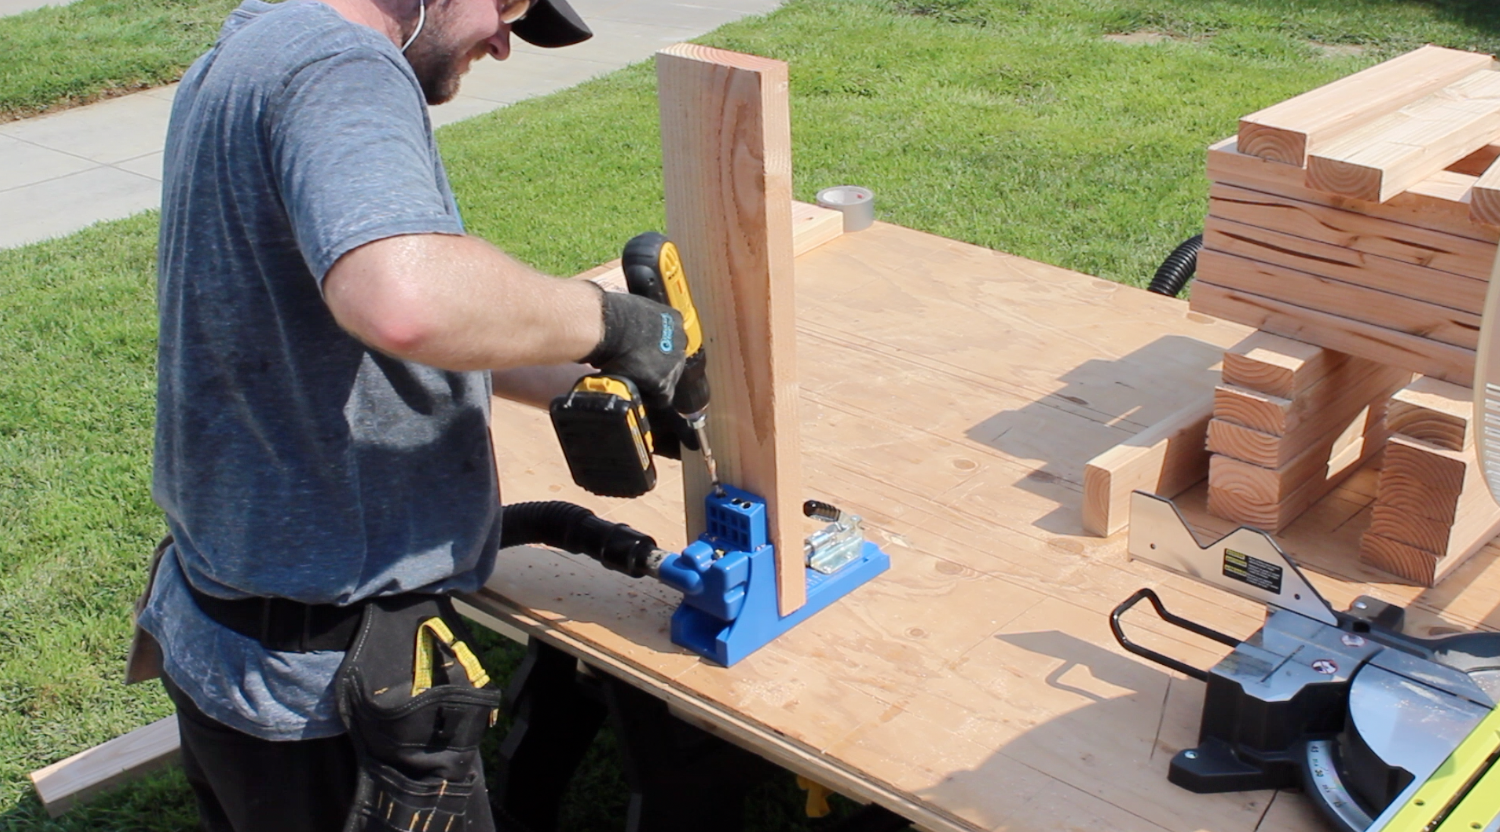
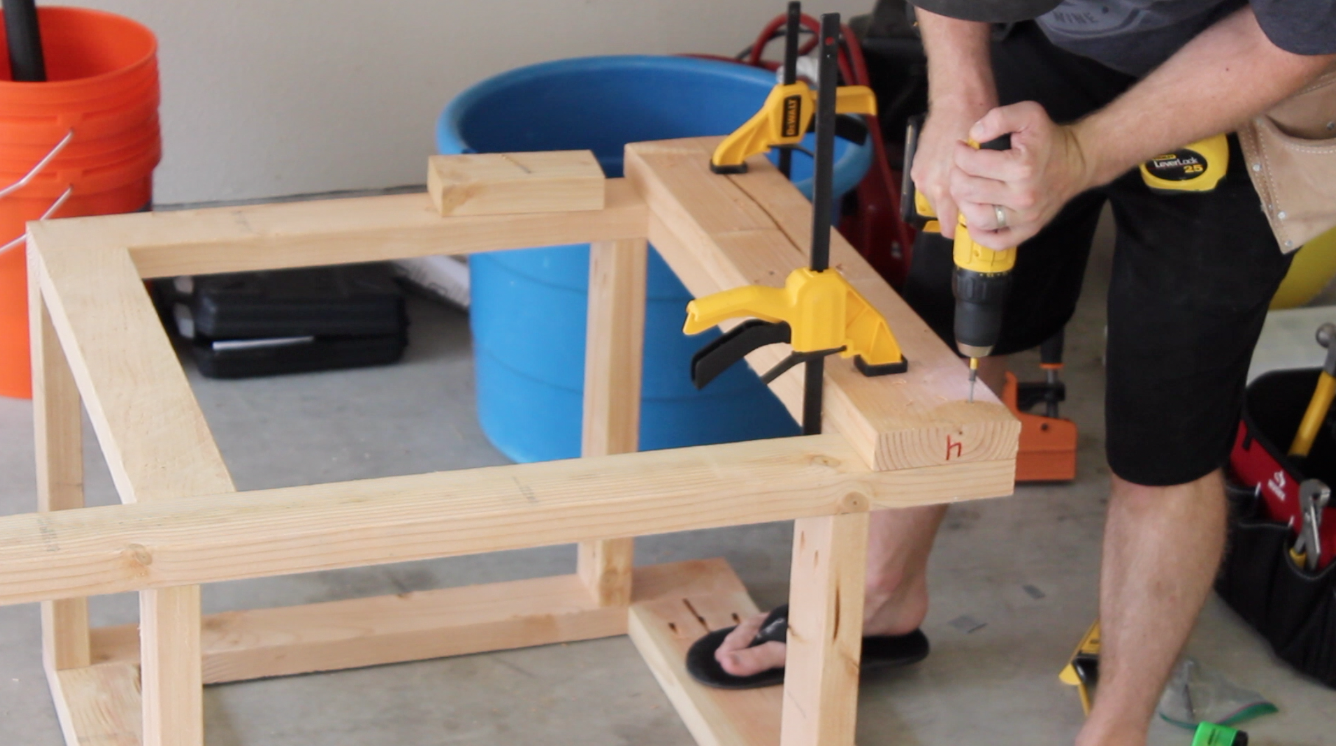
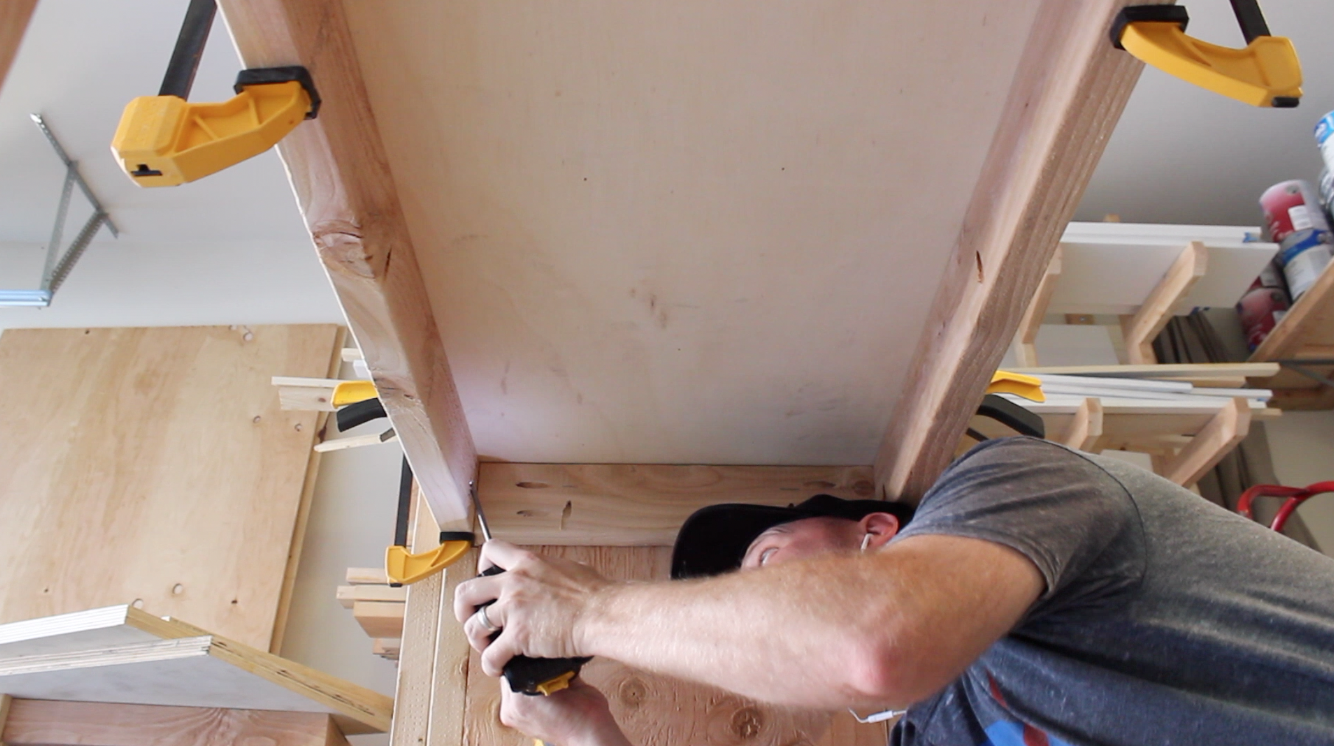
I used pocket hole joinery to assemble the entire frame. To do this, you will need a pocket hole jig to crank through the many, many pocket holes that need to be drilled. Pictured below is a Kreg K4 pocket hole jig which makes this whole process much easier. It also has a handy attachment for a shopvac to keep the work area clear and the drill bit cool.
With all the pocket holes drilled, join the frame with 2 1/2-inch Kreg pocket holes screws. Be sure to clamps the boards together while joining them.

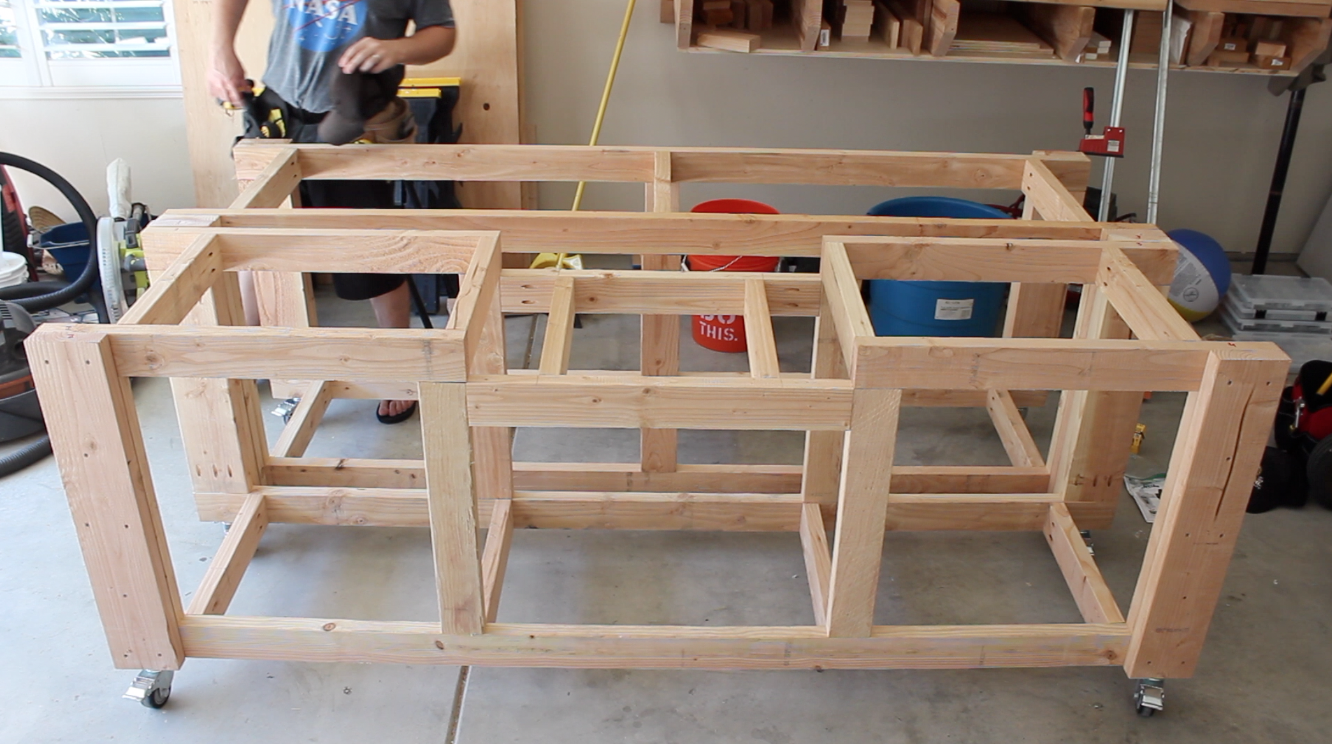
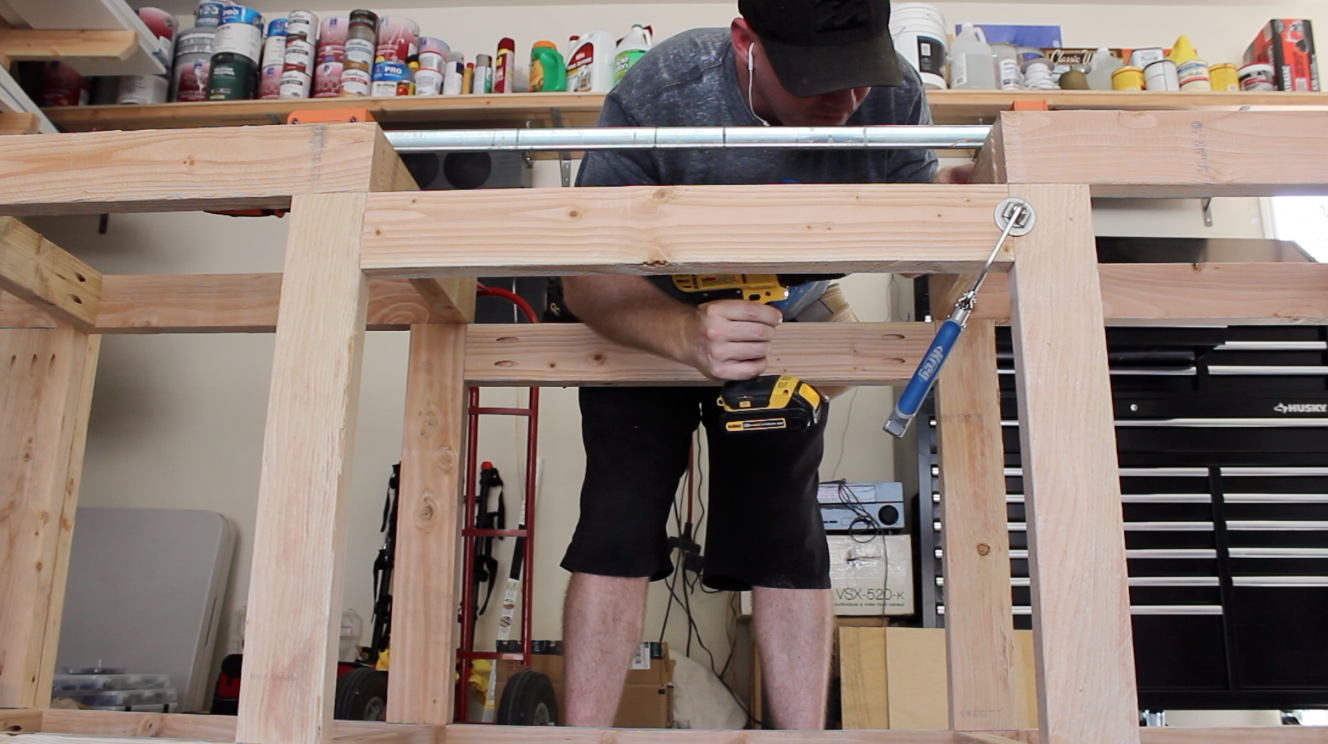
The frame is essentially comprised of two long sides while being joined with shorter boards that span the width of the table.
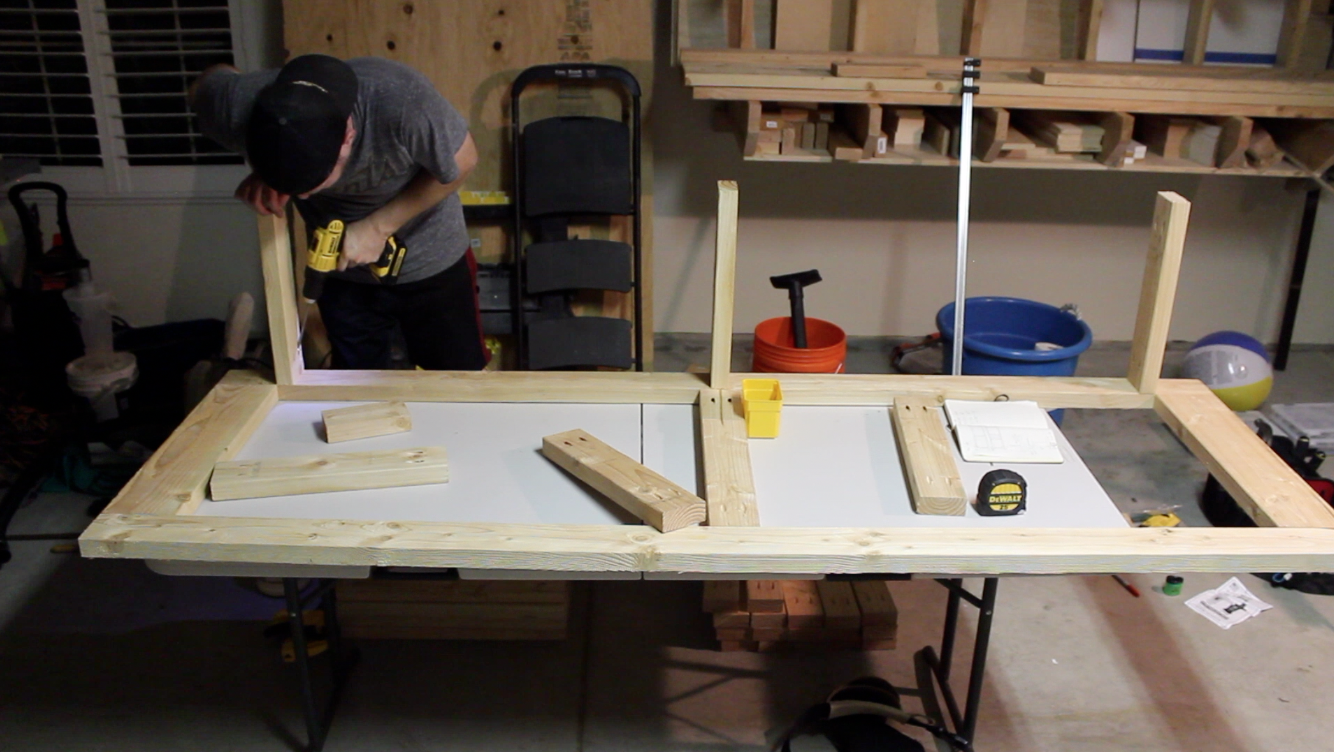

Once the frame for both benches were assembled, I added a 2×6 to the outside of each side to create the “legs” for the workbenches. This adds extra rigidity to the frame and creates a wider base for attaching casters at the bottom of each workbench. Note that the length of the extra 2×6 is the entire height of the workbench.
Once the legs are fully in place, add casters to the bottom of the bench. This makes moving the project much easier as you continue to build it. Use locking casters so the workbench will stay in place when the time calls for it.
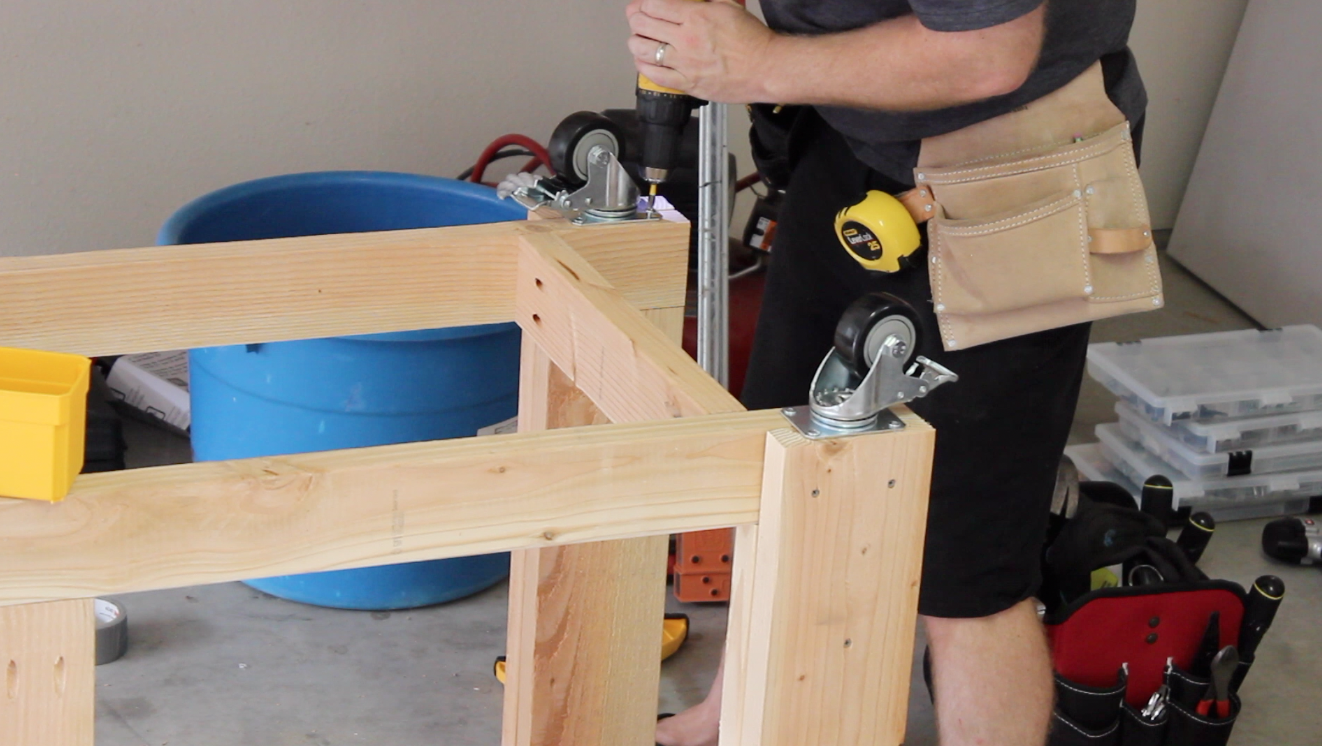
I caught this later in the build, and the issue is unique to this workbench design where two casters sit next each other, but you’ll have to account for their rotation range. Initially, I had the two inside casters sitting next to each other, and because of this, they would bind up and block one or both from moving freely. This results in a workbench that is very difficult to move and maneuver.

To correct this, I moved the casters further apart. This lets them rotate freely while the workbench is pushed around. This also added to the height of the workbench.

2. Build and Attach the Workbench Top
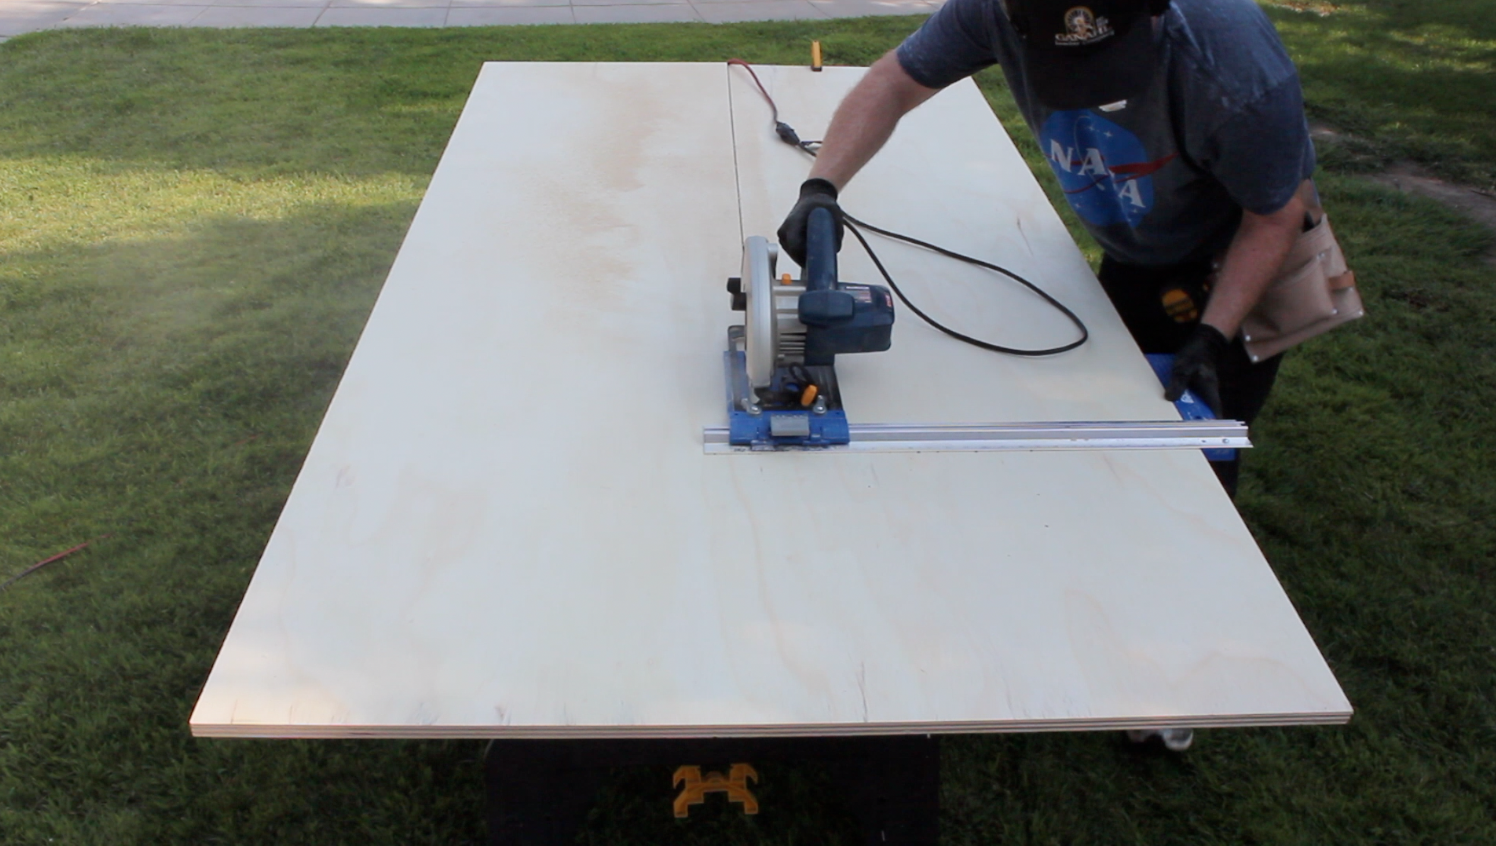
Most of the workbenches I saw online were constructed with top made of 2×4 glued together by their face grain. This makes for a super-strong work surface, but it used quite a bit of material, takes more time and can be challenging to ensure that it’s completely flat. Instead, I opted for 3/4-inch cabinet-grade plywood. I made the top strong by lamenting two layers with glue.
To create the bench top, start by cutting the plywood sheets right up the middle with a circular saw or table saw. Using the Kreg RipCut (pictured below), I was able to make long, straight cuts.
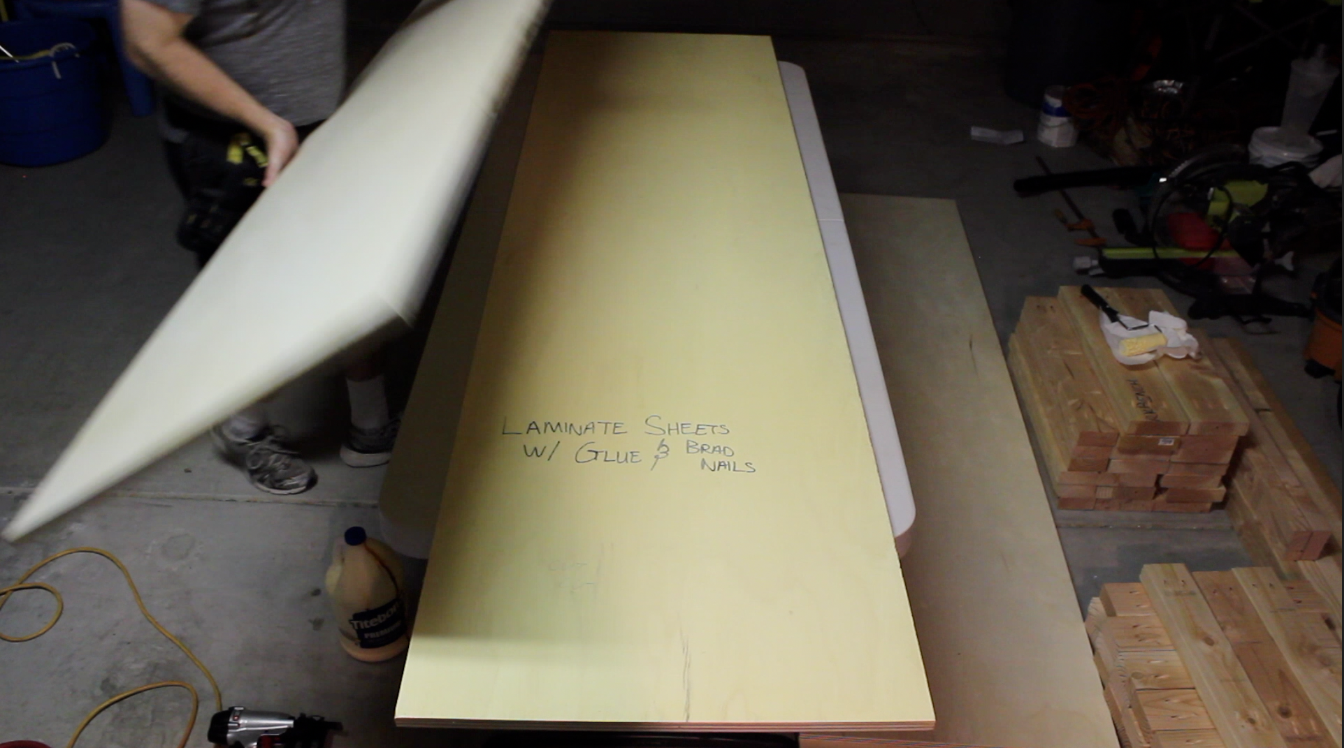
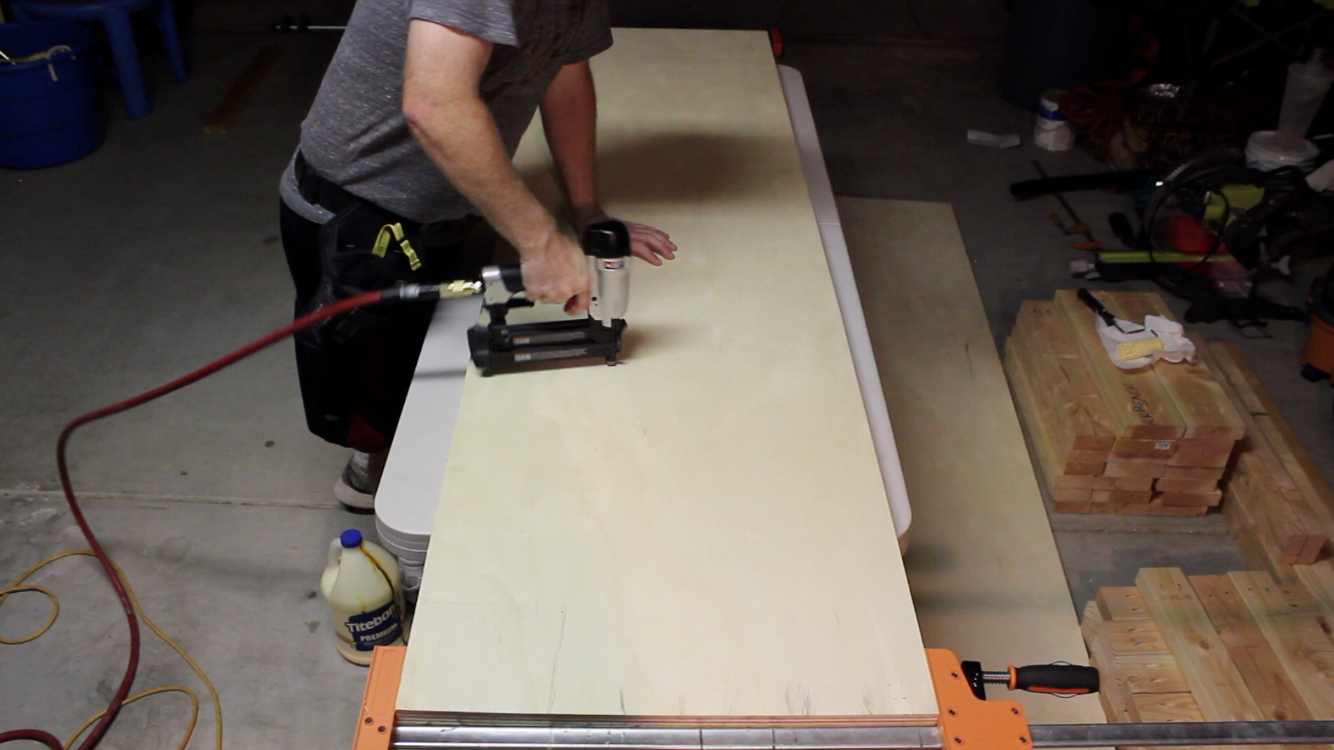
Laminating these layers of plywood will create a very sturdy and strong work surface, and it starts by liberally brushing on wood glue to one layer of plywood and then placing the other on top of it. To provide clamping pressure while the glue dries, attach brad nails while pressing down on the plywood layers. Be sure to make sure the edges of the plywood line properly.
To attached the table top, I drilled pocket holes on the inside of the workbench frame. You can chose to attach the top by simply using screws through the top of the bench top, but that means screw heads will be visible on the workbench. That’s not a huge deal for most, but since I have a pocket hole jig, (in this case a Kreg Mini Picket Hole Jig) I used pocket screws to attach the table top. Whatever you decide to do, be sure to attach the top in a way that allows you to easily remove it down the road in case it needs to be replaced. This workbench is going to get plenty of use and abuse so you can image that the top will need to be replaced at some point in time.
3. Attaching the Tables With Magnets
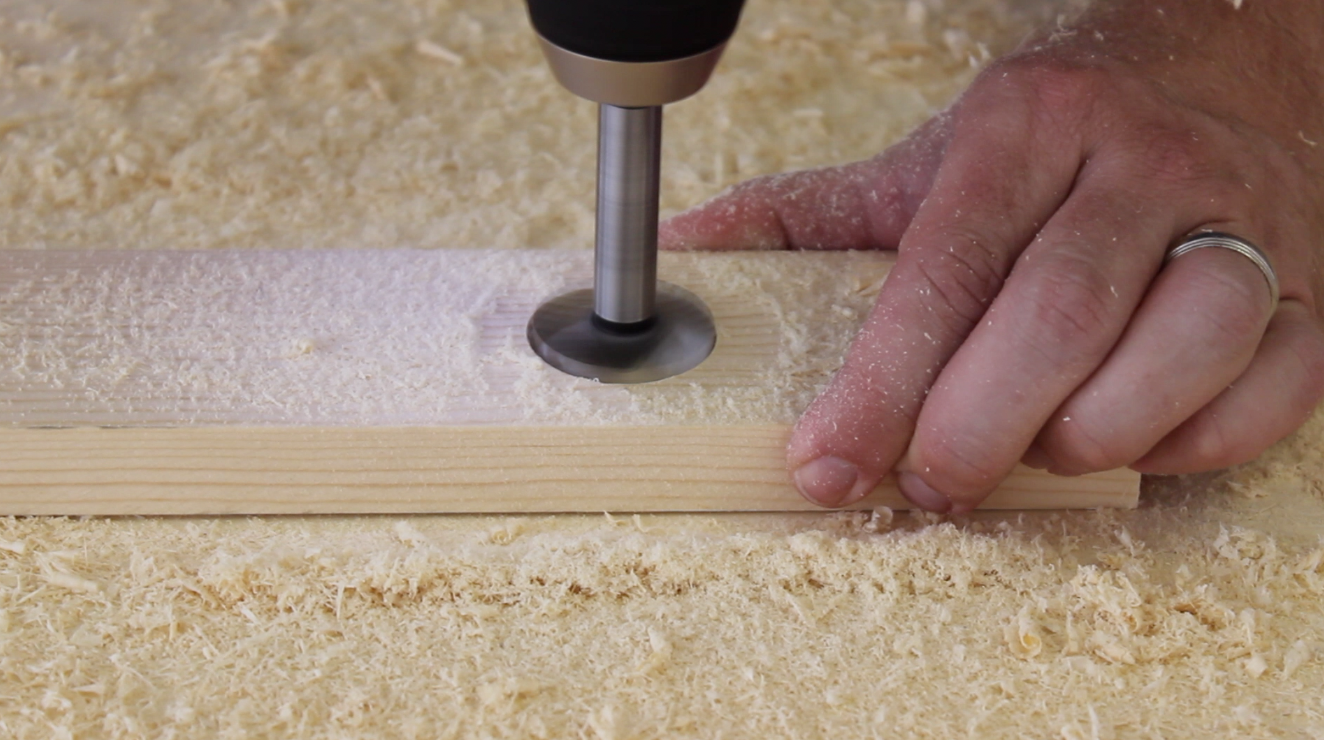
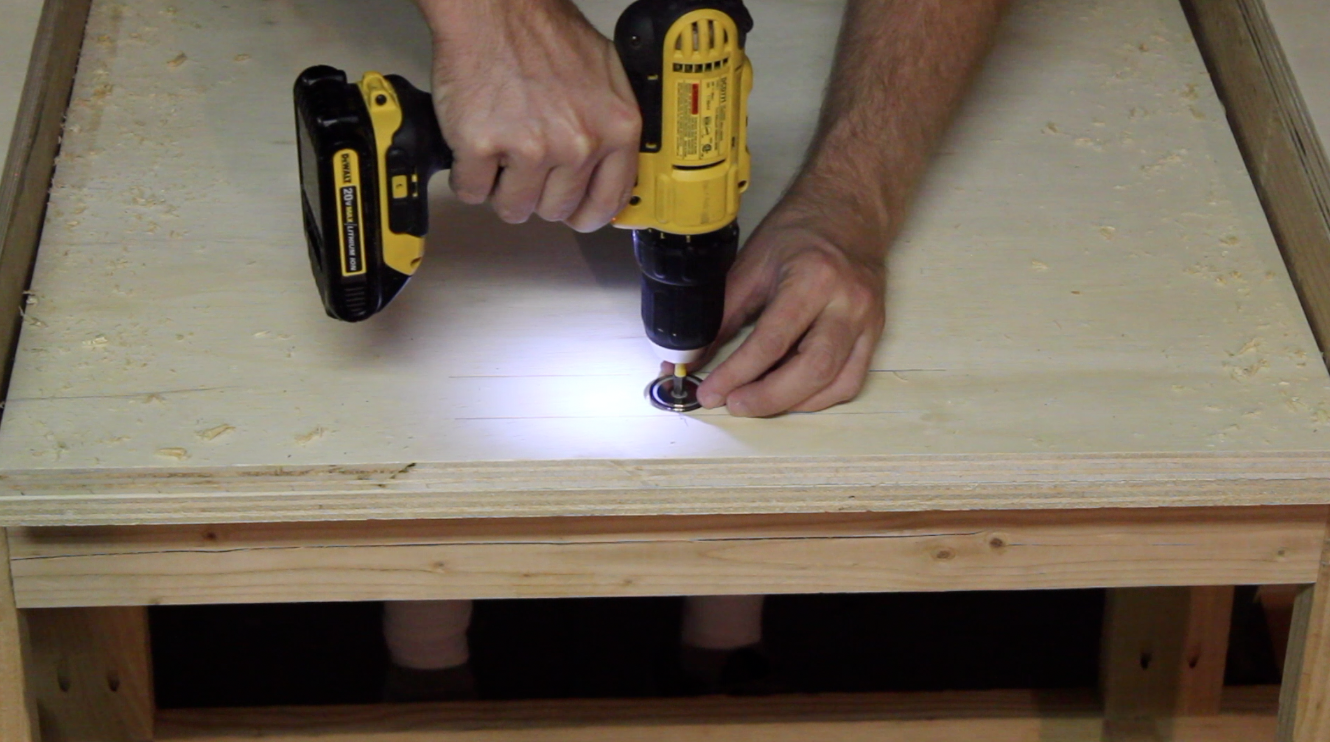
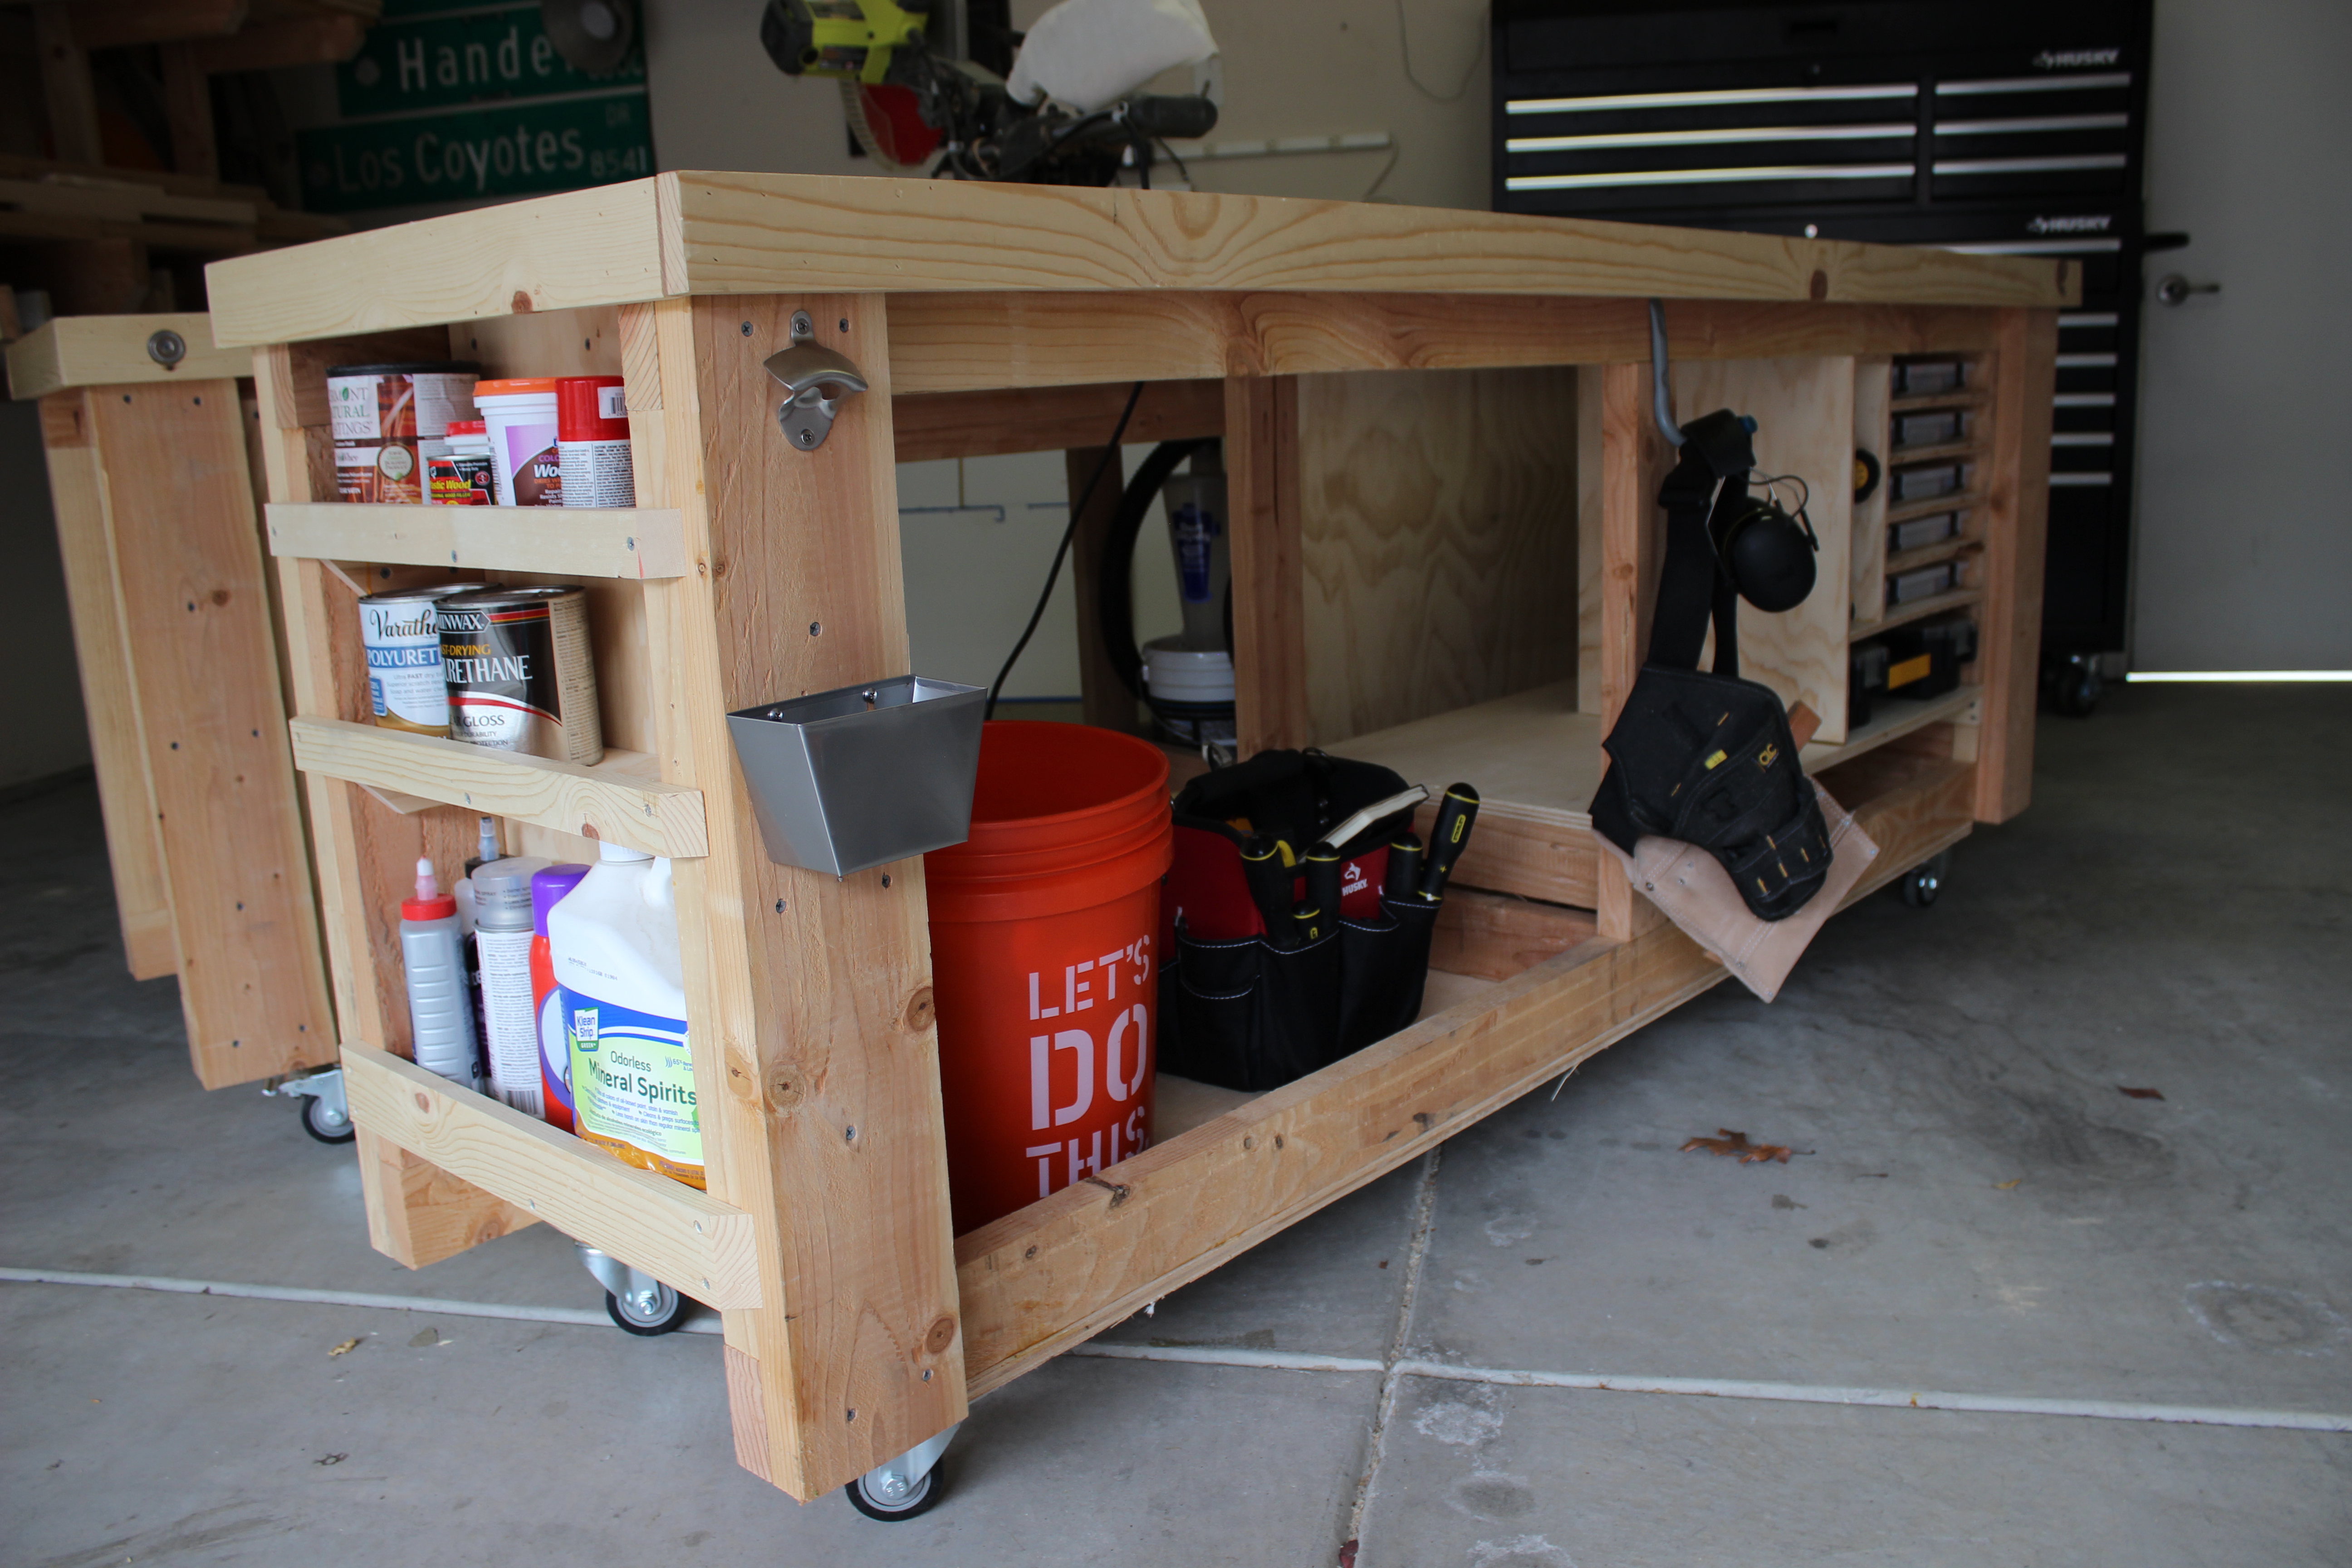
Using the of idea of attaching modular workbenches with magnets, I drilled circular slots into 3-inch strips of pine using a forstner drill bit. These slots fit the circular neodymium magnets that would help clamp the workbenches together.
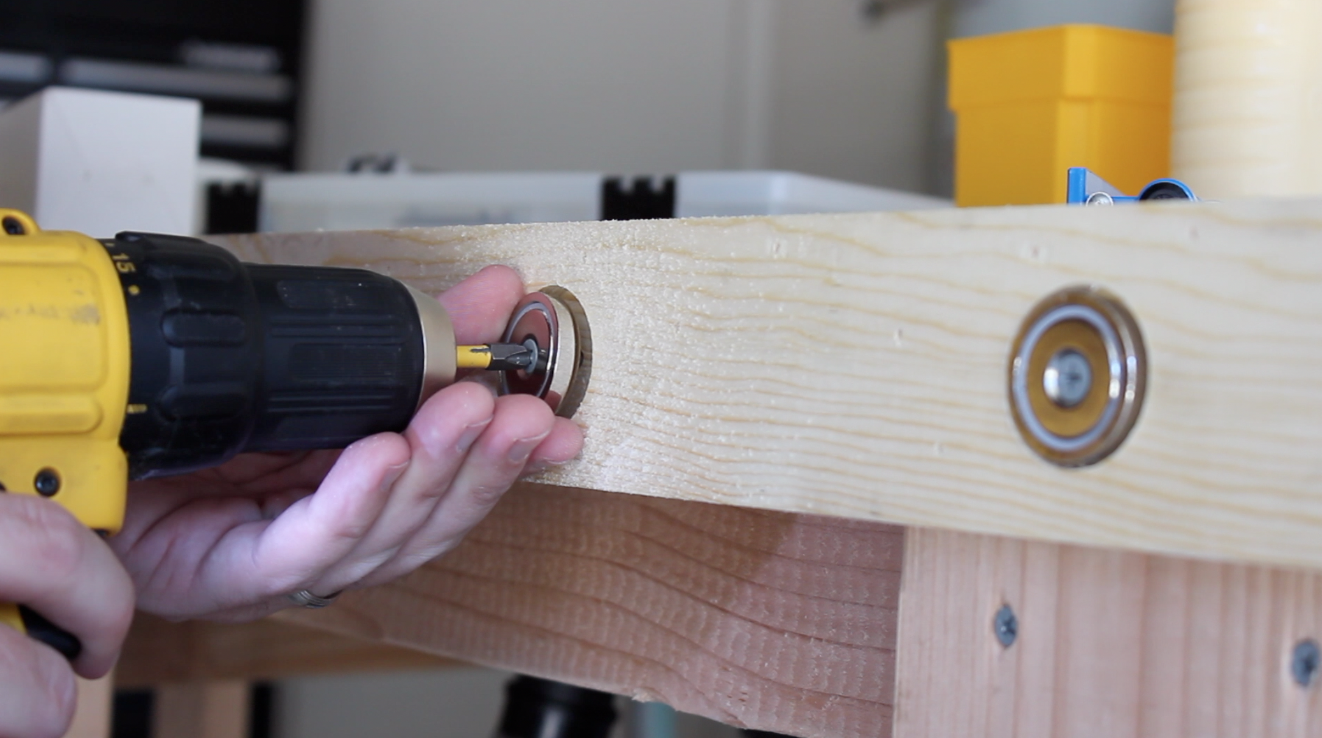
The wood strips that hold the magnets are wider than the actual thickness of the plywood top. I did this for two reasons: 1) The magnets are wider that then thickness of the workbench, and it was easier to drill the slots on separate pieces of wood than attached them directly to the plywood top. 2) With the top edges of the pine strips flush with the plywood table top, this left a slight over-hang that acted as a handle all the way around the bench top, and moving the workbench became much easier.

As I mentioned in the build video, it’s recommended to have the magnets stick out a bit from pine board edging. This allows the magnets to make better contact and form a tighter bond when moving both workbenches together. I highly recommend these neodymium magnets on Amazon. I ended up using 6 pairs to attach my workbenches, and I would maybe even recommend using 8 pairs to make an even tighter bond.
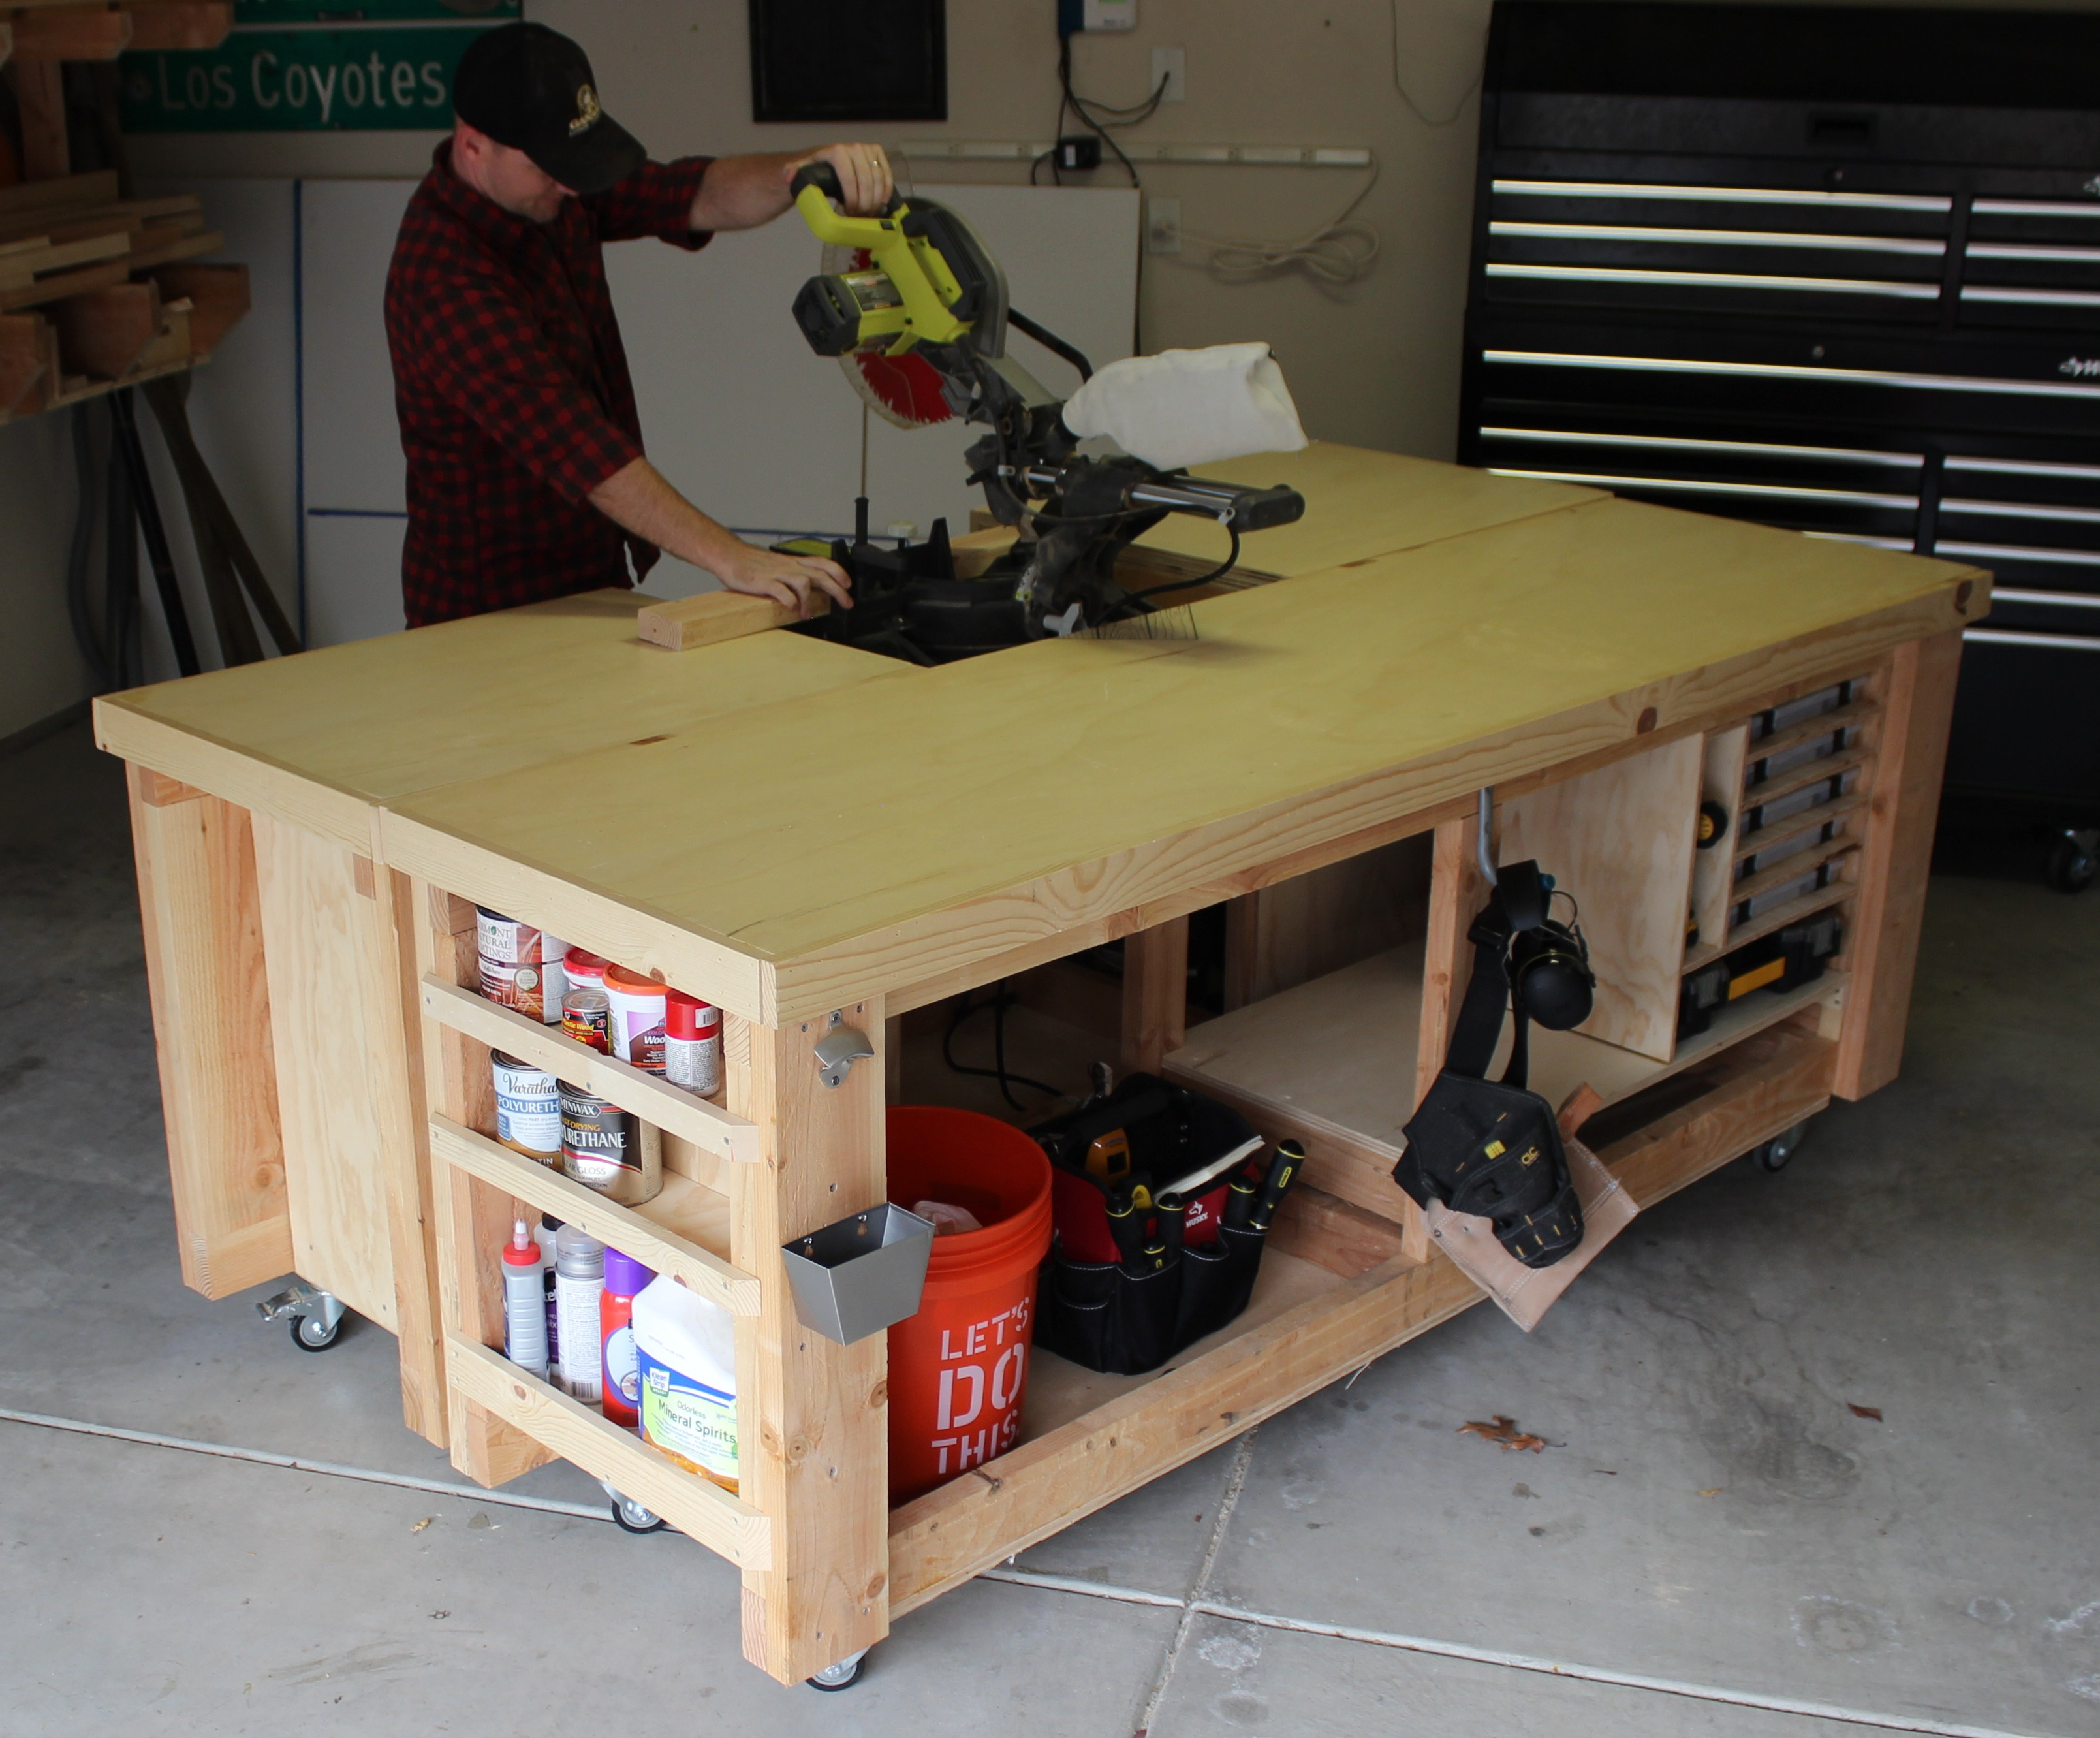
4. Completing the Miter Saw (or Multi-tool) Slot
Of all the features of the workbench, this is the one I have found to be most handy. Turning the workbench into a miter saw station is so convenient, and fortunately, making a small variation to this basic frame design allows you to build this in.
One of the workbench halves has a 3 1/2-inch-deep slot built-in to accommodate a drop-in for a miter saw. This requires additional framing, but the design is simple enough. The boards are 2x4s joined by pocket screws. It just worked out that the height of my miter saw’s work surface is 3 1/2 inches. Carefully measure the dimensions of any tool you want to “drop-in”, and remember to account for the additional height of a table top that will be added later to the workbench.
For times when I didn’t need my miter saw in the drop-in and/or I wanted a completely flat work surface, I created an insert for the drop-in.
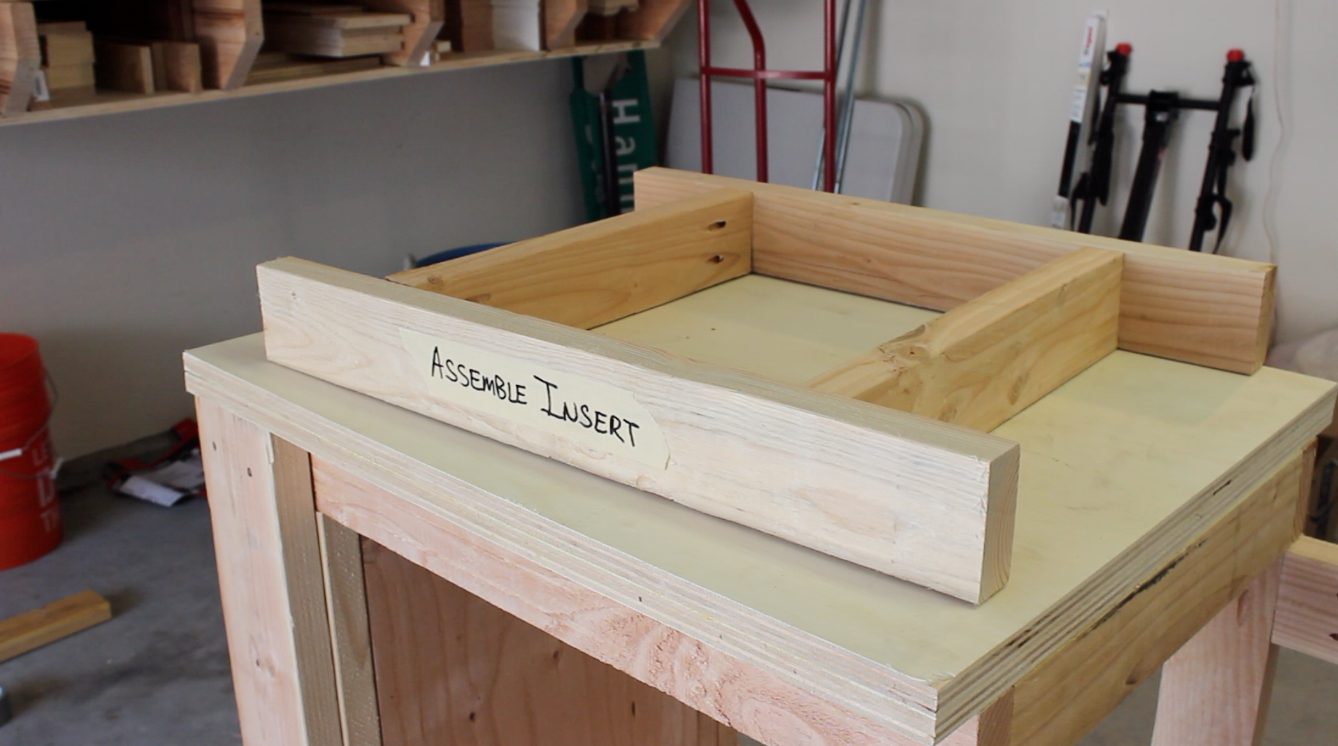
Before I made the platform for the miter saw, I first made the insert of the slot using 2x4s and two laminated layers of plywood. I build this so the insert would be level with the rest of the workbench. I also used magnets (the same ones used to connect thee sides of the two workbenches) to secure the insert on to the workbench frame.
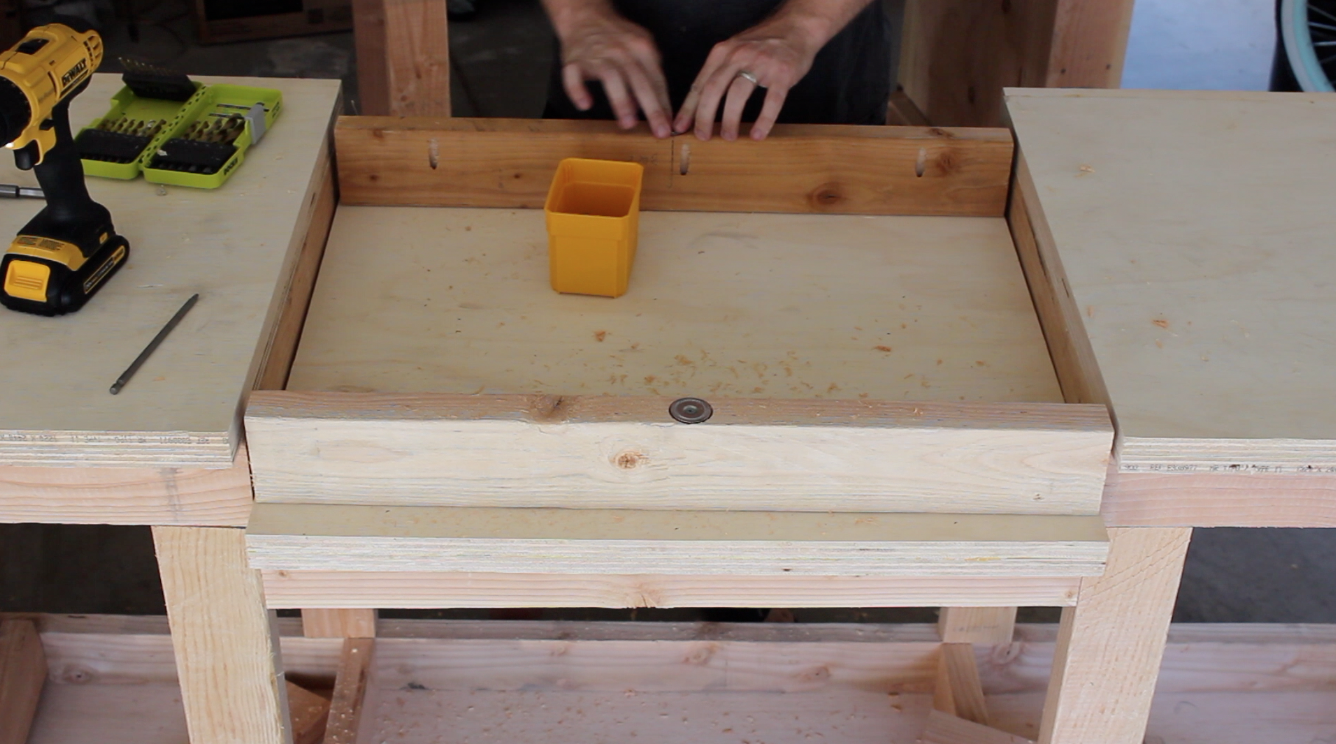
For the miter saw insert, I also used two layers of 3/4-inch plywood, laminated together with glue, and secured it to the workbench frame with magnets.
I carefully lined up my miter saw to make sure it was in the center of the insert. If you have a compound miter saw, be sure to test its rotational range in all configurations to make sure the insert will accommodate it. The last thing you want is to attempt to adjust your miter saw for 45-degree cut, only to have it not fully rotate because the workbench slot is not wide enough. With the saw is set in place, attach it to the plywood insert with screws. My miter saw has 4 screw holes for this purpose, but you may need some washers to completely attach yours.
5. Finishing Touches
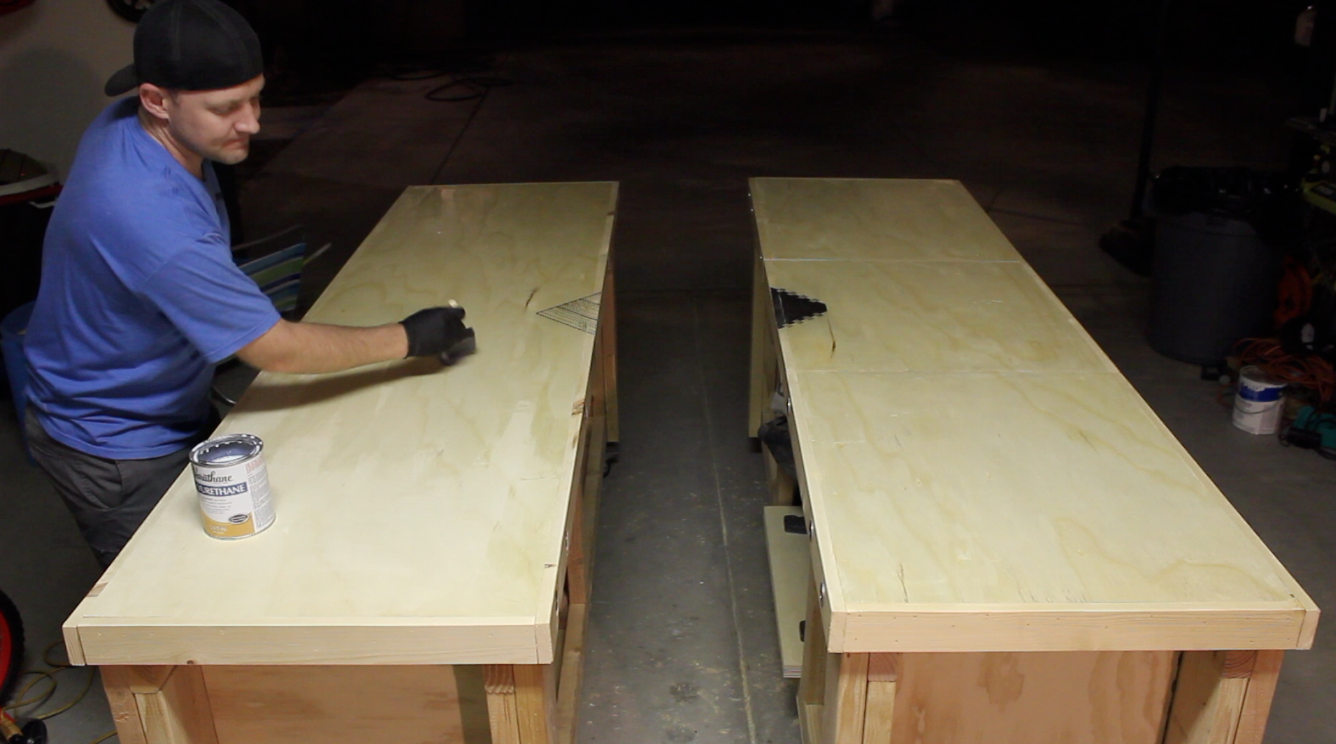
You may want to consider applying a few coats of finish on the workbench tops to provide an extra level of durability. This also leaves the workbench feeling silky-smooth, and it makes clean-up a little easier. I also added my logo to the center of the workbench using my trusty inkjet-to-waxpaper transfer method.
Final Thoughts
I am so happy with this design, and I hope this was helpful for as you plan to build your own workbench. I spent a long time sketching this plan on paper, but after actually using this workbench design for 5 months, here are the top aspects that for me:
- Setting up for woodworking is so much easier when all my tools are on a rolling workstation. I would spend a good 20-30 minutes getting out all the tools I needed for a project, and now this is down to a matter of seconds.
- The miter saw insert is big a time-saver. Also, since the workbench top is level with the miter saw platform, cutting long boards is much easier. And when I’m not using the miter saw, I can easily store it under the workbench and re-gain a large, flat work area.
- Having a workbench also creates a lot more storage for your shop. So as you’re working on your design, think about the tools and materials that you want to store.
- I thought that I always wanted a giant workbench that would sit in the middle of my garage – I mean workshop. But given my set-up, that’s just not practical. Most of the time, there is a car parked in my garage, so splitting the workbench into two lets me store it out of the way. Also, it’s nice to have two smaller workbenches at times, depending on the kind of work I’m doing.
So what do you think of this design? I’d love to hear your thoughts and suggestions I how to improve it. And let me know if you build one of your own – I love seeing photos of your projects. I’m happy to answer any questions and don’t forget to subscribe to Gadgets and Grain on YouTube.
Links to Tools I Used
If you’re curious about some of the products I used on this project, check them out on Amazon. When you click on the links below, Gadgets and Grain gets a little commission when you check out – I would greatly appreciate it!
- Kreg Jig K4 Pocket Hole System
- Kreg Pocket Hole Screws
- General Tools Digital Sliding Bevel Gauge
- Kreg Face Clamp
- Dewalt Trigger Clamps
- Dewalt 20V Cordless Drill
- Kreg RipCut Circular Saw Guide
- Titebond II Wood Glue
- GluBot Glue Applicator

do you have a cut sheet for the wooD?
LikeLike
Yes – I just posted plans and cut list in the blog post. Let me know if you run into any questions.
LikeLike
Great build!! I have been searching for a work bench build for quite some time and I loved this one! I want to make it, but could you share your cut list?
LikeLike
Thanks! I just posted plans and but list in the post. Let me know if you have any other questions.
LikeLike
Thanks so much! Can’t wait to get started!
LikeLike
I feel like I’m missing something here. I can’t find any dimensions to cut to, and I can’t find a materials list for the wood. Can you point me in the right direction for this?
LikeLike
You’re right, Michael. After getting some great feedback in the comments section, I just posted plans and a cut list. Let me know if it helps.
LikeLike
Hi,
I was wondering if you have a cut list by chance for this particular build. This is exactly what I need for my one car stall workshop!
LikeLike
I just posted plans and a cut list. Let me know if it’s what you were looking for. Good luck!
LikeLike
Have you thought any more about how to incorporate a router table? Do you think you will make another insert or perhaps just build it right into the existing middle section (when the miter insert is not on)? If you add it please make another video! This design is great, thank you.
LikeLike
I have, but just haven’t had time to flesh out a design. I’m thinking it will need to be another insert so the router tip will be flush to the rest of the table surface. And when the time comes to build it, I will definitely make another video.
LikeLike
well done and thank you
LikeLike
Just about done building this and UBER excited! Unlike many of the benches on Pinterest, this one is the perfect blend of portability, adaptability, and usability. As an added bonus, this project made quick use of the scrap I had after finishing my basement. Looking forward to using the heck out of it in the coming months for other fun projects. Thanks again!
LikeLike
Really appreciate the feedback, Bryan. Enjoy!
LikeLike
I’ve been looking for a practical work bench. I’ve look st all the workbenches on you tube. When I saw your workbench I blew me away. The next day I went and got all the lumber to built the one with the miter saw insert. I start tomorrow. Thank you for your design and lumber list
LikeLike
That’s great Raymond, and thanks for the kind words. Good luck on the build. Shoot me over some pictures if you get a chance.
LikeLike
This is awesome. Congratulations
LikeLike
What do you drink that has pry top caps!?!? Great design, and very adaptable for anyone to ‘customize’ for their very fussy usage!
LikeLike
I think I may add a “lift shelf” like the one I put in my kitchen for our Kitchen Aid mixer, then put my sander on it! Or other tools. What do you think?
LikeLike
I like that idea!
LikeLike
Jeremy, thanks for the awesome video, cut list, inspiration and overall awesomeness of bringing this bench forth! Also thanks for the recommendations to Steve at WWMM and Bob at I like to build stuff! I have literally have just put the finishing touches on my build and I am In awe of what I just built with your help! This is my first practical build and I have learned some much from this. I can wait to start using my bench for all the ideas that are accumulating in my noggin. I wish I could upload a pic for you as I am so proud of what I’ve just accomplished. Thanks again! And I hope you continue to produce some more Awesome builds!
LikeLiked by 1 person
Hey Paul. So glad you were able to build your bench and it’s great to hear that this is just a launching point for all the things you’ll build down the road. I really appreciate the kind words and feedback – it means a lot. And if you’d like, shoot me over a photo of your bench at jeremy@gadgetsandgrain.com
Thanks again, Paul. All the best.
LikeLike
I am looking to do this project, and am getting prices on materials, what type of wood did you use/would you recommend?
LikeLike
Hey Justin. I used Douglas Fir boards that can be found in most home centers. I recommend going with kiln-dried lumber to keep the weight down and reduce the chance of the boards warping. Try to pick the straightest boards you can find. Good luck!
LikeLike
Is Douglas Fir a higher end wood? Also does this type apply to the plywood and dimensional lumber(2x4s etc)? I had a quote sent to me from a local lumber shop and if I use standard ‘grade #2’ dimensional lumber and standard 3/4″ plywood, with exception of the table surface which would be ‘AC Pine underlayment’ it all comes to under $200. Some of the other types given were quite a bit more expensive. Thanks for your input!
LikeLike
Douglas fir is pretty inexpensive, and here’s the wood I used from the Home Depot: https://www.homedepot.com/p/202094172
It is #2 grade lumber. They also have some nice kiln dried board for a little more: https://www.homedepot.com/p/304013211
For the plywood, here is what I used: https://www.homedepot.com/p/203414066
Hope that helps. Let me know if you have any questions.
LikeLike
Hey Justin, you got a great price for your lumber. As Jeremy mentioned in regards to the plywood, I also used the Sande ply, but for the tops I laminated it with some PureBond ply also. The Purebond is generally $10 more per sheet but using the Red Oak gives it different look. Totally not necessary since this is a work bench, but as this is pretty much my first build, I just wanted some experience in working with different materials. What ever you use, the plans provide for an awesome bench. Happy Building
LikeLiked by 1 person
Thanks for the info Paul, I will look into it. Do you have any photos of yours you could share?
LikeLike
I didn’t have a K-4 so I went ahead and bought the K-Forman, it was delivered yesterday. WELL WORTH IT!!!!
LikeLike
Nice! 🤛
LikeLike
I noticed that your plans include center vertical supports in the front and back, but they don’t carry any load down to the floor. 90” is a pretty long span for a 2 x 4, especially on a bench that supports a lot of weight. I’d be concerned there might eventually be some sagging across the length of the bench.
It would be very easy and inexpensive to replace those two center supports with full length legs (a few more pieces of 2 x 4 and two more casters). That would reduce the bench’s maximum span to around 45”.
LikeLike
Thanks for posting these plans with the cut list. I just finished the flat top half last night and plan to use some of the scrap 2×6 left from one of the legs to reinforce one end and mount a vice. That will be my “mechanic” bench with hand tools and such.
The miter side will have mdf top so it’s slick and well be used for wood working. Then if I need to have the larger table I can join them together.
Can’t thank you enough for the plans!
LikeLike
Very cool and thanks for the note, Mitch. If you don’t mind, send me some photos when you’re done. jeremy@gadgetsandgrain.com
LikeLike
Love this work bench!! Working on building it now! One thing I noticed though. For the half with the miter saw insert, and maybe this is me not knowing something, but shouldn’t “G” be 28? If “F” is 31, 31+31+27.5=89.5. Where as 31+31+28=90 for the full length to match the bottom. I only ask this because building it now, that half kinda is a little bowed upward I would call it. I am going to try the 28” length and see if that brings it back to the two sides being level. Thank you for the plans and the inspiration!
LikeLike
Hey Andrew. You are totally right. G should be 28”. I’ll fix that typos in the plans ASAP. Thanks for catching that.
LikeLike
No problem, I took pics of before and after and it definitely bring both ends of that bench up level with each other and the other half! Again, thank you for your hard work and making these plans available!
LikeLike
This looks great for my needs and definitely appreciate the time you put into this. Appreciate your generousity. Have a new subscriber on u-tube.
LikeLike
Thanks Tim!
LikeLike
I just started working on mine this past weekend!! Excited to get it all done. Just an FYI to anyone looking to build it, where I am located, my total cost is approximately $325 ish. Pretty sure buying a bench like this already built would be WAY more tho. Thanks for the plans.
LikeLike
Awesome idea. Looks very functional. I have been looking for something to replace a work table that a friend gave me.
LikeLike
You, sir, are a magician! Fantastic design and concepts! Well done!
LikeLike
Thank you for sharing this, it’s perfect for my small shed workspace, think I’ll try making a flip top for the mitre saw. Beautiful finished project, thank you again.
LikeLike
I just finished my workbench using your video and crystal clear plans. Turned out amazing. Perfect solution for my garage. So glad I took the time to upgrade my rickety workspace. Thank you for sharing.
LikeLike
I’m getting ready to make this workbench as it’s the perfect fit for my mini garage workshop. What length wood screws did you use to secure the longer 2×6’s? Since you had to move the casters in, is it really necessary to have the 2×6’s there now? Or was it just an issue with your casters?
LikeLike
I plan to build this in the next month or so. I’m super-excited. Due to my space, I need to only do 12 feet total (so 6 feet each table). My questions are:
1. What is the size of the insert for the miter saw? I’ll need to adjust the plan since I have a shorter table.
2. What type of plywood did you use? It seems smooth vs rough like I see in a lot of home stores.
Any other advice for me? This will be the first time I’m attempting something like this.
LikeLike
Hey Aaron. Hope this helps…
1. You’ll want to figure our the size of your insert based on the size of your miter saw rather than the overall size of your table. My miter saw is about 21-inches wide, but it needs more clearance if I have it extended out for cutting miters. So see how wide your miter saw gets to figure out the best width. Does that make sense?
2. I use “cabinet-grade” plywood for the bench tops. You might have to ask around for it at your local home center. It is more expensive, so maybe consider buying the smooth stuff for the very top layer. You can laminate the cabinet-grade plywood to rougher plywood. This will give you a stronger work surface and save some money.
As far as other advice – Just take your time, and practice some of your cuts and joinery on some scrap wood first. Feel free to shoot me some photos if you need any help down the line – jeremy@gadgetsandgrain.com
LikeLike
Good points. My mitre saw from side to side is about 25 3/4. So I probably need to measure the size at the widest point which would be when I’m at the most aggressive angle, right?
Thanks for the advice.
LikeLike
What size screws are you using to secure the 2×6 for frame and leg reinforcement? Did you predrill the holes before screwing?
LikeLike
Hello Jeremy,
Thank you for the your design and all the effort you put into showing us how to build this workbench.
Your instructions, cut list and video were exceptional and they were a big help.
Thanks,
Andy
LikeLike
Thanks Andy!
LikeLike
Thank you so much for this great idea and plans. It was awesome that you are sharing.
LikeLike
This design is absolutely perfect for my workshop! 😀 I’ve designed it in SketchUp with some adjustments to meet my needs and space! Unfortunately, I couldn’t build your lumber rack so I had to modify it to get it to fit!
Such great ideas and love your channel! 😀 Hope for some new content soon.
Love from Peter
Sweden
LikeLike
Thank you Jeremy for sharing such a great design. I’m about 3/4 of the way through building these workbenches for my new home workshop and it’s been a ton of fun. Looking forward to when you get a chance to make a short video about the shelves you added at the end. Though I suppose it should be possible to replicate them just from the photos. It would also be helpful to add the 3 inch pine used for the edging to the cut list.
For the others with questions about how to attach the 30″ 2x6s for frame and leg reinforcement – I drilled pilot holes and used 2.5 inch deck screws, going from the inside out rather than the outside in. Seems to have worked fine.
LikeLike
WOW….I’ve been looking for ideas to build a movable work bench. I to, use my garage as a shop and need something that doesn’t take up much space. A two section bench, what a GREAT IDEA. ii will make this soon..THANKS JEREMY….GREAT IDEA…GREAT VIDEO….
LikeLike
So glad this will work for you, Bill. Really appreciate the kinds words!
LikeLike
Hey Jeremy. Thanks for putting this together. Excellent write up and video. The plans and cut list were spot on. I spent this weekend building the workbenches just as you had designed. I did leave off the magnets as I didn’t think would use them often. And I rounded the edges of the MDF instead of trimming them out. They came out great! They will be the starting point for my garage/shop. Planning to finish them with some shellac and then come up with some shelves. Thanks again for all your work!
LikeLike
That’s great! So glad to hear the plans were helpful. All the best on your shop!
LikeLike