Update 8/2/19: After receiving hundreds of questions about this topic over the years, I made an updated version over here: Check it out.
When it comes to home decor, vintage is definitely in. But if you have ever done some DIY woodworking projects, you’ll know it can be hard to obtain that aged wood look. You can either buy pricey “barn wood” from a boutique lumber supplier or let your new lumber from Home Depot sit in the backyard, exposed to the elements for a couple of midwest winters – or perhaps you may want to use this easy, inexpensive method for aging your wood in just under a week.
What You’ll Need
For this project you’ll need a few household items from your pantry and garage:
- unfinished, untreated, and sanded wood
- white vinegar
- 0000 grade steel wool
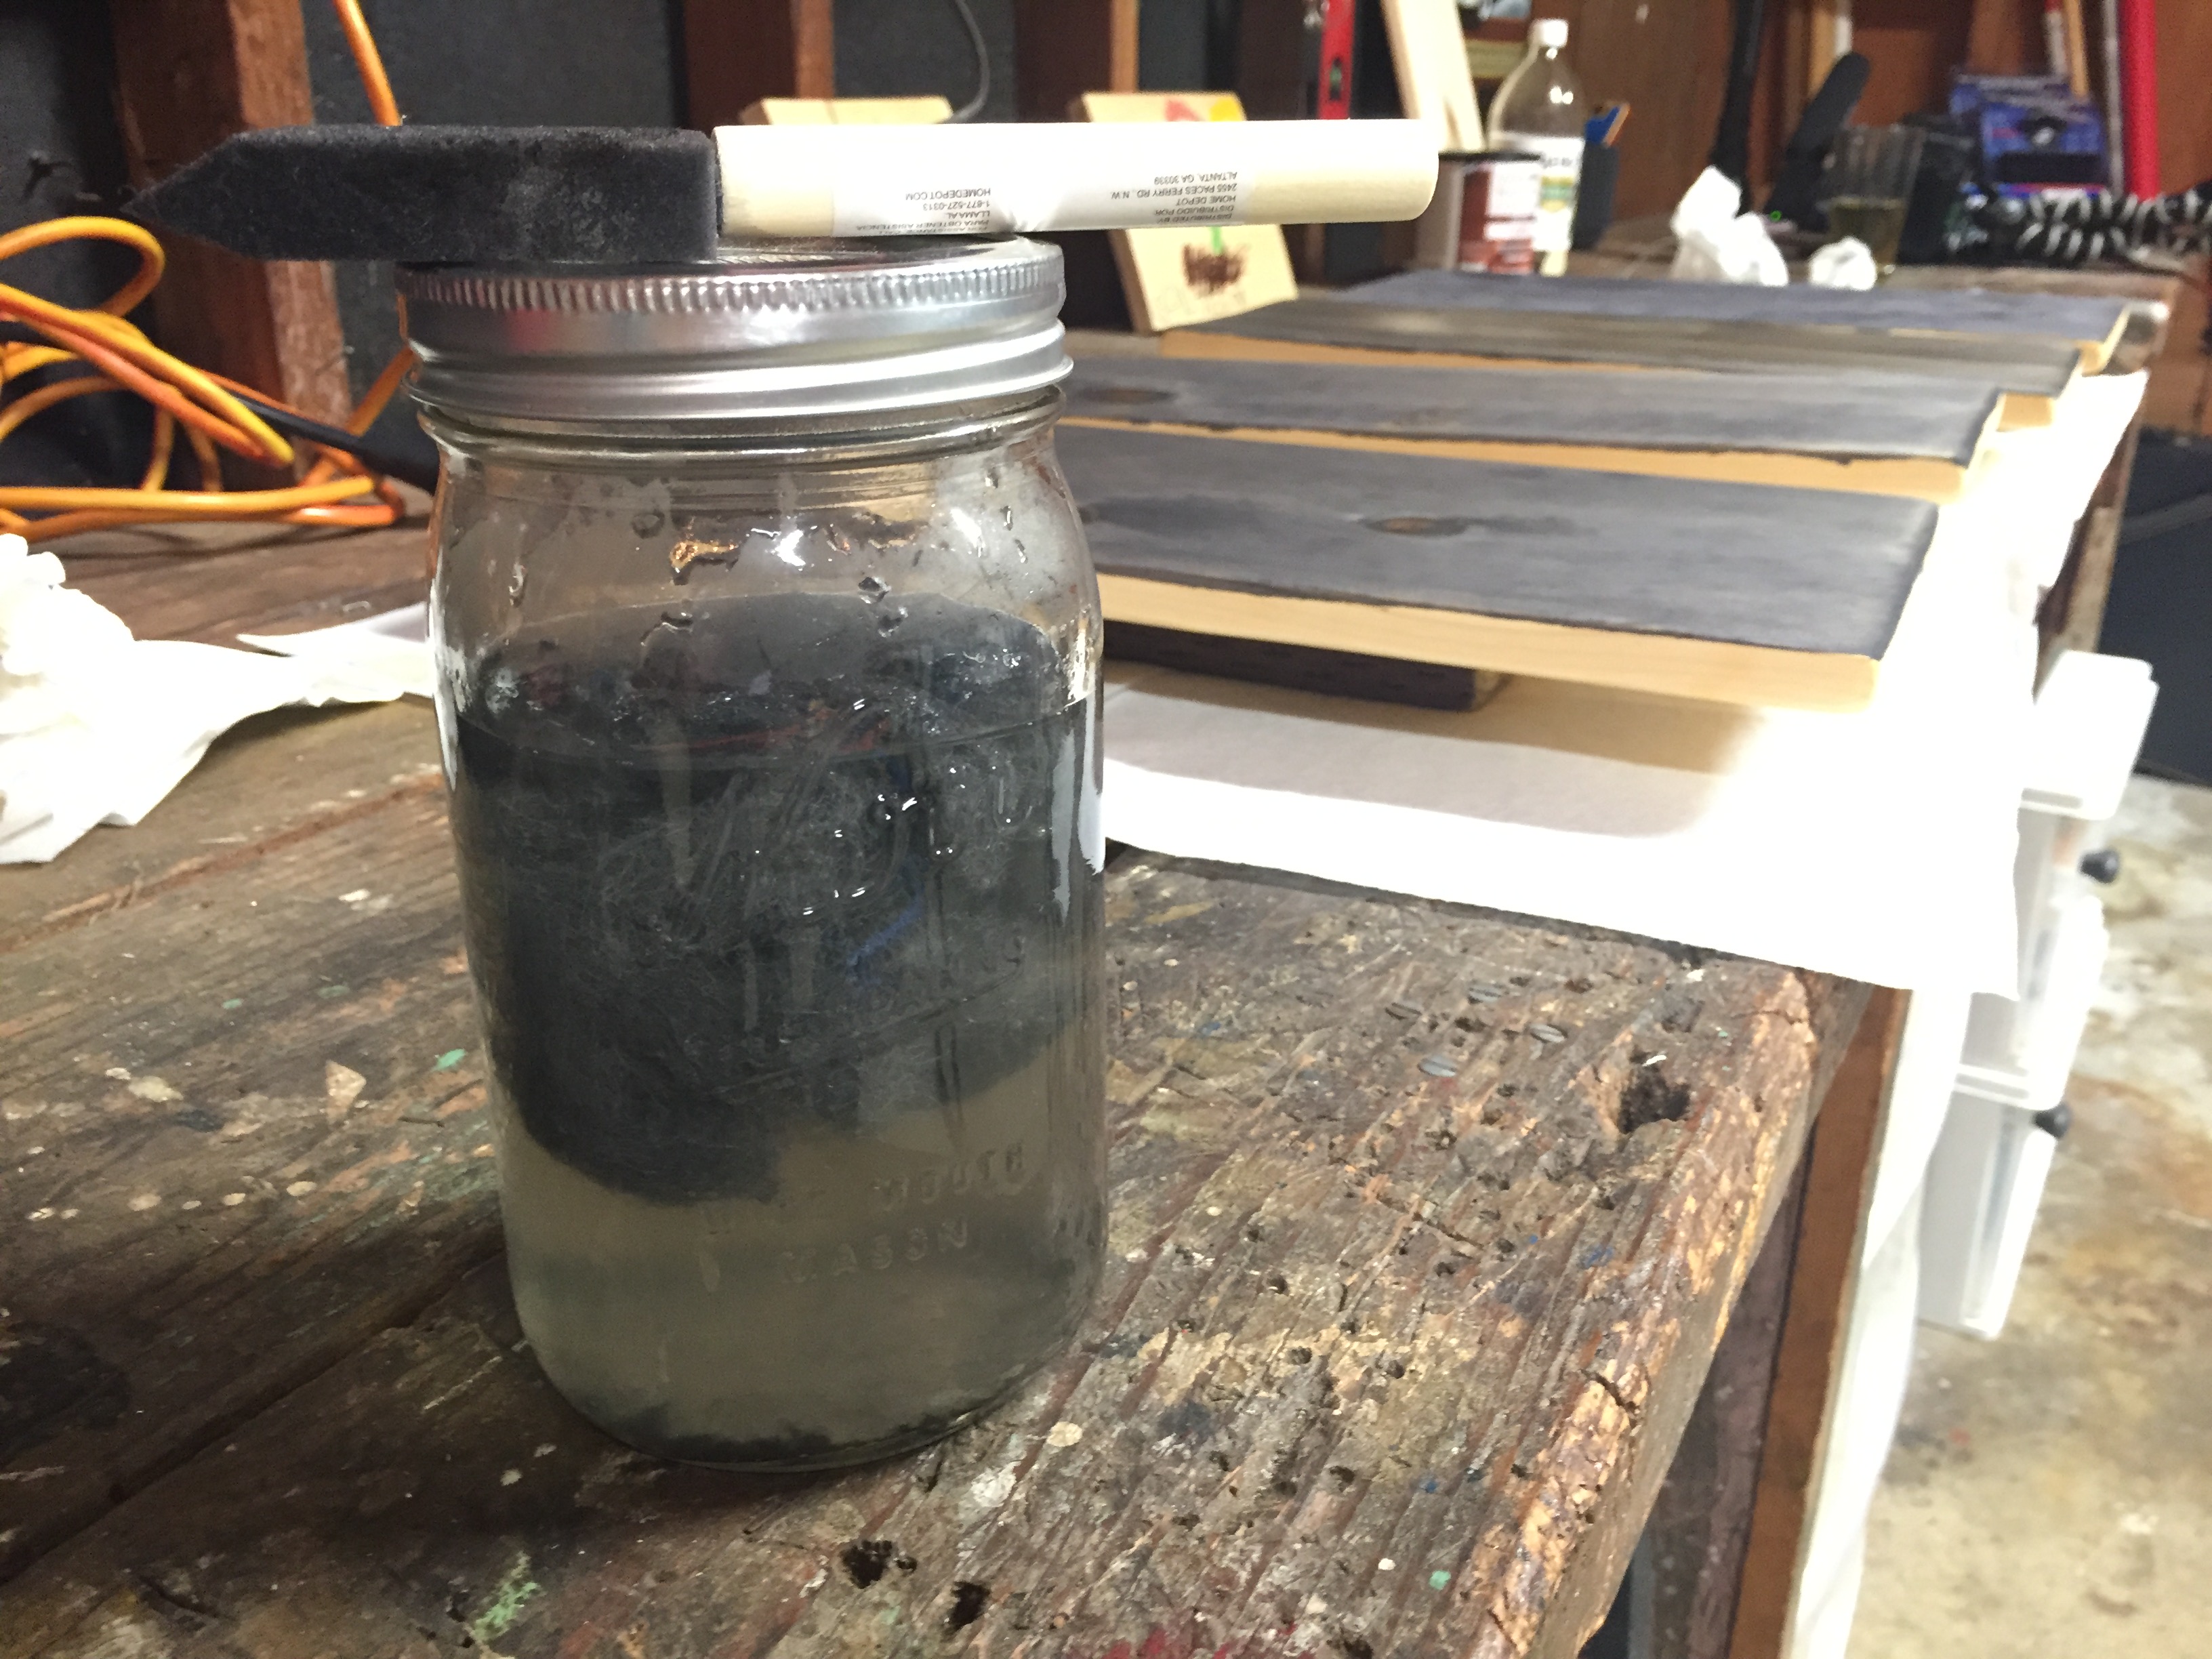
- 24 oz. mason jar
- Black tea, approx 10 bags for the solution
- disposable paint brushes
- 400 grit sandpaper
- some type of finish to seal and protect the wood


Step 1: Make Your Oxidation Solution
Creating your oxidation solution is straightforward. Take a roll of steel wool and tear off bits into your glass jar. Pour in the vinegar until your jar is full and cap the jar with the lid. Oxidation of the steel wool will take about 4-5 days in my experience. In general, the longer your solution can oxidize, the darker your wood color will be. I tested my solution on some pale pine wood after 3 days and it had a nice dark yellow hue to it. After about 6 days of sitting, the solution produced a dark gray. Because every wood will react differently, I would recommend testing your solution on scrap wood to see what kind of hue you’ll get.
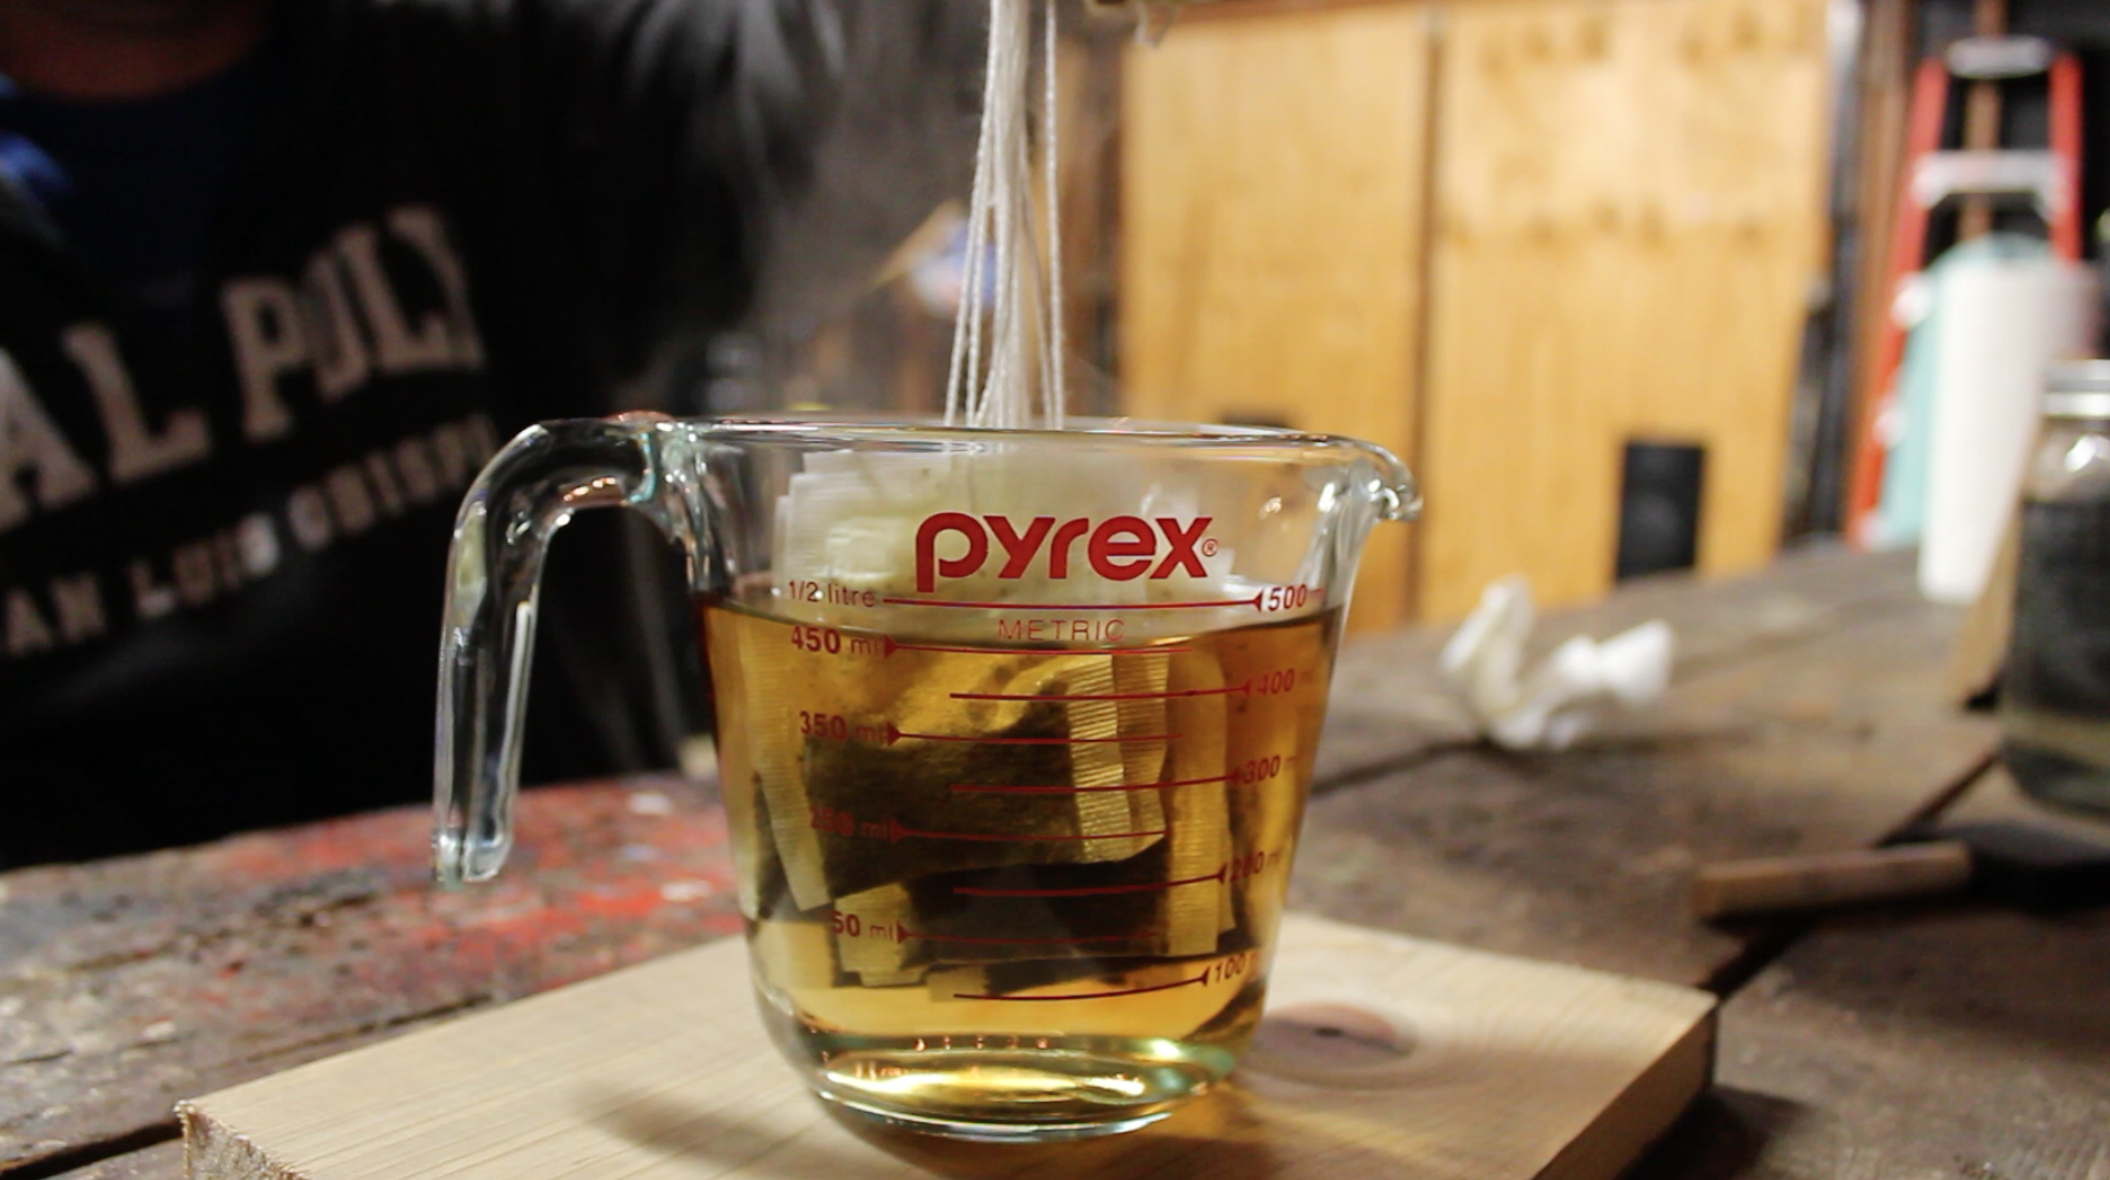
Step 2: Give Your Wood Some Tannins
To help give your wood more definition and properly prep it, you’ll want to brush it with some strong black tea. I brewed some rather strong tea with 10 bags in 2 cups of boiling water. As you can imagine, the tea will slightly stain your wood, but it will also give your wood grain more of a pop. I also discovered that the black tea gives the wood a nicer finisher when you finally apply your oxidation solution. If you skip the tea step, and just use oxidation solution, the wood will end up looking dirty and not aged. There’s just something about that tea that gives the wood a more refined look – sort of how British accents make things seems more sophisticated.
Step 3: Oxidize Your Wood
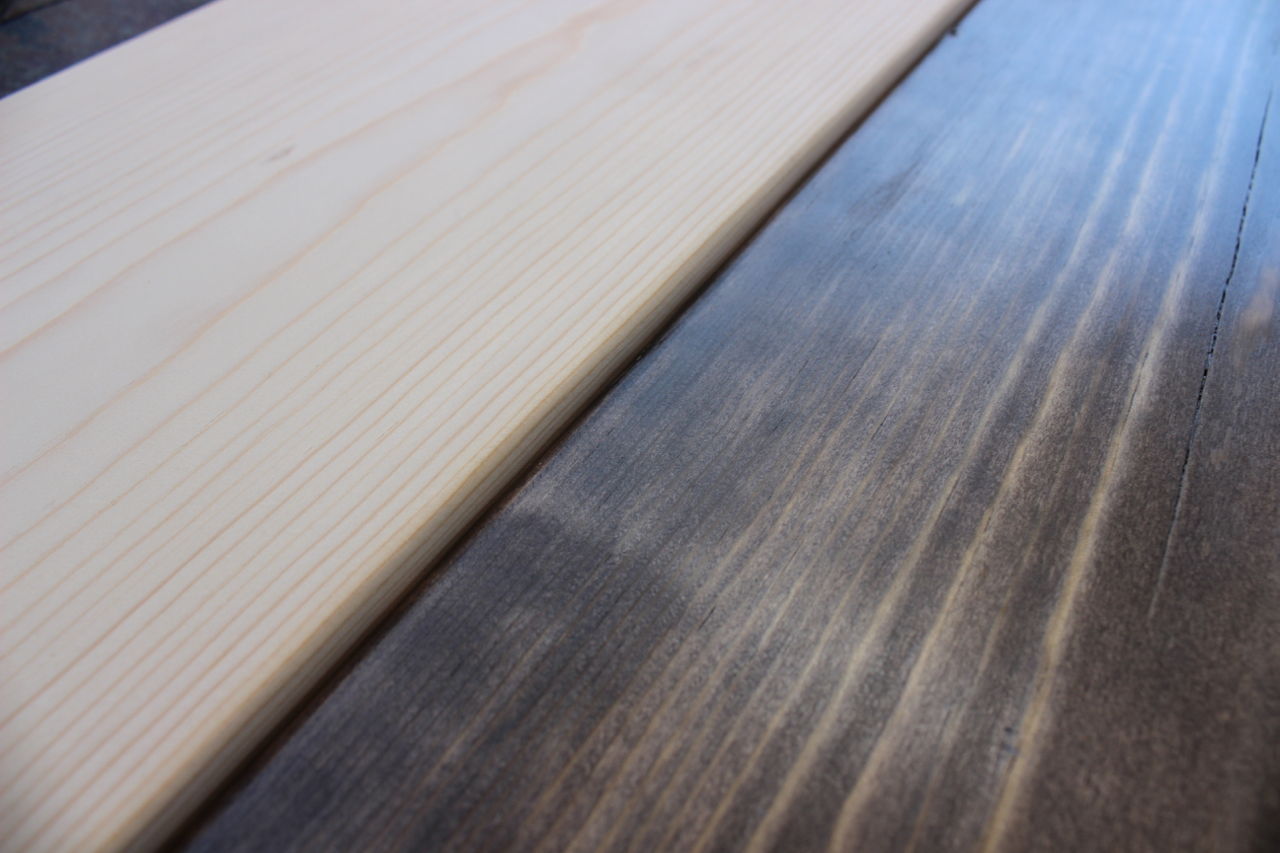
When your wood is dry from high tea, and after the oxidation solution has sat for 4-5 days, your wood will be ready to get “the look”. When you crack open (not literally) your jar, there will probably still be steel wool floating in the solution – that’s ok. If you leave the solution sitting long enough, eventually all steel wool remnants will dissolve. And you can save the solution for future projects. Using a foam brush, paint on the solution. The wood will almost instantly turn gray, and over the next 10 minutes, it will get even darker.
Step 4: Sand & Finish
After the wood has dried, give it a light sanding with 400-grit sandpaper. This will help lighten up the stain and even out the color. The more you sand the wood, the more you’ll remove the stain (obviously), but it can produce some unique variations in the grain – up to you, but again, be sure to experiment on some scrap wood before applying to your final project.

For the finish, I use a clear semi-gloss Poly Whey Furniture Finish from Vermont Natural Coatings. This is a really easy-to-use finish with low odor, quick dry time, and it feels great to the touch. I can’t recommend it highly enough, and you have it shipped right to you from Amazon. I like to lightly sand with 400-grit sandpaper after each coat to keep that super smooth feel, and I would recommend applying 3 coats of this finish. Be aware that the finish will change the color of the wood slightly to give it a warmer, almost tarnished hue.
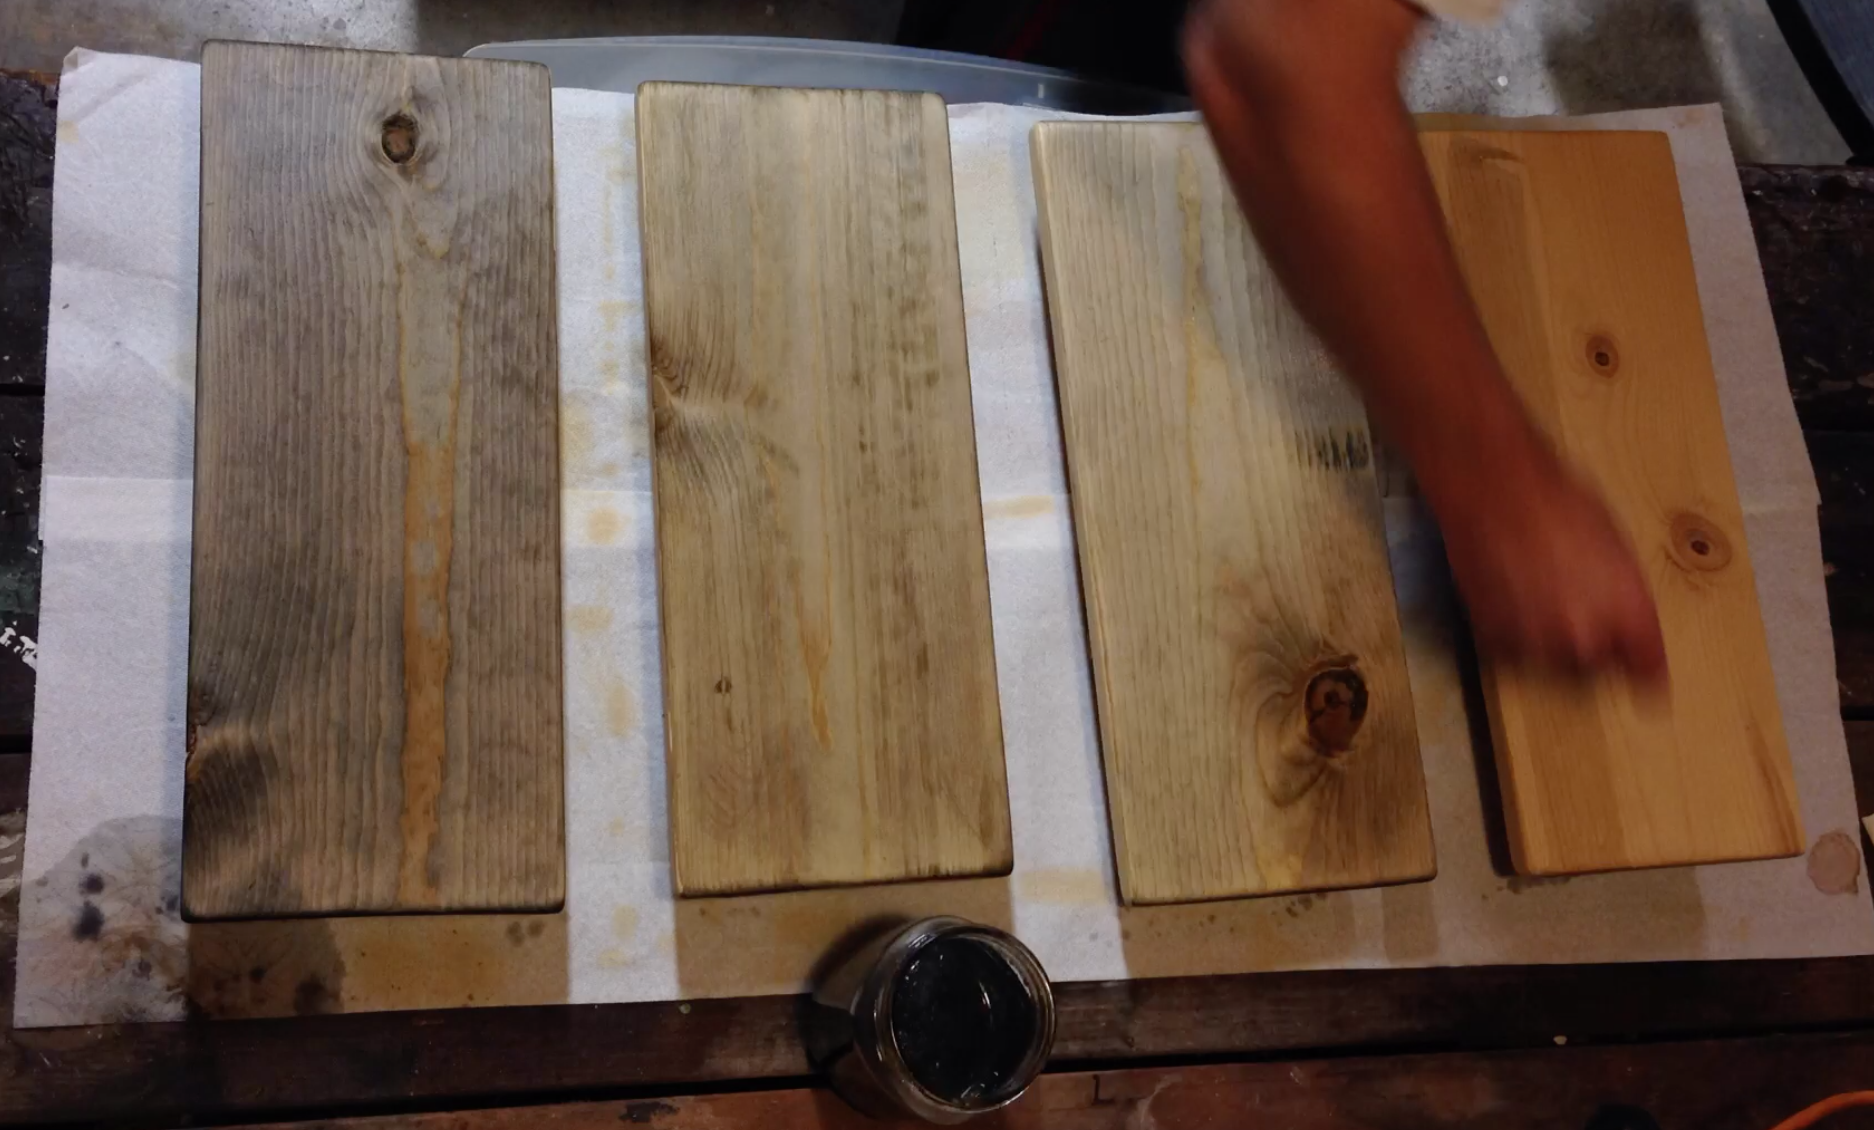
Below is a side-by-side of how far we’ve come with the unfinished pinewood (left) to wood with the tea-stain and oxidation solution (middle) to the wood with 3 coats of finish.

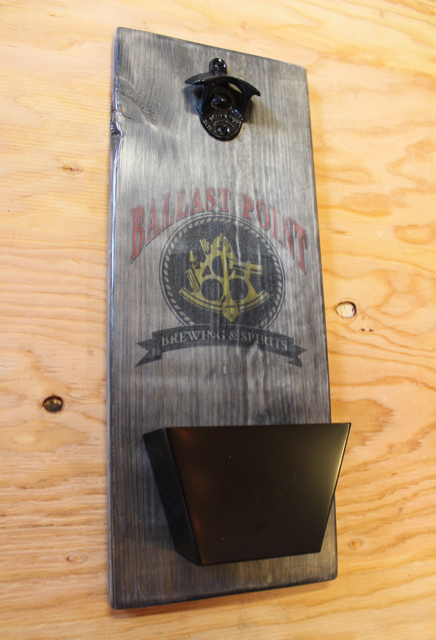
So what will you build now that you know how easy it is to get this vintage wood look? I’ve got a few projects up my sleeve, and when you think about it, the sky’s the limit. Imagine building your own farm table or a little box for holding those bathroom towels that you’re not suppose to use – whatever! Below is a wall-mount bottle open I made. My goal was to make it look like the plank of wood came from an old crate from the brewery.
Let me know if you have any ideas in the comments below, and I would love to see what you build.
And a special thank to Hillary at Friendly Home for all the inspiration for his post.

How much area would the 24oz. Solution cover?
LikeLike
Hi Kelly. That’s a great question, especially as you start to consider staining large areas. I can’t give you an answer based on personal experience, but if I use other wood stain products as a reference (like this one: http://www.minwax.com/wood-products/stains/minwax-wood-finish) then 24 ounces could cover approximately 112 square feet. That’s just a guesstimate though. Good luck!
LikeLike
Fabulous! Very informative – I will definitely give it a try for a feature wall! Thank you very much…
LikeLike
Thanks for watching, Susan!
LikeLike
Hey man. When should you do the tea? Anytime during the 4-5 day wait time for the steel wool?
LikeLike
Hi Aaron. I replied to you comment on YouTube as well – thanks for watching! Yes – You can apply the tea at anytime. Just make sure the wood is dry before applying the oxidation solution.
LikeLike
Thanks for posting this. It seems simple to do for my patio sign I have in mind. Q – Do you recommend sealing with the clear semi-gloss coat (like you used) before I finish the sign? Or after I do all the lettering etc. on the oxidized wood.
LikeLike
You’ll want to apply the finish last after you do all the letter and applying the oxidation solution.
LikeLike
Hey I was wondering about the third piece of wood in the picture, I love the color of that piece as well. What type of stain did you use for that color. Both the grey and tan looks amazing. Thanks for the info.
LikeLike
Hi Thomas. The coloring you’re seeing on that third piece was actually the result of some “yellowing” by the finish I was using. This middle piece of wood is one that just has the oxidation solution applied. Finishes can produce a bit of a yellowing from time to time, and I do like the look it produced. As always, test out your stains and finishes before doing a final product.
LikeLike
Hello, i want to try this so Just making sure. The last one was the oxidation solution applied then stain? And do you remember what stain?
LikeLike
The oxidation solution is the “stain”.
LikeLike
I made barn doors from keln dried limber to keep the twisting down on the frames, and but joint T&G as my inserts.
I want to use the rough side of the T&G with wire brushed frames go the real rustic look and feel.
Will your method work on a rough surface?
LikeLike
Applying this solution to a rough surface should work. Just be sure it gets down into the wood, and don’t worry too much about saturating the surface. Areas that received more solution than others won’t look any different. You also will want to use a course brush for application, of course 🙂
LikeLike
I wonder if doing the tea trick to add tannins to pine would allow you to fume it with ammonia. Fuming with ammonia is used on oak (which has lots of tannins naturally) to age it. I might experiment with that.
LikeLike
I tried this on a test piece of oak plywood after letting the solution sit for 24 hours and my board looks black. I haven’t sanded it yet, but I’m worried something went wrong. Is this a normal response?
Thank you!
Erin
LikeLike
I haven’t tried this with oak, but i experienced the same thing with pine – it almost had a charcoal finish to it. Sanding (very lightly) will help tone down the black. I also noticed that the colored lighted up after applying my finish.
LikeLike
Thank you so much! I’m new to this and I’m in a woodshop class building some furniture for my home. I should have my piece lol it together by next week, so just trying to decide on my finishes and trim. I saw your video on how to age and it is beautiful. I really hope to accomplish the same look on my oak. But I’ll keep working my test piece with sanding to see what I get. Thank you for your reply. 🙂
LikeLike
Oak has a lot of tannins in it naturally. You might try skipping the tea step.
LikeLike
Could you do this with a butcher block island countertop and safely seal it?
LikeLike
It should work! Just make sure you’re using a food-safe finish to seal the wood. Sounds like an awesome project.
LikeLike
What wood did you use in the demonstration? Is that cedar or pine?
LikeLike
I used pine wood in this video. I’m hoping to make a new video soon to test the solution on a variety of woods.
LikeLike
I have been working with this recipe/method now for several days and my white board pine is getting too BROWN… I really want the grays. Any suggestions??
LikeLike
I’m not sure what could be causing that. I’m going to make a new video here soon to test out what variables affect color. How much steel wool did you use?
LikeLike
Is this video with the species white pine or yellow pine?
LikeLike
I think it was yellow pine.
LikeLike
Hi There, can’t wait to try this out. For a finish, is it okay to varnish with an oil based or water based varnish, or could I use Tung Oil?……Thanks
LikeLike
It should be, but always test your finished before applying your final project.
LikeLike
Those look beautiful. Going to try this on some 2×6 Doug Fir’s for a bunk bed set. We like the darker, “pre finished” look. Any tips on how to retain the darker color?
Best,
Ben
LikeLike
Hi Ben. Thanks! I haven’t done this myself, so test it first, but imagine applying a second coat (or multiple coats for that matter) would help produce a darker color. Good look! Would love to see a picture of the bunk beds.
LikeLike
and how did you get that picture on wood? some photo/drawing transfering?
LikeLike
I used this method: https://gadgetsandgrain.com/2016/06/05/how-to-print-on-wood-sort-of/
LikeLike
What about instant tea, would it work?
LikeLike
Not sure, but test it, and let me know how it turns out. I think it should work.
LikeLike
Hi! I’m REALLY excited about trying this. We’ve been looking for the perfect weathered grey and have purchased multiple stains to no avail. My one question is did you apply the steel/vinegar 3 times or do you mean you applied each of the solutions once?
LikeLike
I applied just one coast of the steel wool/vinegar solution. I just used three different boards in this video because I was working multiple projects.
LikeLike
My oak wood has been sanded, I want to oxidize with your method. Due to it being sanded, should I leave the steel wool in for a shorter amount of time?
LikeLike
Interesting question, and I don’t know at this time. I want to make a follow up video about how differing lengths of time affect the strength of the solution. If you can, test this on a piece of scrap oak and see how it turns out.
LikeLike
Have I done something wrong?
LikeLike
We recently tried this and our furniture came out a rusty color. Can you think of what might have gone wrong? I know my husband used fine wool and not superfine.
LikeLike
I’m not sure what could be going on Steph. What kind of wood is the furniture? Did your husband also apply a finish?
LikeLike
Hi. I loved this and want to do it on my knotty pine ceiling boards. Is there a combination or ratio of steel wool to Vinegar that gives a more griege or beigy gray color than such a full gray color?? Thank you.
LikeLike
I’m not sure if it will give you the exact color you’re looking for, but if you apply coffee instead of tea. That will give you more of a grey-brown. Test it out and see what you think.
LikeLike
I would like to have the dark steel stain with a little whiter undercoat ant suggestions?
LikeLike
Try using a really light colored wood like pine and after applying the steel wool stain, sand the wood to reveal more of the base wood color.
LikeLike
Do you think brew coffee will work also instead of tea?
LikeLike
Yes, but it will give you more of brown, rusty look.
LikeLike
Hi man. I’m using your idea to upcycle a dining. One small problem – I live in Ireland and I can’t get your Polywhey Furniture Finish. Can you recommend a close second best? Brilliant tutorial, thanks for the inspiration. Ed
LikeLike
Hi Ed. Sorry for the late reply, but I was waiting to get a response from the Poly Whey folks to get back to me. I haven’t heard from them, so the best I can tell you is to use any polyurethane that has the finish you want. Good luck!
LikeLike
I wonder if it is crucial that the Wood is new and untreated, or if it is possible to sand down and oxidize some Wood that has already been treated with funiture Oil and a finisher?
Thank you for a great guide!
LikeLike
This will not work very well to any wood that already has a finish or varnish on it. You would need to completely sand that away in order for the solution to penetrate the wood. Hope that helps and good luck!
LikeLike
Would that work with alder. I would like to try it on an alder guitar..
LikeLike
It should. But first buy some alder at your local hardware store and test the solution on that piece. Also, make sure you completely sand away the finish on your guitar so the solution is applied on bare wood. Good luck. Would love to see a picture.
LikeLike
Can you tell me what type of wood you used in the video? Was it cedar or pine?
LikeLike
I used pine in this video.
LikeLike
Tommy Gun Outdoors. I don’t know. Grains look great but, multiple samples and all look teak or brownish to me. No sun bleached Greys.I cut the black tea in half and added 1 more cup of water to the tea,reheated it,and at best I’m getting dirty grey with 2 coats of distilled vinegar and 000 steal wool. 5 day old ,36 hour old and 60 hour old… Also ,will the tea keep safe for days or do you have to remake fresh tea? 10 bags in two cups of water is very dark….Im going on the aged pine theory iv interpreted from your article,which should be dark or lite grey. Haven’t put a finish on yet. Will get back to you.I may have mis interpreted the grey barn board look. Thanks.
LikeLike
how did you do apply the artwork on the bottle opener?
LikeLike
I printed a design on wax paper with an inkjet printer and transferred it to the wood after applying this oxidation solution. I made a video on this technique as well: https://gadgetsandgrain.com/2016/06/05/how-to-print-on-wood-sort-of/
LikeLike
Hi. I made the vinegar and steel wool solution, BUT it went total brown like rust, why ?? I used the normal household clear vinegar that you make food with like pickles and a large among of steelwool, already 3 days later it went brown, I have seen some use the same type of vinegar on Youtube, is there a difference on the type?, here in denmark it’s called (lager eddike) wine vinegar is what google translate it to, contains fermented vinegar from (water and fermented alcohol) with E223 preservative and (Natriumdisulfit) sodium metabisulphite. What was wrong ???
LikeLike
I found out that it shall only be within 24 houres, then remove the steelwool
LikeLike
What type of wood are you using?
LikeLike
What kind of finish could I use to ensure I keep the grey color, like in the second board?
LikeLike
I don’t have a good answer for that at this time. I’m hoping to run some more tests and post a new video.
LikeLike
Does tea or coffee have to be hot?
LikeLike
Not when you are applying it on the wood – no.
LikeLike
I let the solution sit for 4+ days, used the black tea and applied them to cedar. It got slightly darker and had a very light gray tint, but never got close to the dark gray look as expected. Is there something else that I could try? Thanks.
LikeLike
Cedar might behave different than the pine I used in my video. Try testing it with more steel wool to make the solution more concentrated.
LikeLike
Hello, thank you for your creative experiments. I have ammonia for fuming oak, wondering if you know whether it would be too strong a reaction ( aka dangerous!) to try the steel wool in a jar of ammonia?
Thanks!
LikeLike
(Also should add I want to try this on pine, thx!)
LikeLike
I’m no chemistry expert so I would do more research. Anyone else have thoughts here?
LikeLike
Hello, thank you for your creative experiments. I have ammonia for fuming oak, wondering if you know whether it would be too strong a reaction ( aka dangerous!) to try the steel wool in a jar of ammonia?
Thanks!
LikeLike
Hello! my husband and I attempted to make the stain for a hand me down oak table that was hideous before our attempt but I digress, the color turned out amazing but half of the table is much darker than the other. It seems to have soaked up the stain more maybe? do you have any suggestions on how to remedy this? I am not aiming for perfection, rustic and flawed is more our style. Thanks in advance! (I must admit I already added another coat to the lighter side and that did not work!)
LikeLike
Hi Courtney. Since this is a chemical stain instead of a typical color stain, the reaction of the wood can be unpredictable. What could be happening here is that the wood in the table, although the same species, could have come from different lots. Each board can react to the wood differently. Hope that helps.
LikeLike
I’ve seen a lot of videos on aging wood but I like yours the best. I want to stain clear cedar. Anyone tried that yet?
Gypsypainter
LikeLike
Hello, I’m in the process of trying this method. I’m finding that the wood looks black once the vinegar solution is applied. Would you recommend adding more vinegar to the solution to lighten it?
LikeLike
You could, or it might be easier to ever-so-lightly sand the wood to back off the dark finish.
LikeLike
Can you use this method on birch veneer plywood?
LikeLike
Yes.
LikeLike
Hi…do you sand in between sanding or do you stain after you sand?
LikeLike
Both. I like to make the surface smooth before application and it help to lightly sand afterward to get rid of any residue from the stain.
LikeLike
Sorry my question was do you sand after staining…or should you sand then stain?
LikeLike
Hello. I’ve seen the video and I’ve done without the tea just to try.
How can I remove the smell from the vinegar in the wood?
I’ve just applied it some hours ago. Will it disappear?
Thanks in advance.
LikeLike
The smell will go away after the solution has fully dried in the wood.
LikeLike
Hi
I used vinegar and steel wool and now my wood looks very orange. I am not sure what to do? I just read your blog after I applied it. Can I apply the black tea on top of it ? or should I sand it and repeat the process from the beginning?
LikeLike
Hi Sarah. What type of wood are you using? Is the wood unfinished? Since the black tea only provides and ever-so-slight grey tint to the wood, I’m not sure that it will balance out an already orange tint. Let me know what kind of wood you are using and we’ll trouble shoot from there.
LikeLike
hello there, thanks for sharing, this is a rock solid stain! I tried searching for 0000 grade wool on my country with no luck, any advise using other ? I just found one marked as “Abrasion Level: Hard Work”
LikeLike
Hi Luis, you can use other steel wool that is thicker. You might just have to wait longer for the wool to dissolve in the vinegar to get the solution to the right potency.
LikeLike
I work a lot with red oak and birch plywood, sometimes I want to put darker colors in the deeper grain.Can you color the vinegar water to give it red tones or will it basically go black…..Mike Modesto ca.
LikeLike
Hey Mike. Really interesting question, and I’m just going to venture a guess since I haven’t added any colors to the solution before. Since the solution is basically an active chemical reaction between the vinegar and the steel wool, I would not add any colors to tint the wood. Rather, I would tint the wood before applying the solution. To get red, I’ve seen people use look-aid or you could even use some commercial stains that are red. I am going to make a follow up video to answer all these questions down the road, but I hope the answer helps for now. Test some things out and let me know how it turns out. My email is jeremy [at] gadgetsandgrain [dot] com
LikeLike
Will poplar wood produce the same look/color as the pine used in the video?
LikeLike
I’m not sure – I haven’t tested it on poplar. Buy a small piece of poplar and give it a try.
LikeLike
Steel wool 2 days in the white vinegar…very little change in the color of the vinegar…still almost clear. Will it get “cloudy” or what? Looking for deep gray on pine.
LikeLike
The vinegar itself might not change color as the steel wool dissolves.
LikeLike
Thanks for the great method. I would like to weather an outdoor sofa I am building. Do you think there would be any problem if I use an outdoor polyurethane finish over the stained wood?
LikeLike
No issues that I am aware of. If you can, test the stain and then the poly on some scrap wood to see how they react, but it should work just fine.
LikeLike
do you use white vinegar or distilled white vinegar?
LikeLike
I used distilled white vinegar.
LikeLike