It is so satisfying to take an idea, a pile of lumber and turn it into a one-of-a-kind creation like a dining table, entertainment console or workbench. But most of the time, you’ll want to add some character to your project – perhaps make it look like it has more miles on it than it really does – and one easy way to do that is to stain it with a homemade oxidation solution made of steel wool and vinegar.
This is a really popular method of aging wood in a matter of minutes, and I made a video about it back in 2016. Since then, I received hundreds of questions about the recipe, spanning from queries about results using different wood species to troubleshooting shades that turned out different than what I showed in my video. Rather than continuing to reply to many questions with an “I don’t know”, I decided to give this video another attempt. Sit back as we dive headlong into “The Great Wood Oxidation Experiment”.
Keep scrolling to see the recipe for this oxidation solution, but if you want to get a bit of background, let’s start with asking the question…
What Is Oxidation And Why Does Wood Change Color As It Ages?
Oxidation is the natural process that wood undergoes as it ages. Over time, the exposure to oxygen and UV light from the sun cause a board to either lighten or darken – depending on the wood species. Repeated changes in moisture and exposure to elements like wind and rain can also accelerate the aging of wood. You probably see aged wood every day when you see an old cedar fence which may have an almost ebony tone to it.
And although the wood’s surface is punished in the process, an aged barn door or weathered beam has a certain appeal to it. Obtaining a “vintage” look in a project is something to which many DIYer’s aspire, but getting wood with an already rustic look can be difficult and expensive. To get around the hassle of finding the right wood, you could just create it with a simple homemade wood aging solution…
How Do You Make An Oxidation Solution With Steel Wool and Vinegar?

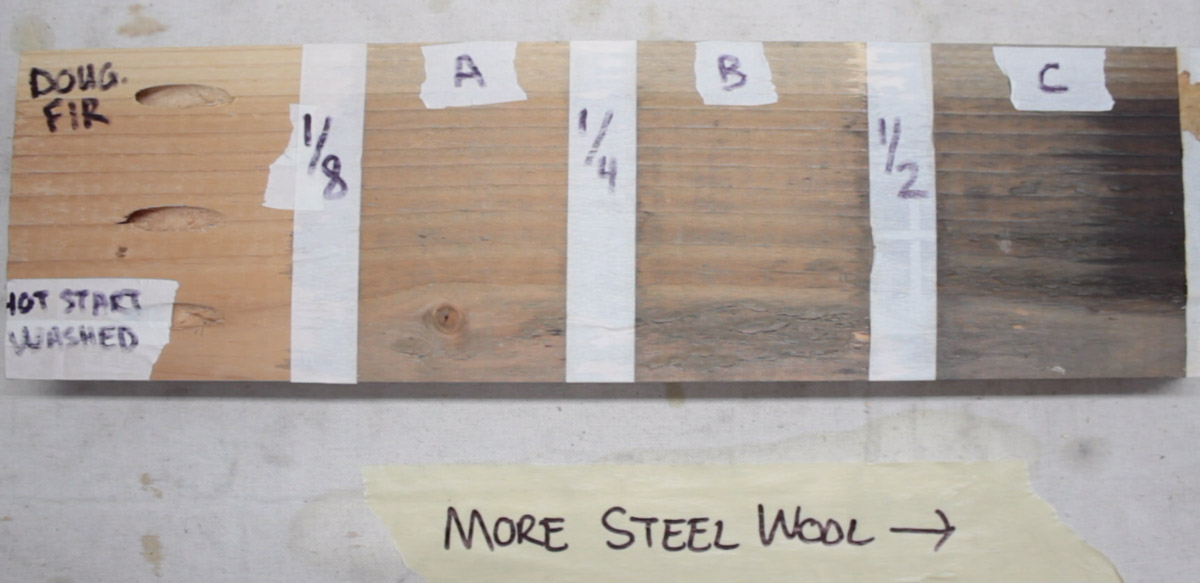
1. Portion the steel wool to achieve the desired tone while the vinegar heats to a boil. For this recipe, I normally use one half of an unrolled bundle of steel wool. If you want to achieve a different tone, the basic rule of thumb is to use less steel wool to get a lighter color and more steel wool to get a darker color.
2. Wash the steel wool with soap and water. This will remove any oils from the factory and help the vinegar to better penetrate the steel wool. Be sure to pat dry the steel wool with a paper towel.
3. Tear the steel wool into small pieces and place them in the empty mason jar.
4. While outdoors, pour the boiling vinegar over the steel wool until the mason jar is nearly full. Keep the lid off the mason jar while the vinegar reacts with the steel wool. This chemical reaction will produce hydrogen which needs to escape in an open-air space. Also make sure not to have an open flame near the solution while it is reacting. Let the solution sit for one hour.
5. Remove the steel wool from the cooled vinegar using protective gloves. Be sure to squeeze out any residual vinegar that is soaked up by the steel wool.
6. Brush on the oxidation solution to bare, unfinished wood with a disposable foam brush or rag. The oxidation process will begin immediately and it will be visually apparent in a matter of seconds. However, the full effect of the oxidation process will continue over several minutes, and it may take up to 30 minutes for the final color to appear.

7. Lightly sand the wood with 400-grit sandpaper to knock off any stain residue or dust nibs.
8. Apply a finish of your choice to seal and protect your stained project. Be aware that finished will affect the color or the stain, so read the section “How Does Finish Affect The Tone Of The Stain?” to determine which finish is appropriate for your project.
A common variation to this recipe is to apply a pre-stain with black tea or coffee to help add tannins to light wood such as pine. While testing these pre-stain methods, I also tested apple cider vinegar to see if it would produce a different result than white vinegar.

How Does This Oxidation Solution Compare To A Store-Bought Stain?
With results that can vary so widely from species to species and given the sometimes temperamental variables of this homemade aging solution, one would naturally ask “Why not just buy a stain that will produce the result you want?” – and that’s very reasonable question to ask. It’s also one I tested.

I tested three off-the-shelf stains from Varathane that would give a weathered look to new wood: a weathered gray wood stain, a weathered wood accelerator and an aged wood accelerator.

Weathered Gray Wood Stain
If you’re looking for a uniform, aged-gray tone with your project, this weather gray stain is a very straight-forward solution. Simply apply the stain to dry, bare wood with a rag, and wipe off after a few minutes. This stain gives wood an even gray tint to it while still allowing some character of the wood grain to show through. To me, the gray tone is a little more on the cooler side compared to the rather neutral tone shown on the outside of the can. This stain is a good choice if you want more uniform color across your wood. However, it might not be the ideal choice if you’re searching for a stain that preserves some of the quirky “defects” in your wood like intricate grain patterns or tonal striations.
Weathered Wood Accelerator
This weathered wood accelerator does a really good job of keeping the personality of wood while still delivering a predictable gray tone like the weathered gray stain. Unlike the gray stain, this accelerator acts very similarly to the steel wool-vinegar oxidation solution in that is performs a chemical reaction on the surface of the wood. When applied to the surface of the wood with a rag or foam brush, the grey tinting effect occurs gradually as the solution dries. Unlike the homemade aging solution, this weathered accelerator produces a consistent gray tone regardless of wood species. For that reason, if you’re dead set on achieving that authentic weather gray look, this is a great choice.
Aged Wood Accelerator
This aged wood accelerator carries the same principles of the weather wood accelerator in that it does a good job of preserving a natural wood look. The only difference with this solution is that it produces a rustic, brown-tone on wood. This product would be a great choice is you’re wanting to achieve a predictable rusty color on your project without the hassle and experimentation of the homemade oxidation solution.
For both the accelerator solutions, the final color will be achieved anywhere from 30 minutes to 1 hour, and it’s recommended to allow 2 hours for dry time. If you choose to use these accelerators, Varathane recommends that you should use a lacquer (not an oil-based or water-based polyurethane) to seal and protect the wood.
How Does Finish Affect The Tone Of The Stain?
Now let’s talk about finishing – the final factor that can (and most likely will) affect the final color of your newly aged wood. I test 5 different finishes:
- Water-based polyurethane (Varathane Ultimate blend, satin finish)
- Oil-based polyurethane (Varathane Ultimate blend, satin finish)
- Marine spar vanish (Total Boat Gleam 2.0, satin finish)
- Tung oil (Watco)
- Spray lacquer (crystal clear, stain finish)

Using all the same variables such as wood type and stain method, I tested all five finishing methods:

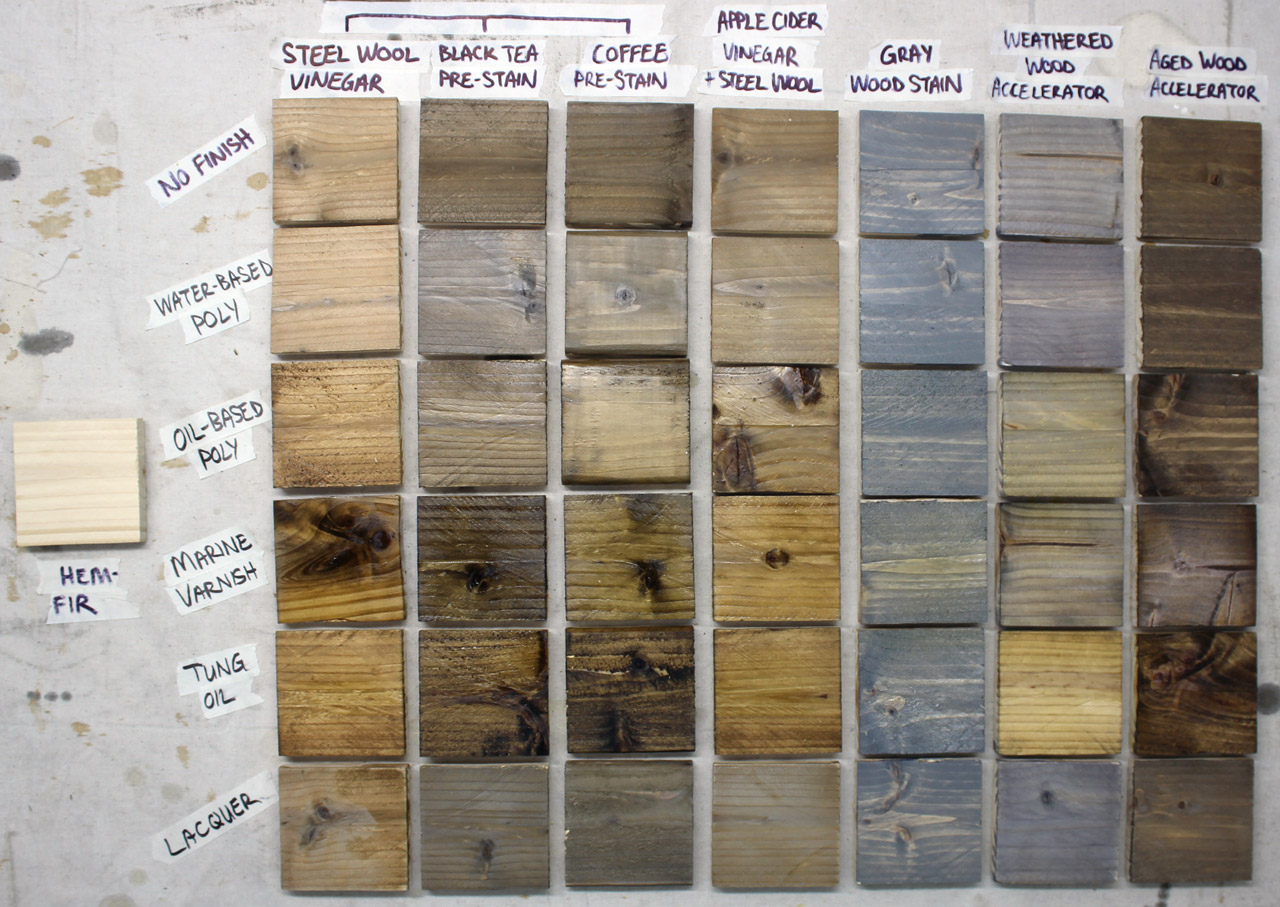

Each finish produced a slightly different look. Here are my observations:
- Water-based poly has virtually no effect on the final wood color. While providing strong protection, water-based polyurethane does a good job maintaining the original aged color from the oxidation solution and stains. Some lighter wood may see a ever-so-slight warming of their color, but for the most part, this is a simple, affordable method for protecting your aged wood.
- Oil-based poly tends to produce a yellowing of the wood. On top of having a longer drying time than water-based poly, this method adds a warming tint to wood.
- Marine finish contributes to a slight warming of the wood’s color. Compared to the oil-based poly, this finish does not produce as drastic warming effect of the wood’s color, and it provides a superior protective finish that is more suited for outdoor applications.
- Tung oil has a heavy warming and yellowing effect on the wood’s tone. This is not an ideal choice to help maintain the original weathered tone of a stain or oxidation solution.
- Spray lacquer has virtually no effect to some woods while producing slight gray tone on other. This finish performs best on the weathered and aged wood accelerators, but it had a slight graying effect on woods using the other aging methods.
How Does This Oxidation Solution Look On Different Wood Types?
Even with the right solution or stain and finish, the last and perhaps even most important variable to consider is wood species. The type of wood used has a drastic effect on the final outcome – just look at the difference between pine and Douglas fir! Although I didn’t perform the same combination of experiments for the wood samples below, I think the references will help guide you to when determining which outcome you’ll likely achieve with a respective wood type. Let’s take a look…

Final Thoughts
Ultimately, go with whatever method makes the most sense to you depending on how much time and/or money you want to invest into that perfect vintage/aged look for your woodworking project. Just be sure to always test a variety of colors be settling on your final choice, so that means having enough scrap wood to devote to staining experimentation.
Let me know if you have any questions, and I would be happy to get back to you. Also, if you have any projects that you done using these staining methods, feel free to email me at jeremy [at] gadgetsandgrain [dot] com and I would love to post them here for others to see.
Now, like I said in the video, I need to figure out what to do with all these scrap wood squares from this experiment. Shoot me a line if you have any ideas!

Great look at a wide variety of woods, techniques and very clearly presented!
LikeLike
Thanks, Erc. Appreciate you stopping by!
LikeLike
Love! Love! Love this! Thanks so much!
Question: If I want to do an image transfer (I saw your YouTube video using ink jet printer on wax paper), do I have to worry about the clarity of the image if I do the transfer on TOP of the stain (considering black tea layered with steel wool/vinegar on top of pine wood for a gray, patina, barn wood look)? The image is solid with blue, cream and red coloring.
Can you advise?
LikeLike
Hey Cassandra. Thanks for the comment. You do have to take all of that into account. If your gray is really dark, then your transfer image will darken significantly as well – that transfer method basically combines with the color of your wood and stain. Test it with a scrap price and see how you like it. Maybe use less steel wool to get a finish that doesn’t darken your graphic as much. Hope that helps. Just curious, what are you making?
LikeLike
Thanks for your swift reply! I’m gonna stain a natural wood crate, line it with burlap and fill it with gifts for a friend’s 50th birthday. I wanted to transfer an image onto the crate to personalize it a bit.
LikeLike
Hi, great video!! I am concerned about the reaction to hardware, nails and screws on a piece of treated piece. I’m worried that they will rust and leach out onto the furniture . Thank you
LikeLike
Thank you for taking the time to pull all of these techniques together. After seeing nice but $$$ tables and other furniture on Pinterest, I’m building the confidence to start making my own. Without having readily available distressed wood this video and comments provides much of what I need. This video and comments are now bookmarked in my browser.
LikeLike
Thanks for the kind words Greg.
LikeLike
Hi, i would like to use the oxidation process on a guitar build, and would like to use a tru oil finish, but i see you note tung oil “is not an ideal choice.” Can u please advise why this is? Will it fade over time? Have a reaction with the oil?
LikeLike
Hi Mikey. For me, the tung oil yellowed the look of the wood stain – so the results were not what I was aiming for. What wood are you going to use for your guitar? I would recommend testing the stain and tung oil on some scrap to see if you like the look.
LikeLike
Thanks for the quick reply. Thats what i thought, but as shown in your great article, i think the tung oil example you did is what i am looking for. I like the result. The body and neck are maple. Have completed tests similar to yours and i think the results are exactly what im looking to do. Im also planning on shellacking one coat prior to using the tru oil. Any other advice is totally appreciated!
LikeLike
Sounds good – no other advice from me other than to make sure your amp goes to 11 😉. Shoot me over a picture when you’re done. I’m looking to re-stain my mahogany body guitar down the road.
LikeLike
Lol, perfect. Will do, when completed, this is going to be a playable art piece thats for sure! Thanks again!
LikeLiked by 1 person
Excellent article and video! Much appreciated!
LikeLike
Really nice job.
I did not know all those différents techniques.
Thks very much from France.
LikeLike
Merci pour les mots gentils!
LikeLike
This was a real treasure to find, thank you for taking the time and tedious effort to line out all the options!
LikeLike
Appreciate that, Peter! Thanks for dropping by.
LikeLike