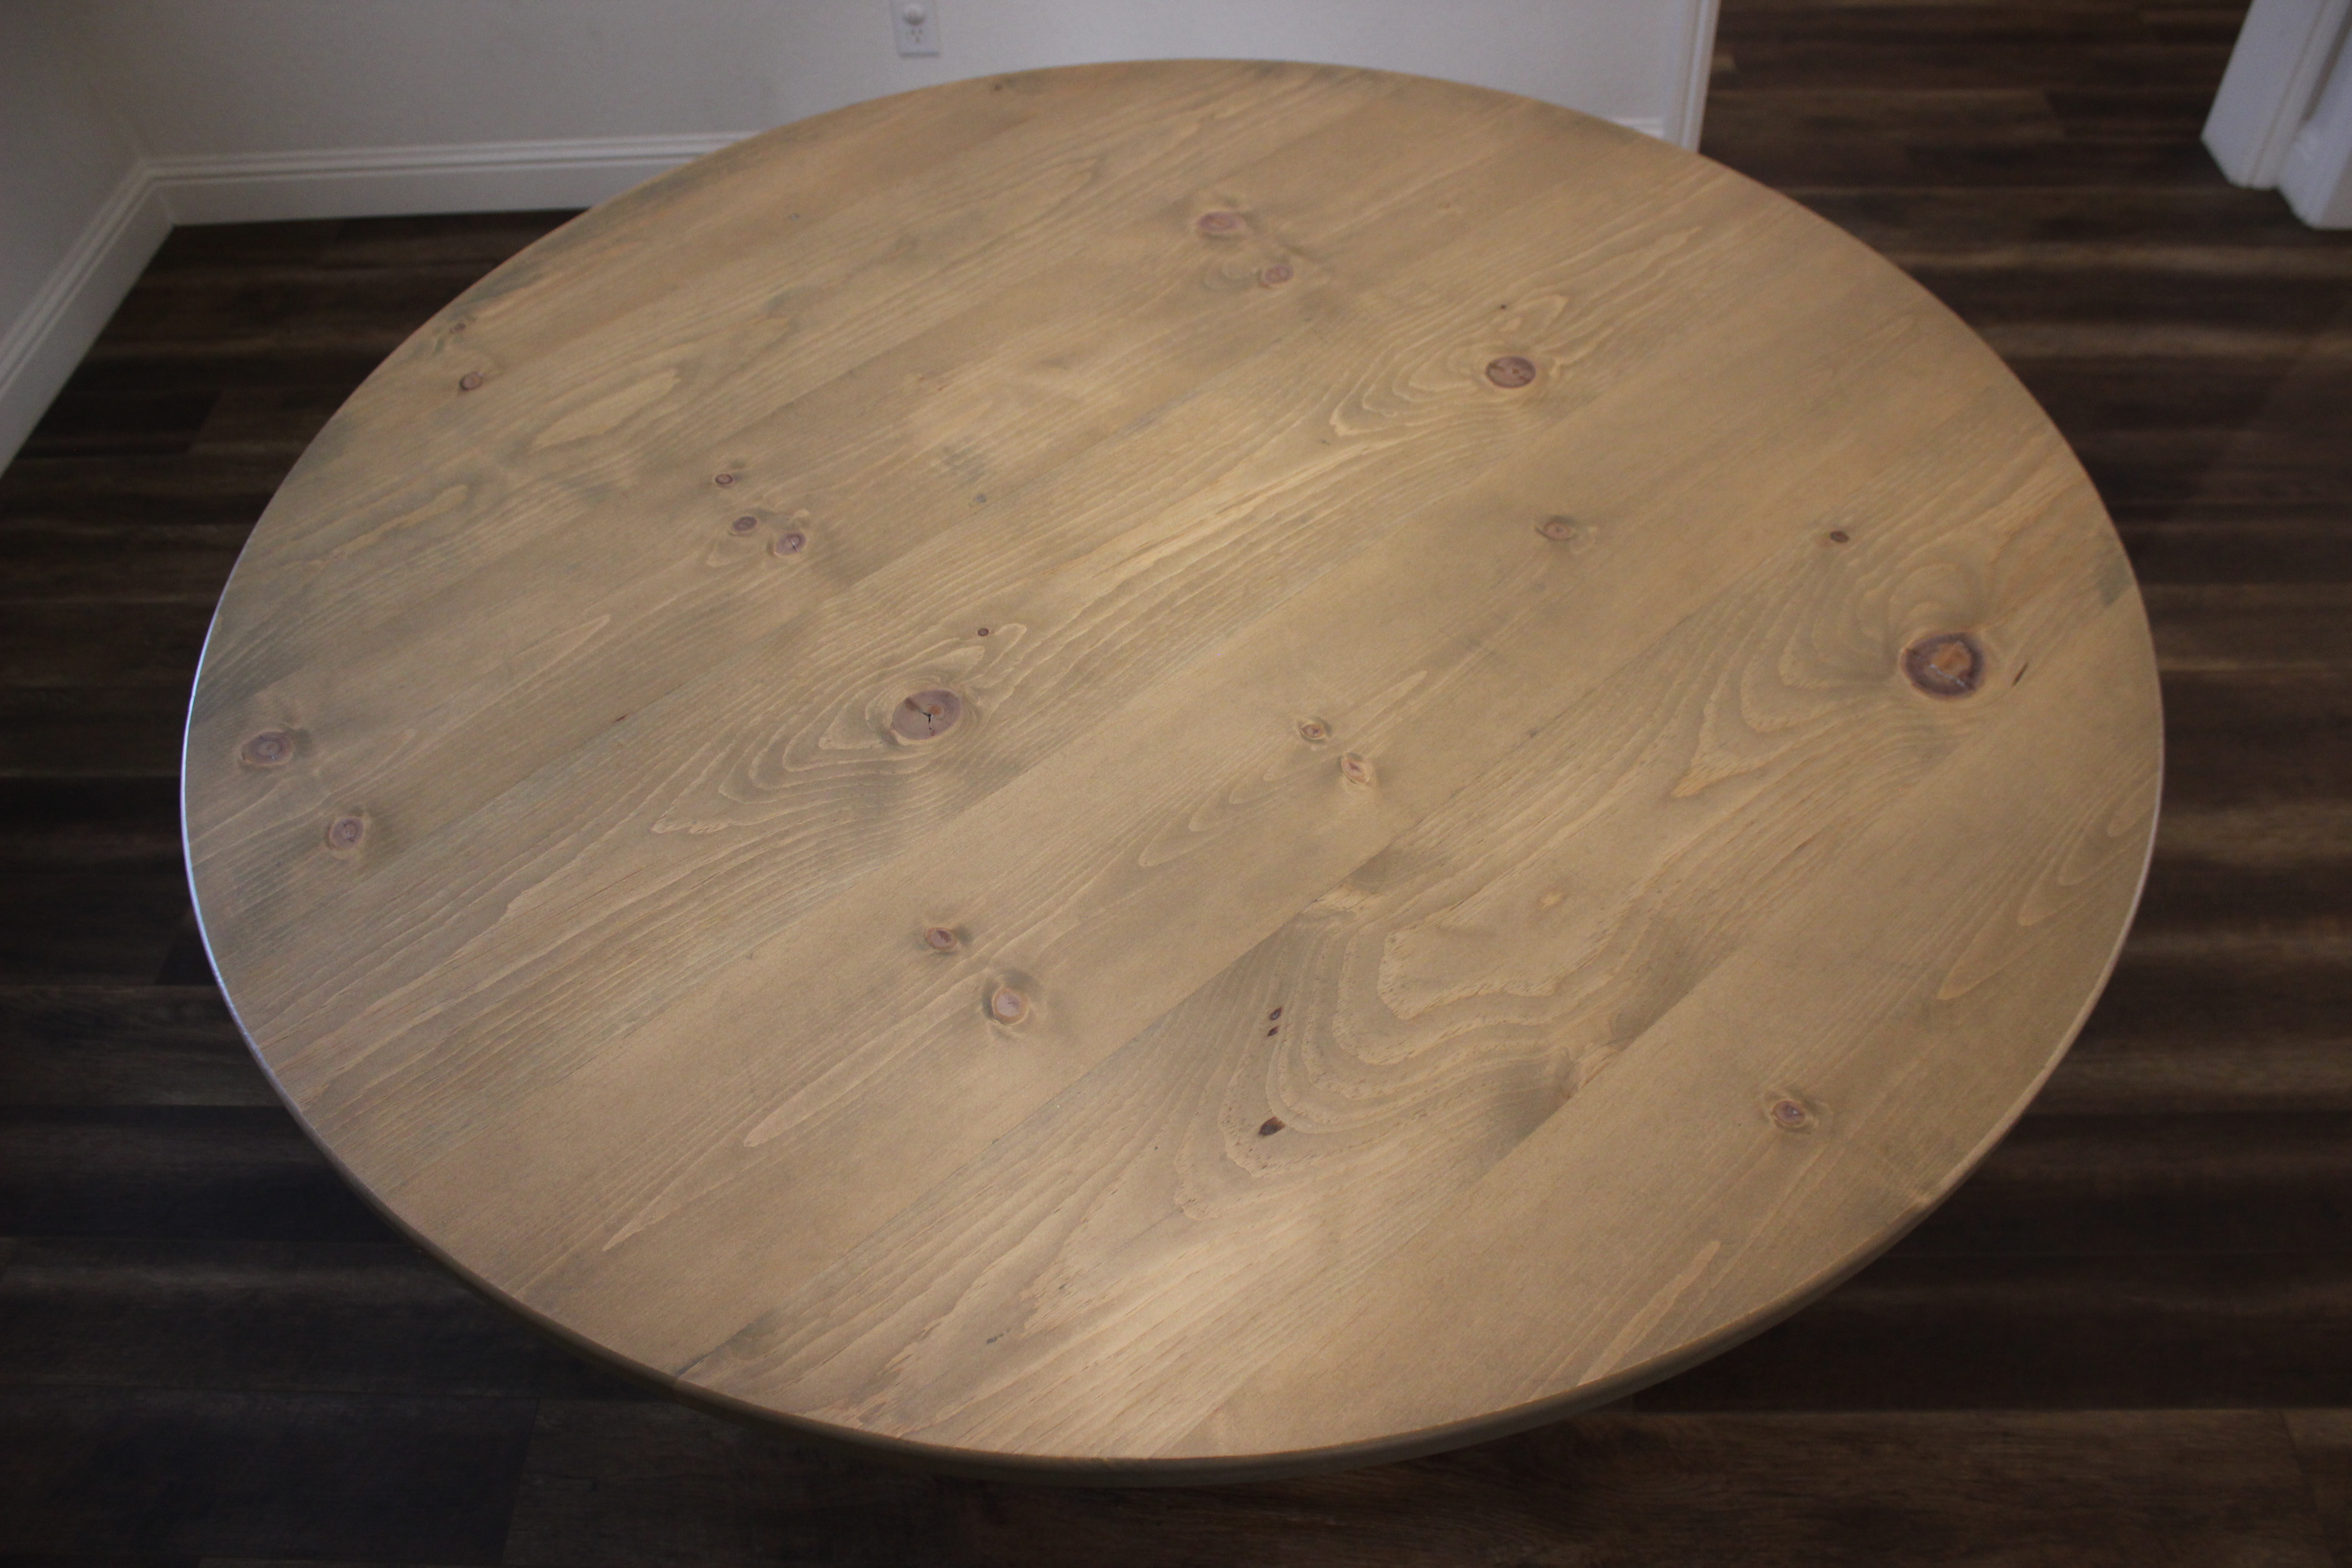
With this being the third table I have built, I wanted to do something special to challenge my skills while producing a fixture in my home that my family could enjoy for years to come. Over the course of nearly three months, squeezing in time on weekends and evenings, I build this 68-inch round dining table. With enough room to seat eight adults, it’s complete with mortise and through tenon joinery in the base and seamless joint in the perfectly round table top. To top it off, the stain is comprised of two different colors to make the plain white pine of this table sing.
Sourcing the Lumber
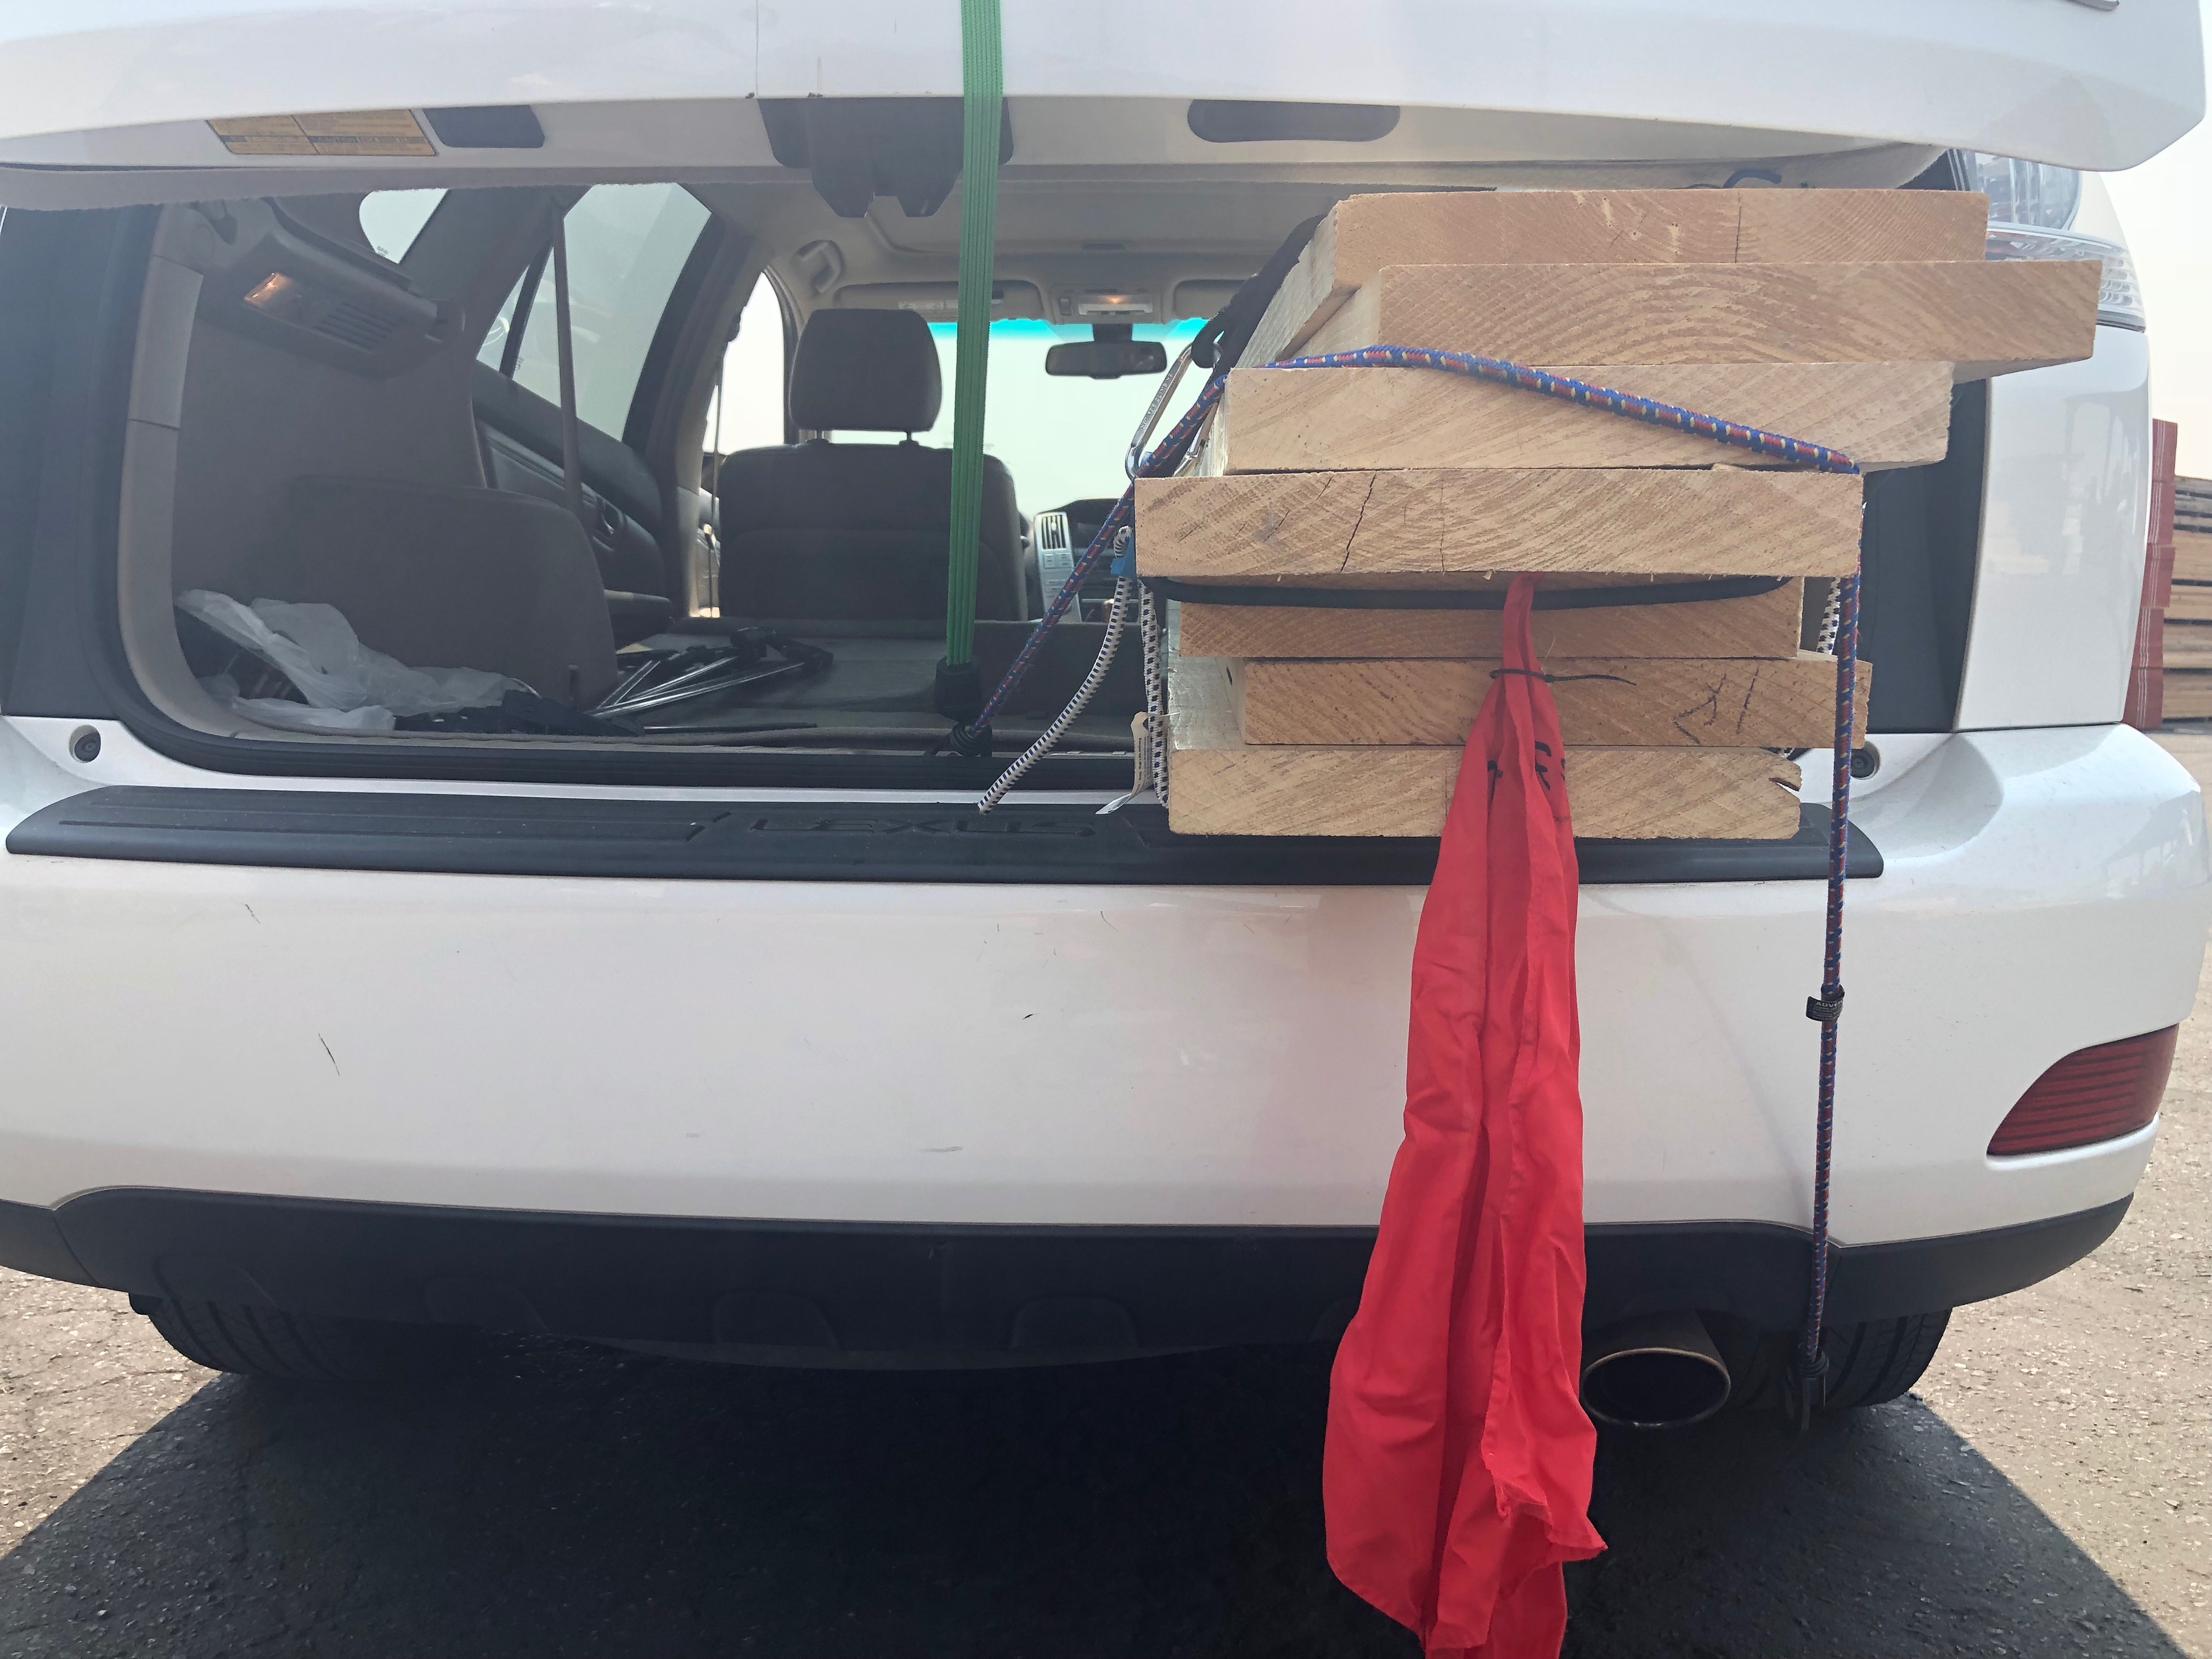
From past table builds, I learned that the lumber from a home-improvement super-center is not necessarily the best to work with when it comes to making furniture – even if it’s a purposefully rustic farmhouse table. Typical lumber at a super-center is great for construction and framing, leaving tough to find quality boards. And that means you’ll spend precious building time sort through boards with defect, cupping, warping and nasty knots.
For this table, I decided to look up a local lumber store, and I immediately noticed two big differences compared to the home centers: 1) The quality of the wood was much better and 2) the customer service was outstanding for a woodworking novice like myself.
The other big benefit of buying from a smaller lumber store is that they usually offer a wider variety of wood species, opening up the possibilities of using some nice (but pricey) hardwoods. For this project I went with white pine, and the folks at lumber store were nice enough to plane the boards for me.

My goal for the project was to produce a 72-inch round table, and doing some quick calculations at home, I determined nine 8-foot 2 x 12 boards would be needed. However, I made some mistakes during the build, and I ended having to make a 68-inch table, so if you’d like to try this project, I recommend going with ten boards (again, 8-foot 2 x 12s).
How to make a circular table top
1. Sort through the boards, picking the absolute best ones – free of defects and knots. Make light markings with the pencil on the boards that are ideal for particular pieces such as table top, legs, stretchers, etc.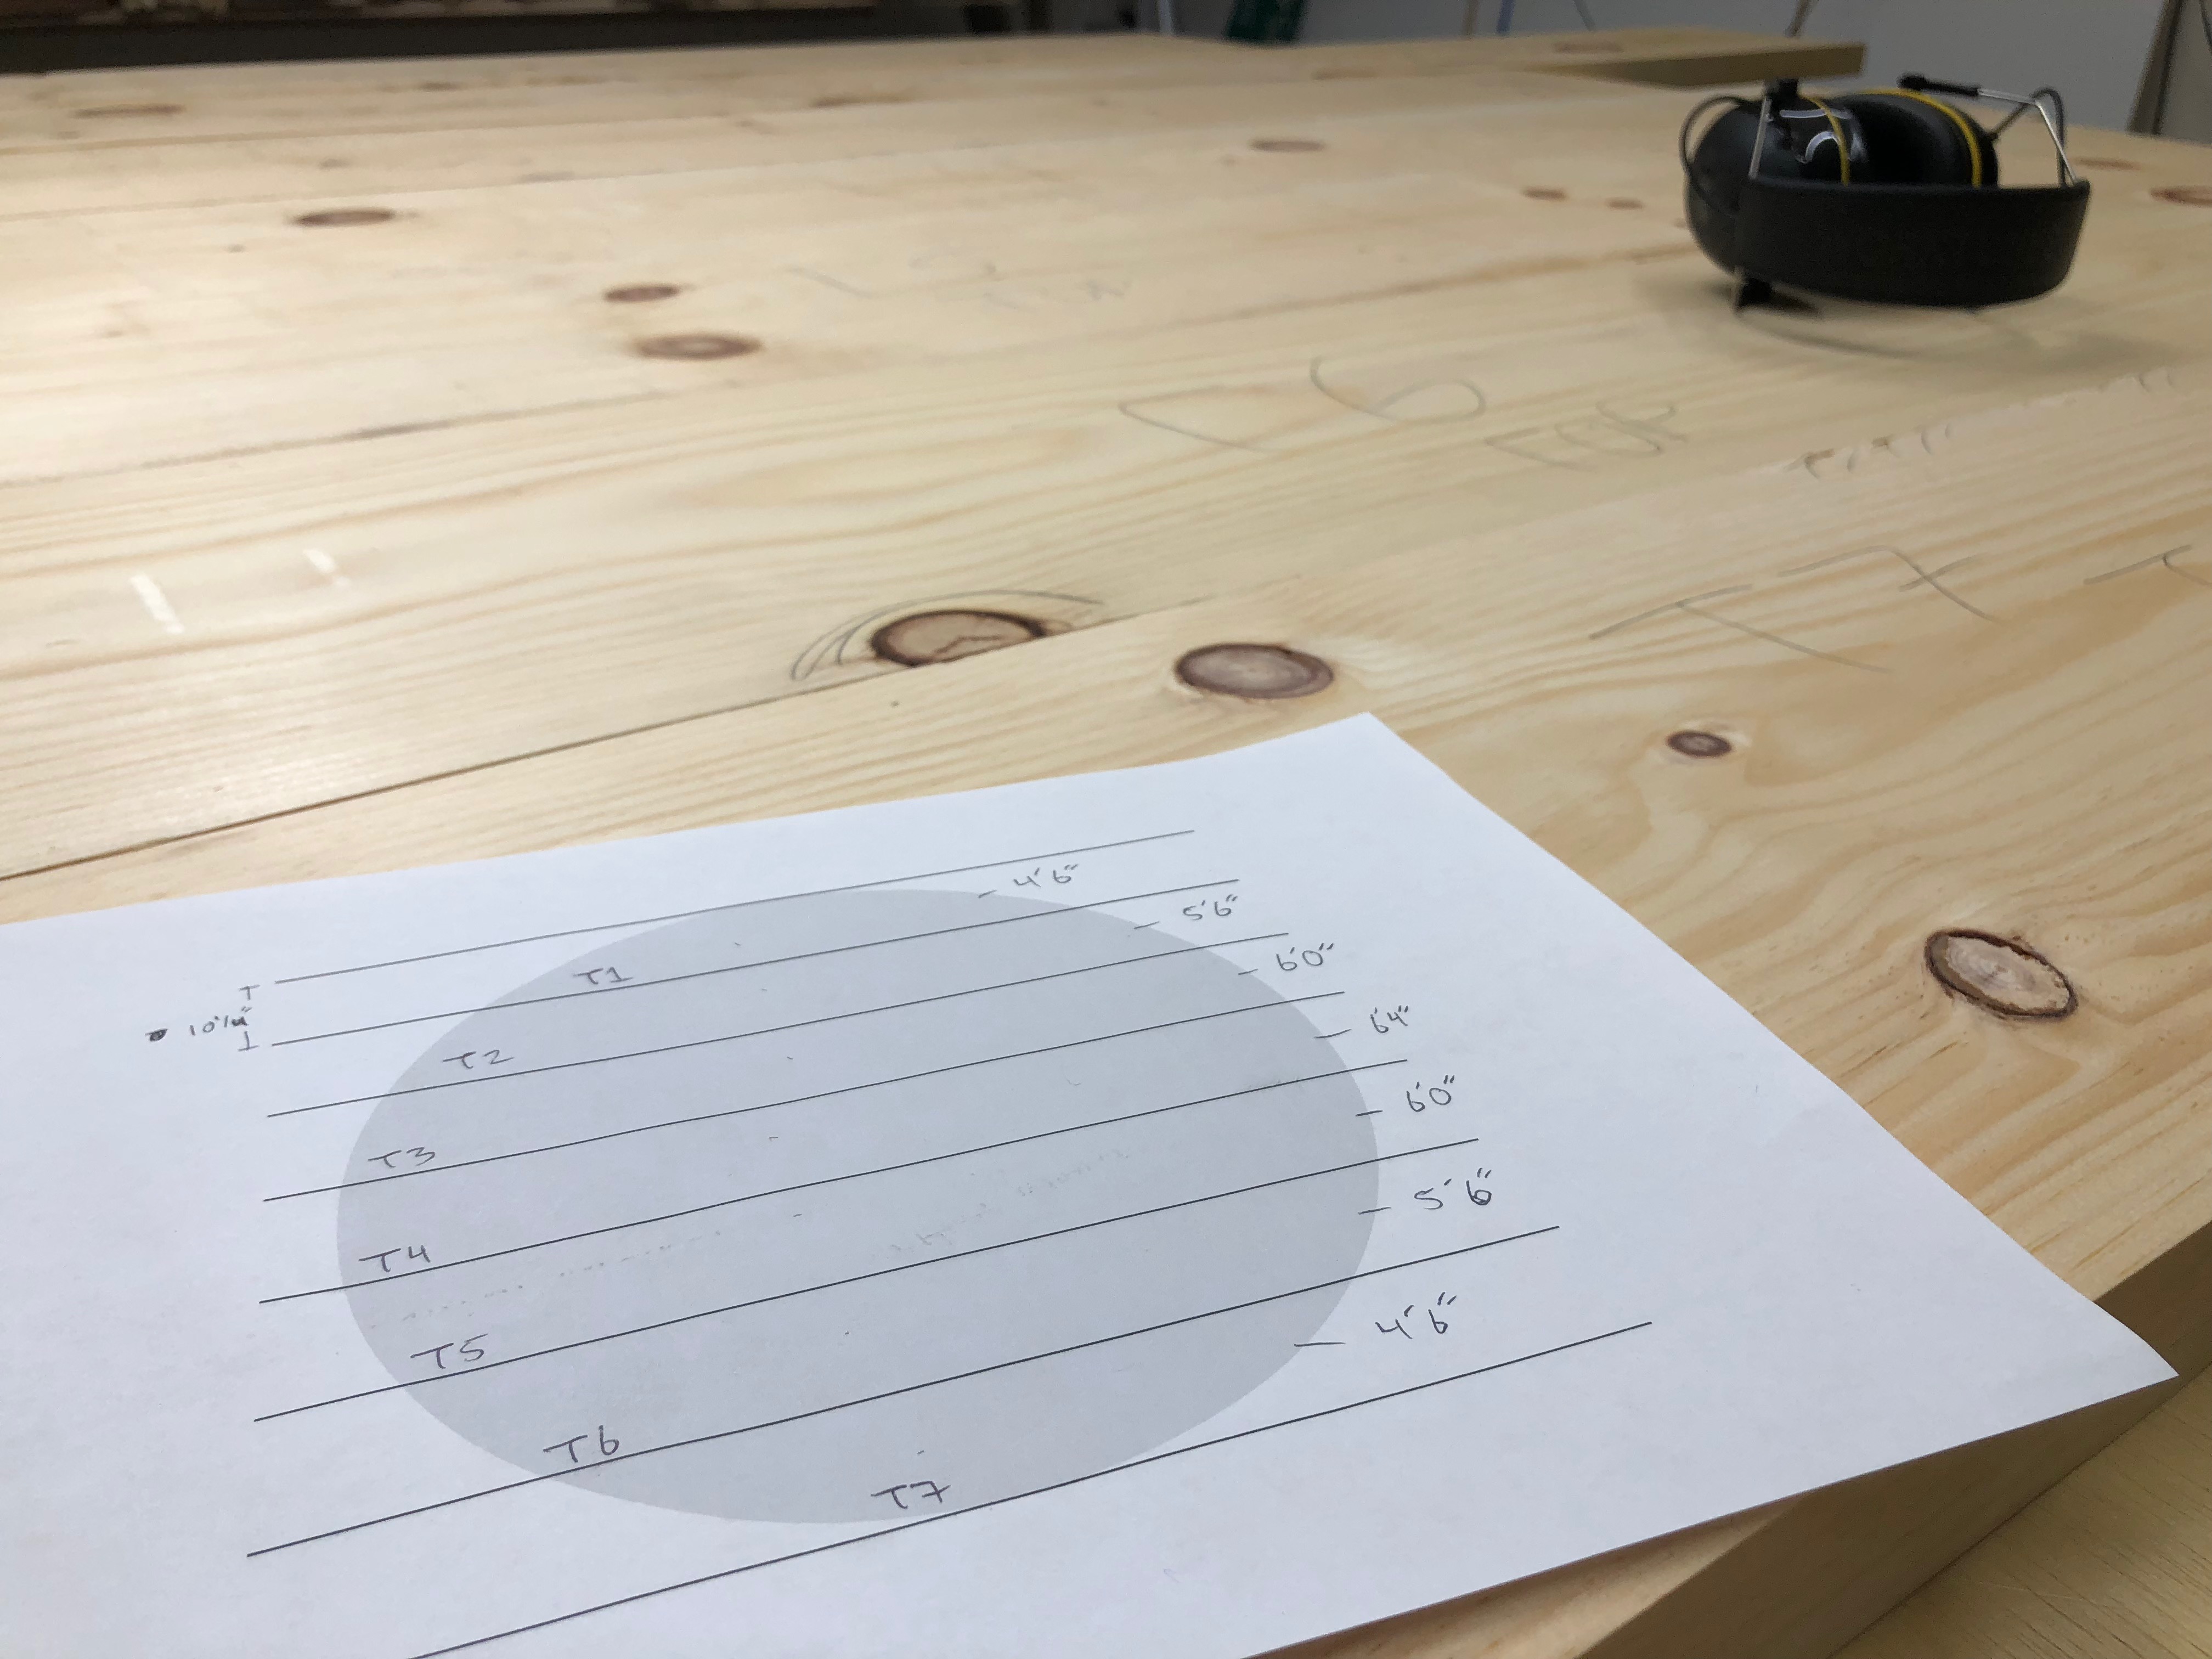
2. Rip the table top boards to clean up there edges. Along with cutting away defects on the boards, this ensures the boards will be flush when gluing them together. I used a table saw for this, and for most, that will work just fine, but I know that this job is best left a planer/jointer if you have one.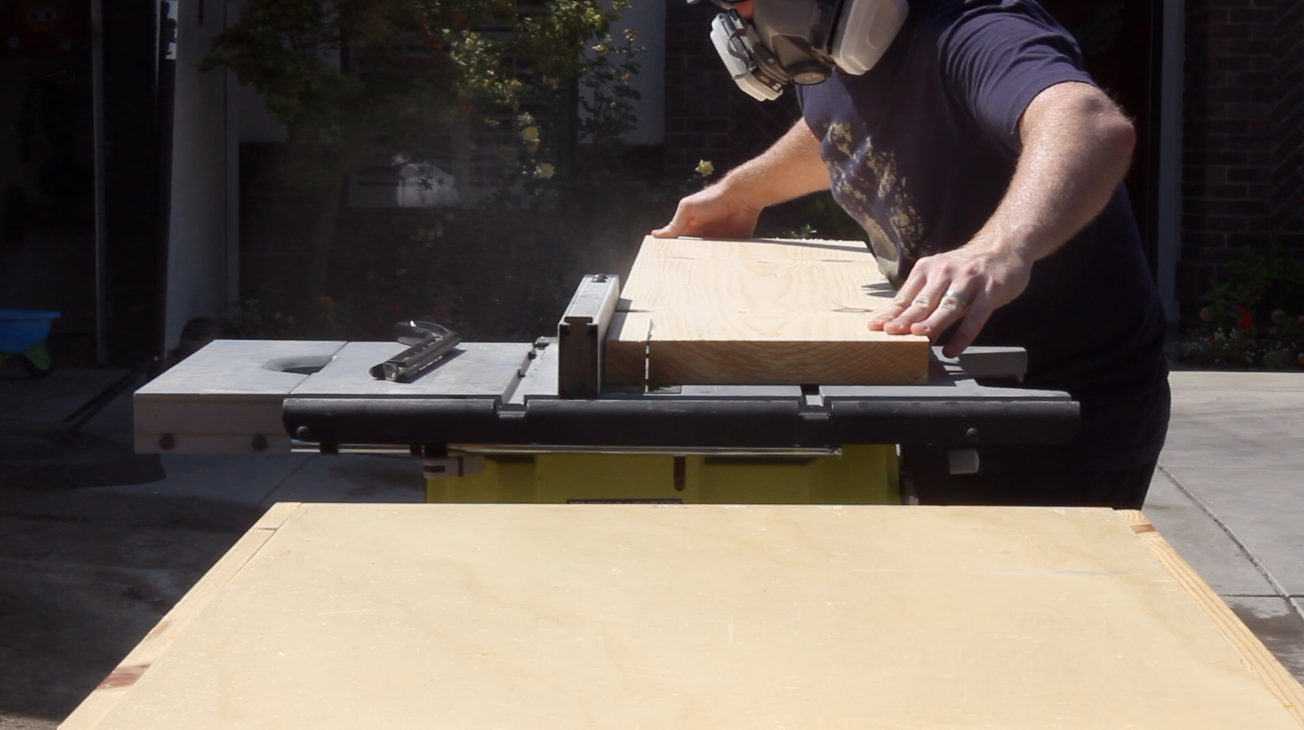
3. Line up the boards with the best sides for the top. Do your best to match the edges of the boards taking into account grain direction – this is purely for aesthetics. Also, avoid having knots close to the edges of the table outline because they will prove to be nasty to cut through, and often times, they will split. To draw the table top outline, start by attaching a string with masking tape to the very center of the aligned boards. Then, using the desired distance from the center to indicate table radius, attach a pencil. Trace a pencil line for the circumference of the table, keep the sting taut. For a 72-inch table, which will usually fit eight chairs, use a radius of 36-inches.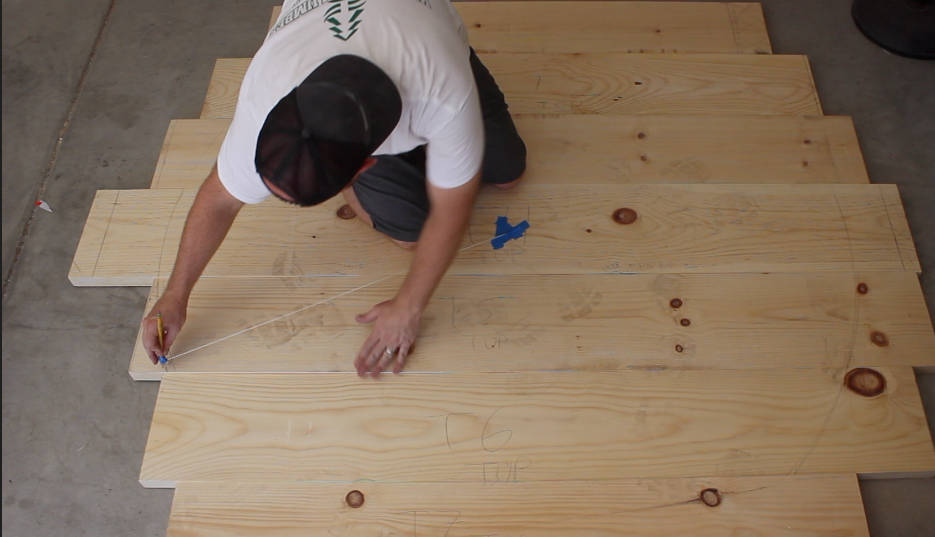
4. Cut away areas outside of the table outline with a miter saw or circular saw. This will make handling the boards much easier during glue up and beyond.
5. Prepare the boards for glue-up by drilling holes for 1/4-inch dowels. The dowels will ensure that the boards stay aligned under clamping pressure. To drill the holes for the dowels, and ensure that the holes would be aligned on joining boards, I created a homemade jig with a drilling guide and my cordless drill. The jig, admitted crude, ensures that the holes are drilled straight into the boards, and that they were a consistent distance from one another. Be sure to use the appropriate drill bit size based on the size of the dowels. There are other methods for joining boards like this – some prefer to use dominoes or pocket holes, but I found this method to be a good middle ground – I don’t have a biscuit joiner and I just didn’t want to cover pocket holes. Let me know if you see any room for improvement here.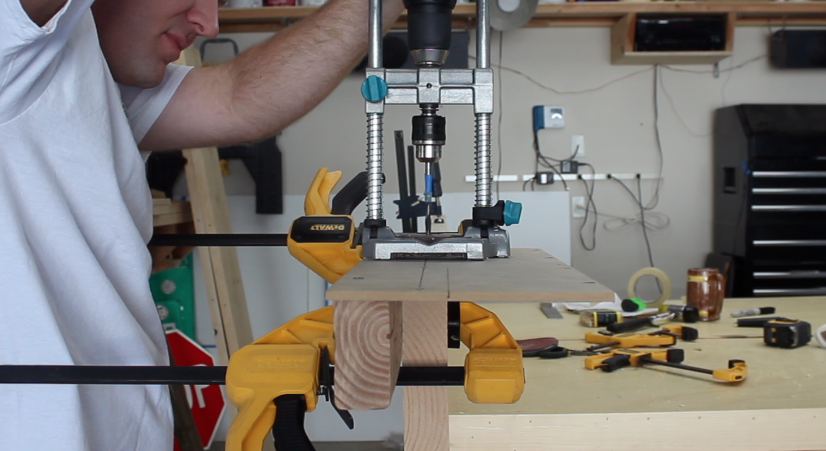
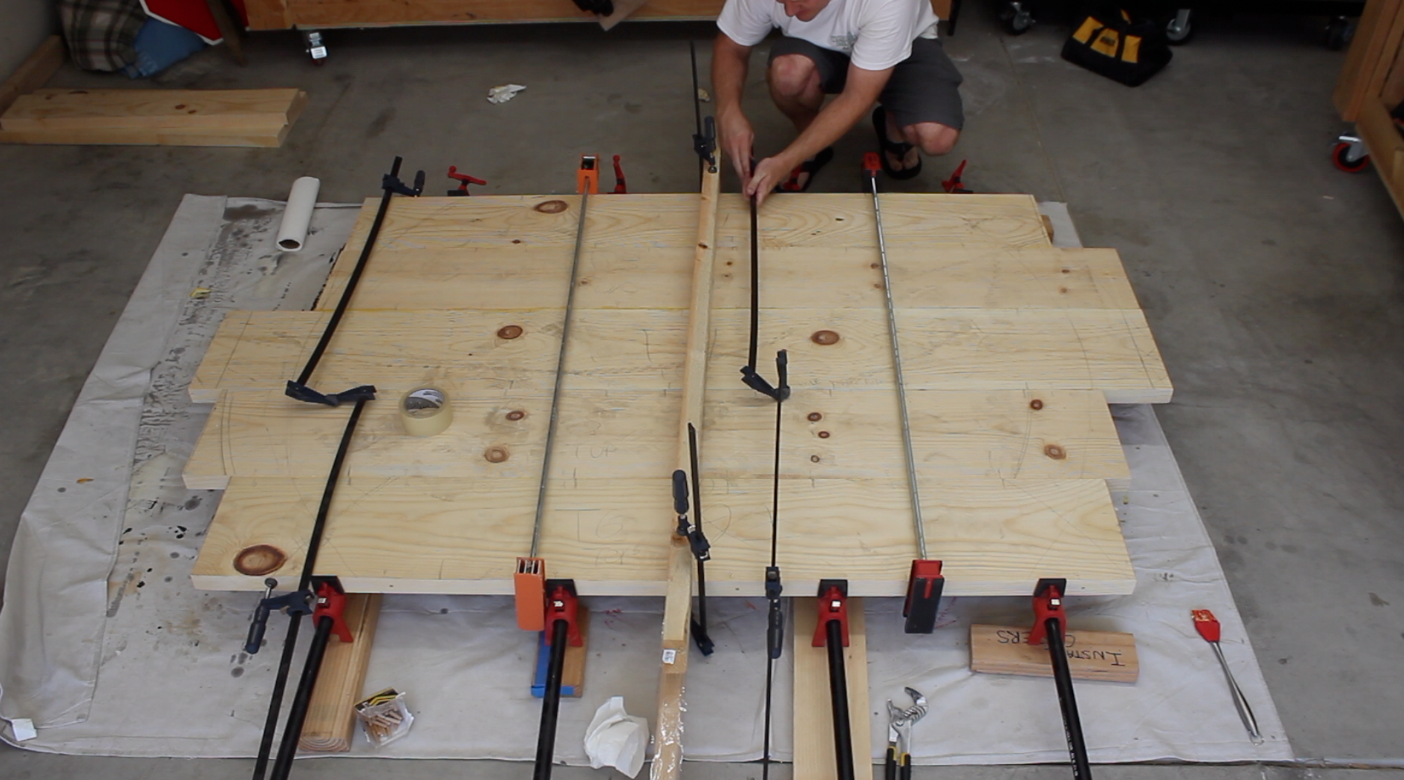
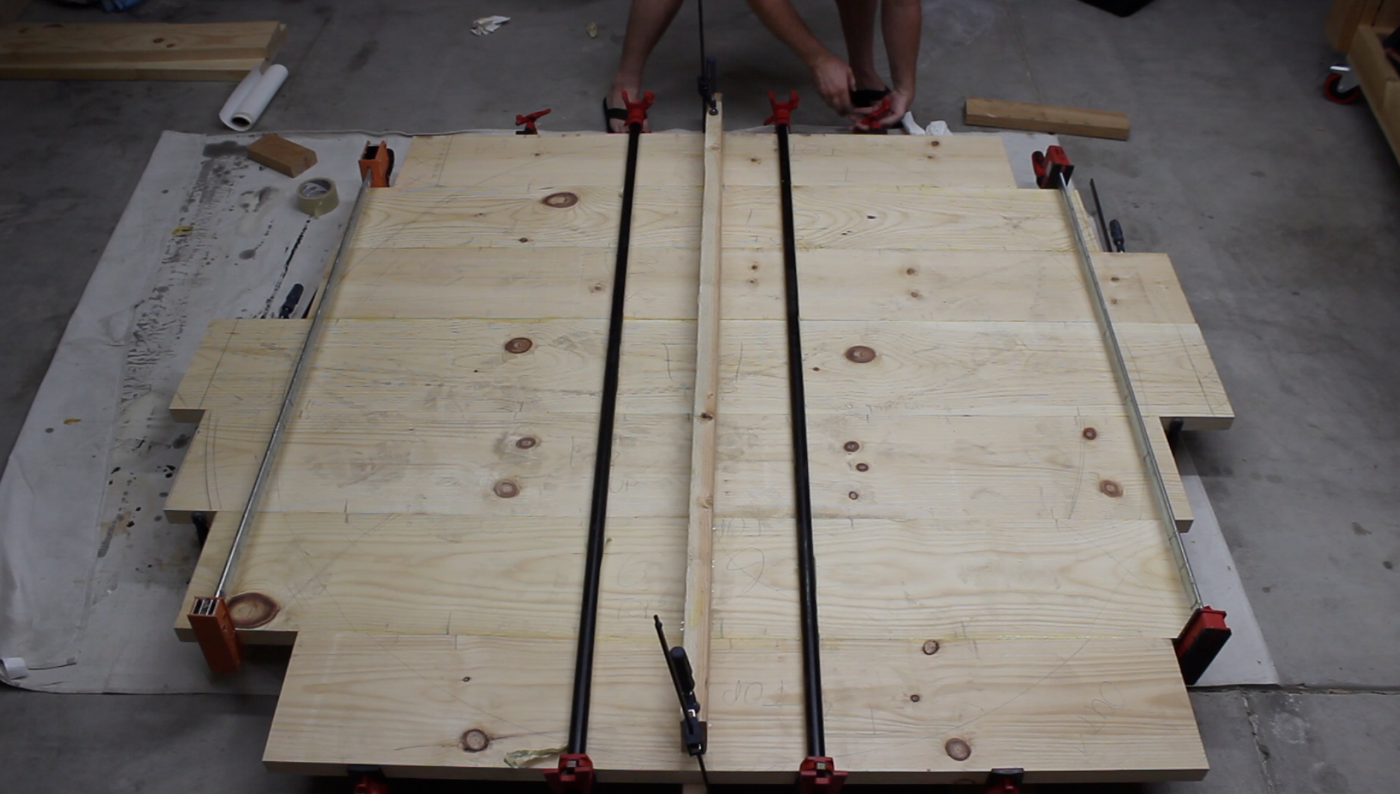
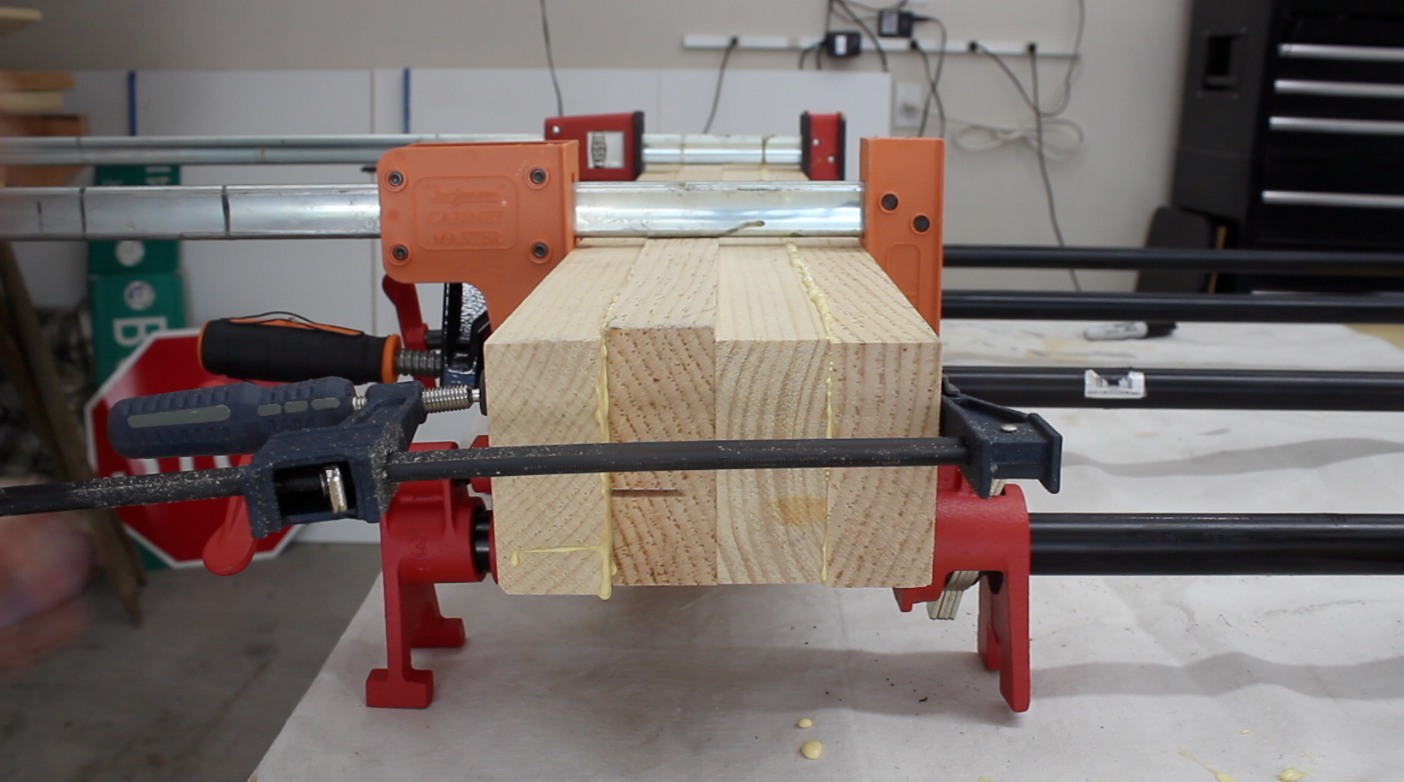
6. Glue together the first few boards for the table top. Based on past experience, I have learned it’s better to join just a few boards at a time rather than a whole table top. Although it takes more time, glueing up a few boards at a time is just easier to manage, and it reduces the chances you’ll have to fight with stubborn gaps or cracks between your boards. I glued together the first three center boards, and then glued on another board on each end the very next day. The day after that, I glued on the final two outside boards.
Use clams on the top and bottom of the table top to prevent the boards from cupping. Also make sure that the grain curvature of the boards alternates. You’ll know this by looking at the end grain patterns of the boards. For example if the center board is curved like a happy face, then the surrounding outside boards should be curved down like a sad face. The alternating grain directions will ensure that the table will not cup when it expands and contracts with humidity and temperature flections in your home.
Glue squeeze-out that is also expected with a big glue-up like this, so it’s recommended to put masking tape of your clamps to keep glued off of them – removing dried wood glue from a metal clamp is near impossible. Also, clamp cauls across the boards to prevent the work piece from cupping. You’ll notice how in the photos below I have some scrap boards spanning the table top. They are clamped together to provide some “sandwiching pressure” on the table top surface. And to make sure the cauls don’t stick to the table top (because glue will squeeze-out), adhere packaging tape to any side that comes in contact with the project surface.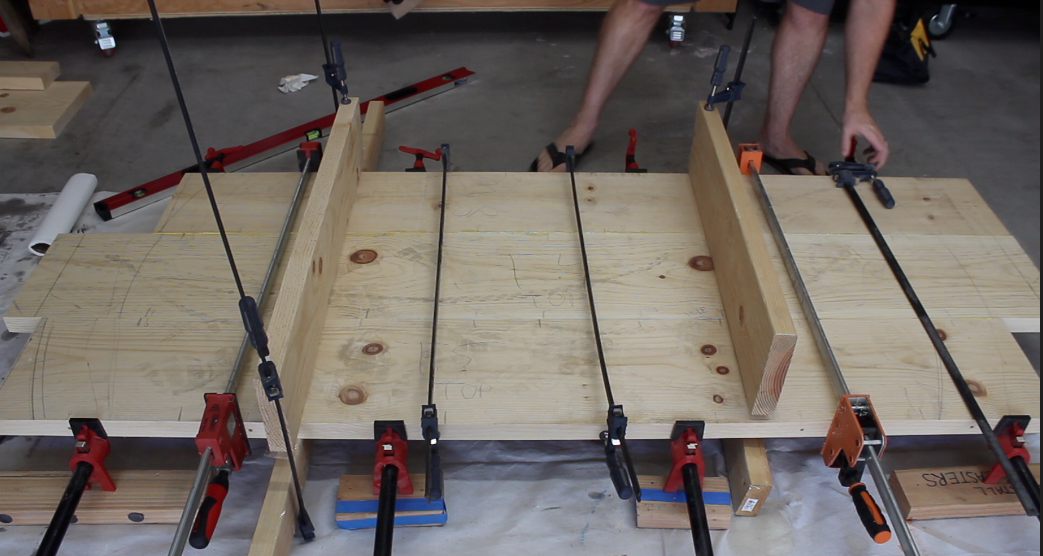
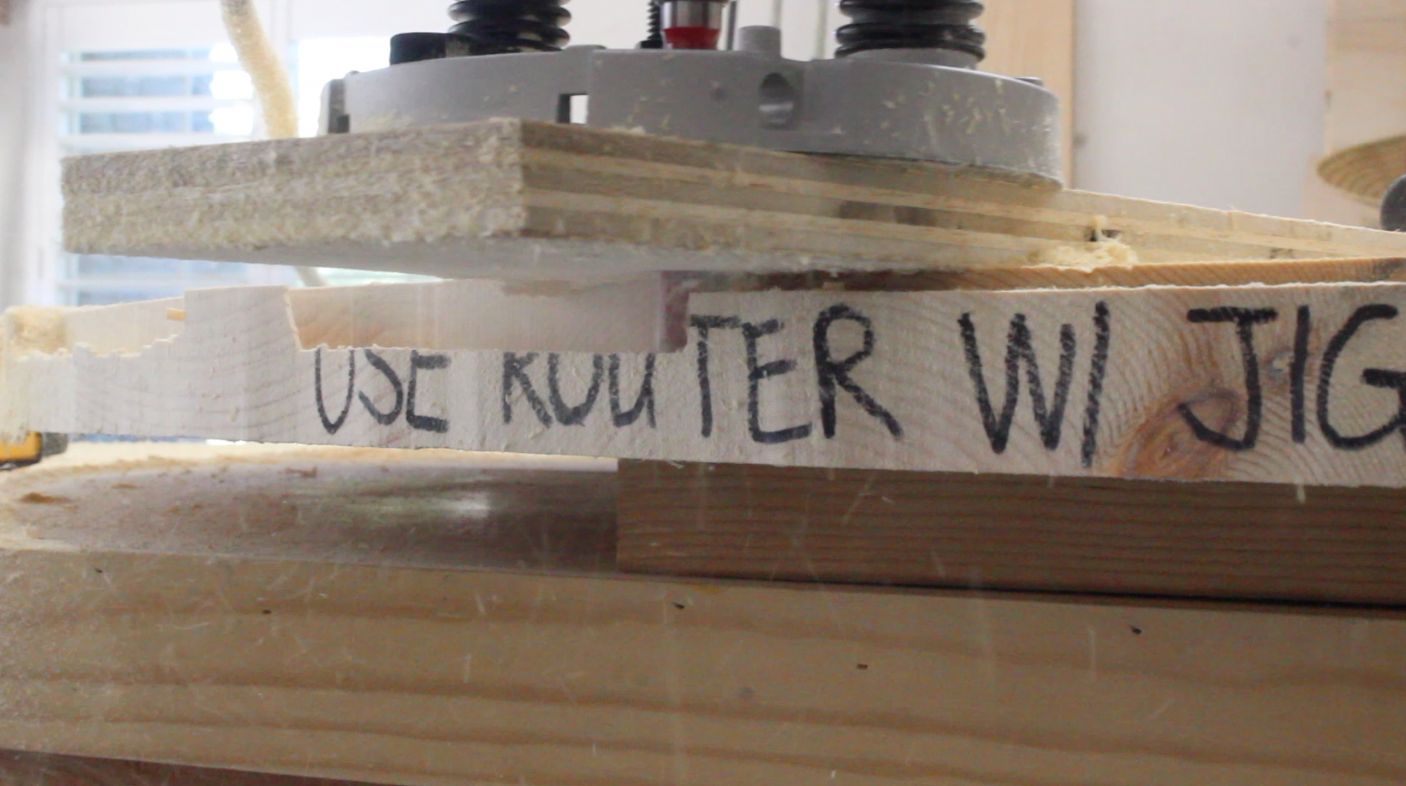
7. Prepare a plunge router jig with some nice, flat plywood. Cut some plywood a little longer than the table diameter, and nail it down to the approximate center of the bottom side of the table top. With the plywood jig able to rotate in a circle, drill a small hole (large enough to fit a number two pencil) the precise distance from the nail in the center of the table for the diameter. Insert a pencil into the hole to draw a perfect circle for the table outline.
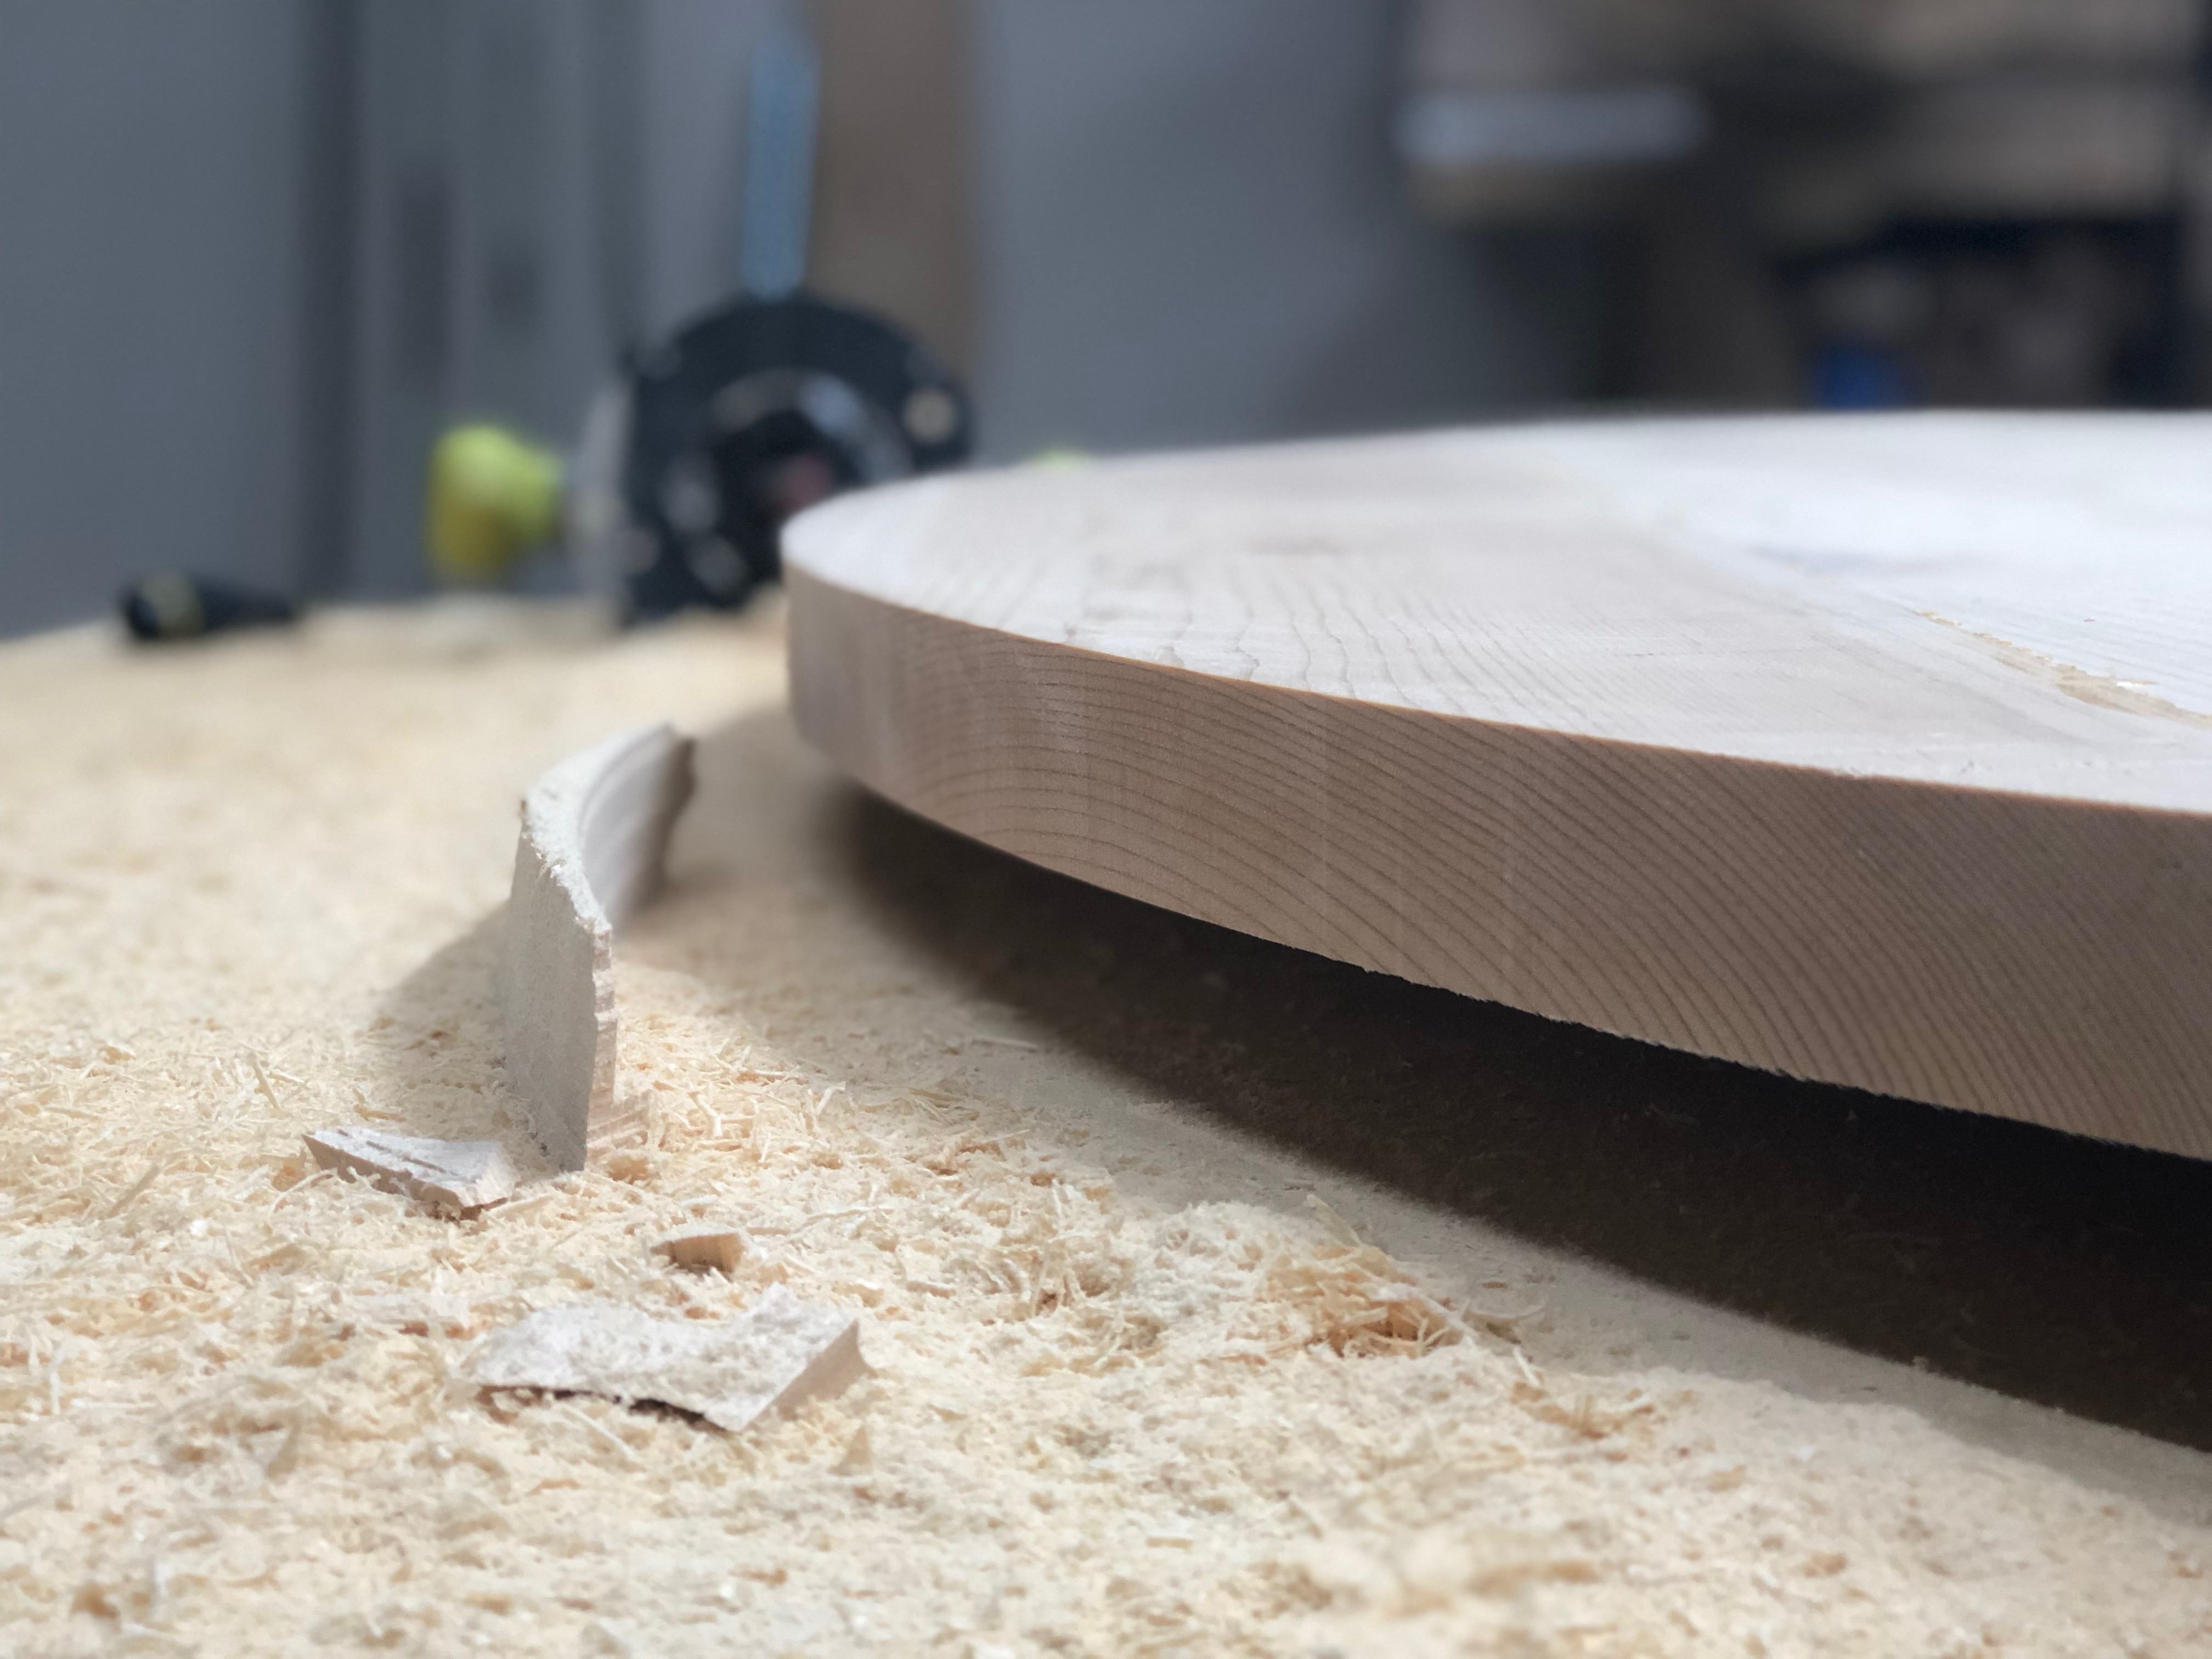
8. Use a jig saw to roughly cut the table circumference. This will make it easier to use the plunger router in the next step.
9. Use a plunge router to form a perfect circle using jig from step 7. A long bit will be necessary to completely router the 1 1/2-inch thick table top – I used a 2-inch long bit . Plunge only about a quarter inch at a the time to route the circumference of the table until all excess material has been removed. This is a really messy step, so wear your safety goggles and dusts mask. You may also want to perform this step outdoors to make clean-up a little easier.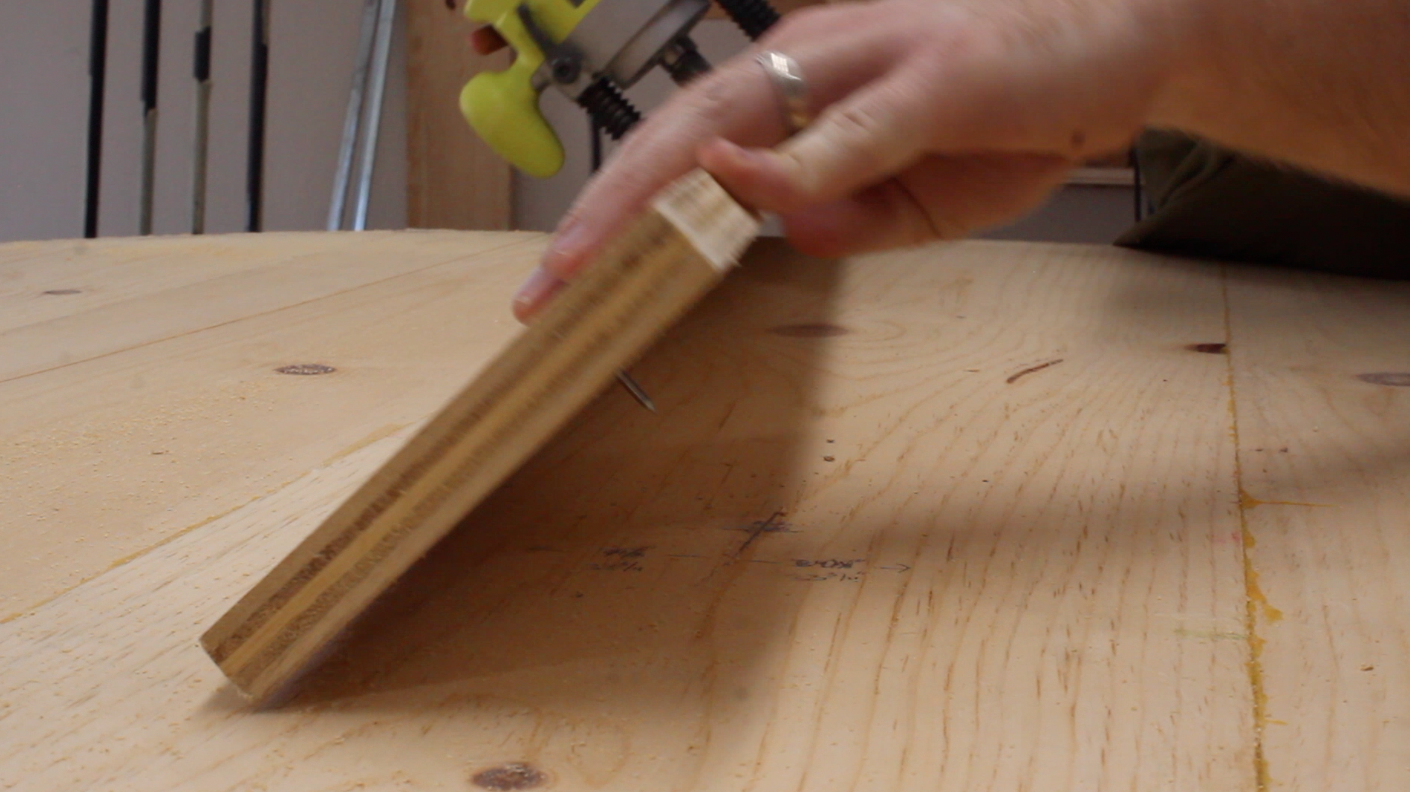
10. Sand both sides and edge of the table top with 80 grit sandpaper. An random orbit sander will make quick work of this.
11. Use a router with a bevel attachment to create smooth rounded edges around a table top. I did this for both the top and the bottom of the table. This step can be optional for some, but I personally liked this touch, and you can certainly sand the edges by hand to achieve a similar effect.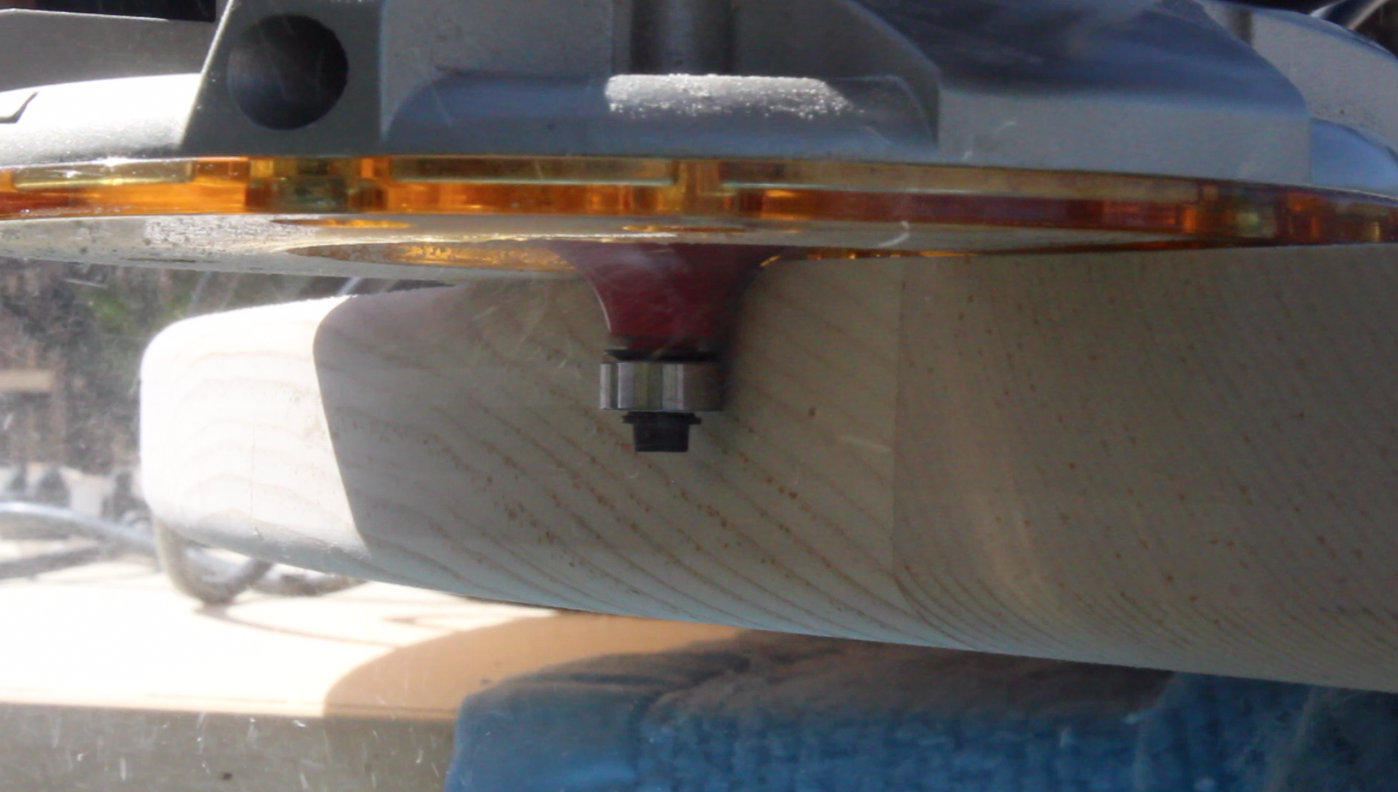
12. Sand both sides of the table top once more, but with 120 grit sandpaper. Since a polyurethane finished will be applied to the table top in the end, there’s no need to sand beyond 120-grit at this point – just my opinion.
How to build the table base
1. Cut all pieces the legs, stretchers and supports to rough length and width, leaving enough room for refinements down the road. For example, a stretcher’s final length is going to be 48-inches, it would be a good idea to rough cut a board to 50+ inches. Or if the table legs are to have a final height of 28-inches, their board should be cut to 30+ inches. The same principle should be applied for board width; table legs with a final width of 3-inch should be ripped to 3 1/2 inches wide. Feel free to add more to your rough cuts – whatever you’re comfortable with.
2. Glue together the table legs, and just like a tabletop, use clamps on both the top and bottom. Since each table leg consists of two 2 x 4s, it’s important to glue together pieces that complement one another from an aesthetic standpoint. Be mindful of grain direction and patterns when pairing up boards. Visually, this method for making the legs can be challenging to mask that two pieces of wood are being joined to become a 3 x 3 leg, but after staining, these two boards will blend surprisingly well together. You will also want to make sure that the face grain board in the leg faces the outside of your table so that the glue-up is not as obvious.
And like the table top glue-up, I only laminated two legs at a time to make sure all gaps were eliminated.
3. Rip the legs for their final width (3 inches) using a table saw. Since the thickness of each board is 1 1/2 inches, this will produce a table leg that is perfectly 3 inches on every side.
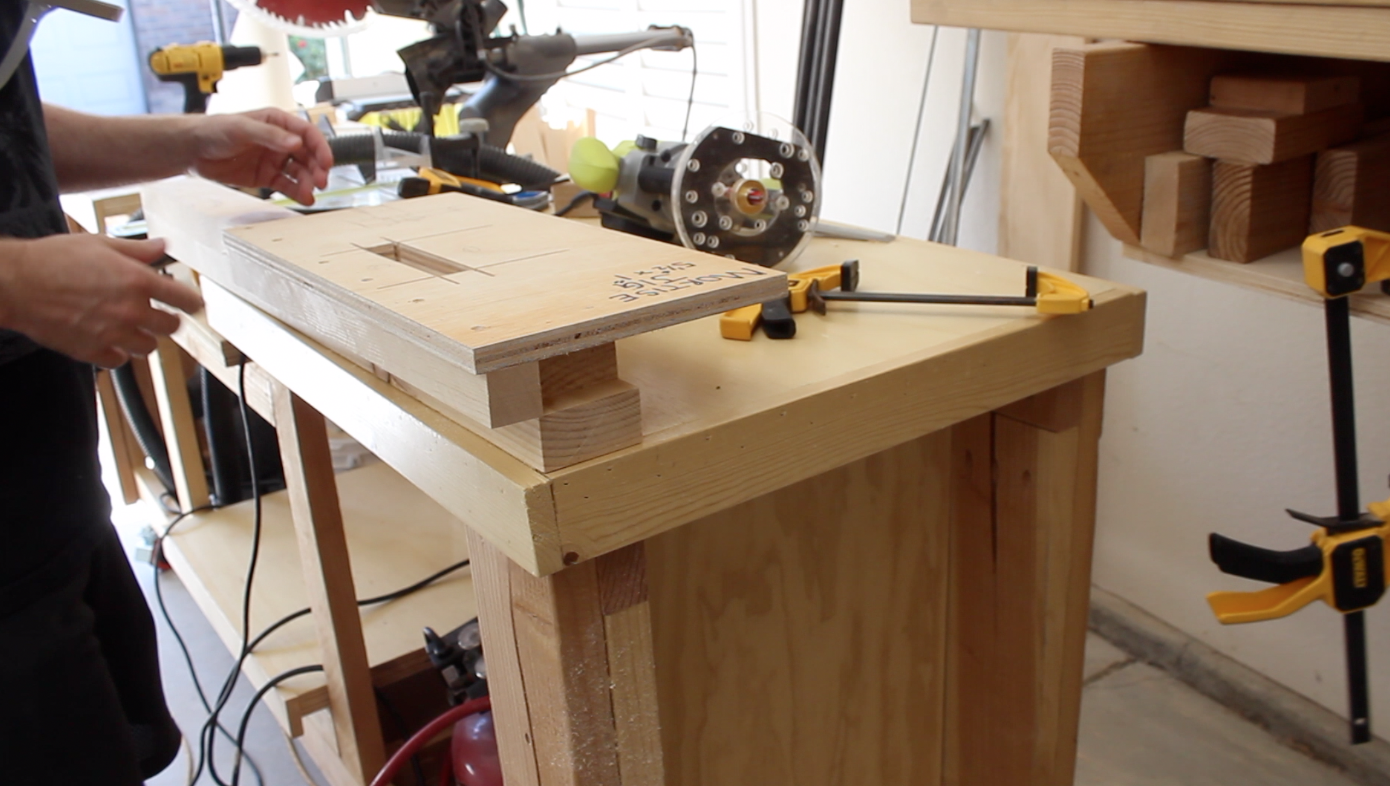
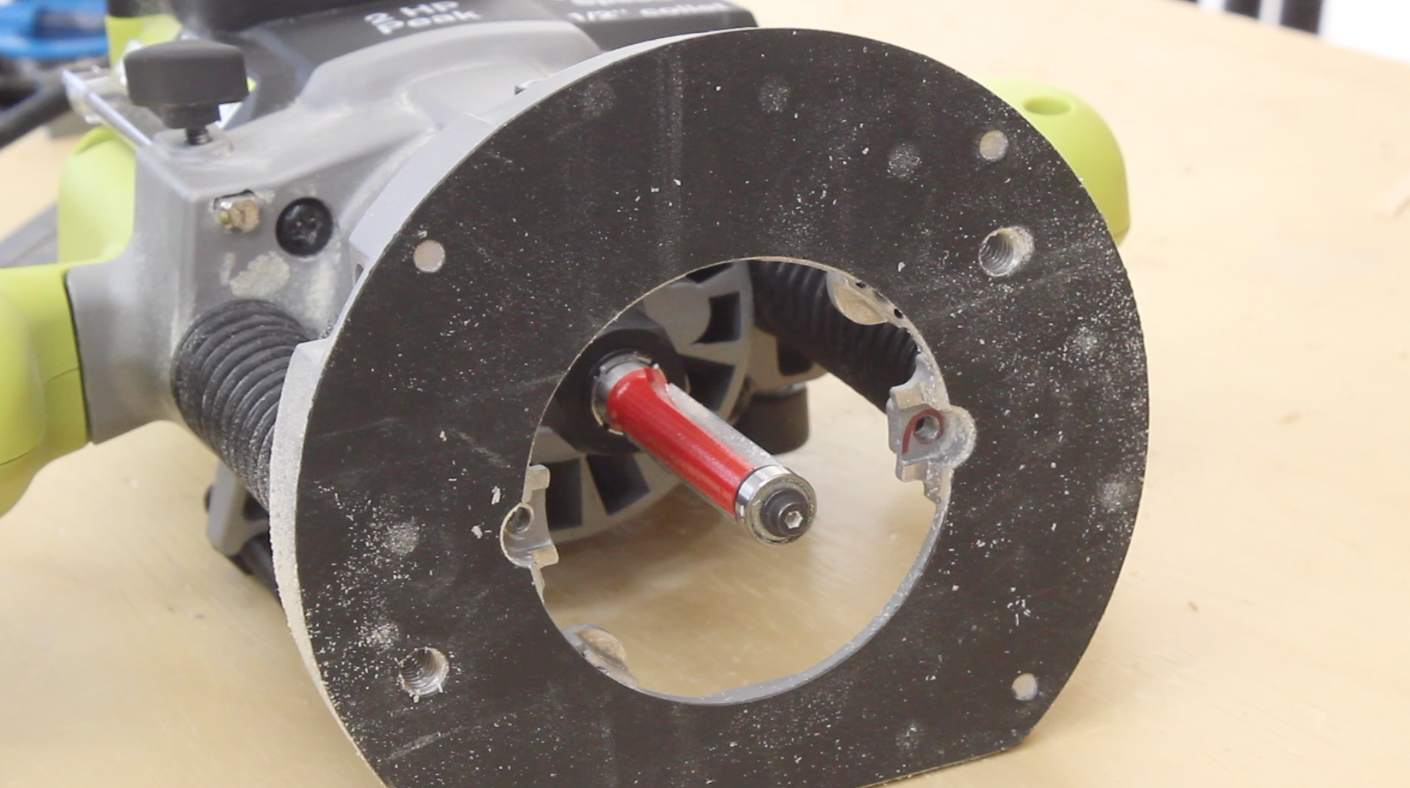
4. Create a jig routing mortises into the legs. Use scrap lumber such as plywood, and cut a rectangle into the jig to act as a template for the router. Using a bushing set on the router, the template will need to be slightly larger than my final mortise. To perfect the template sizing, I practiced on a few other boards before actually routing the final mortises on my table legs. You can see my different prototype jigs below. I highly recommend practicing this step before getting to the final product. And before you read on, you might want to check out this video from The Samurai Carpenter on making perfect through mortises.
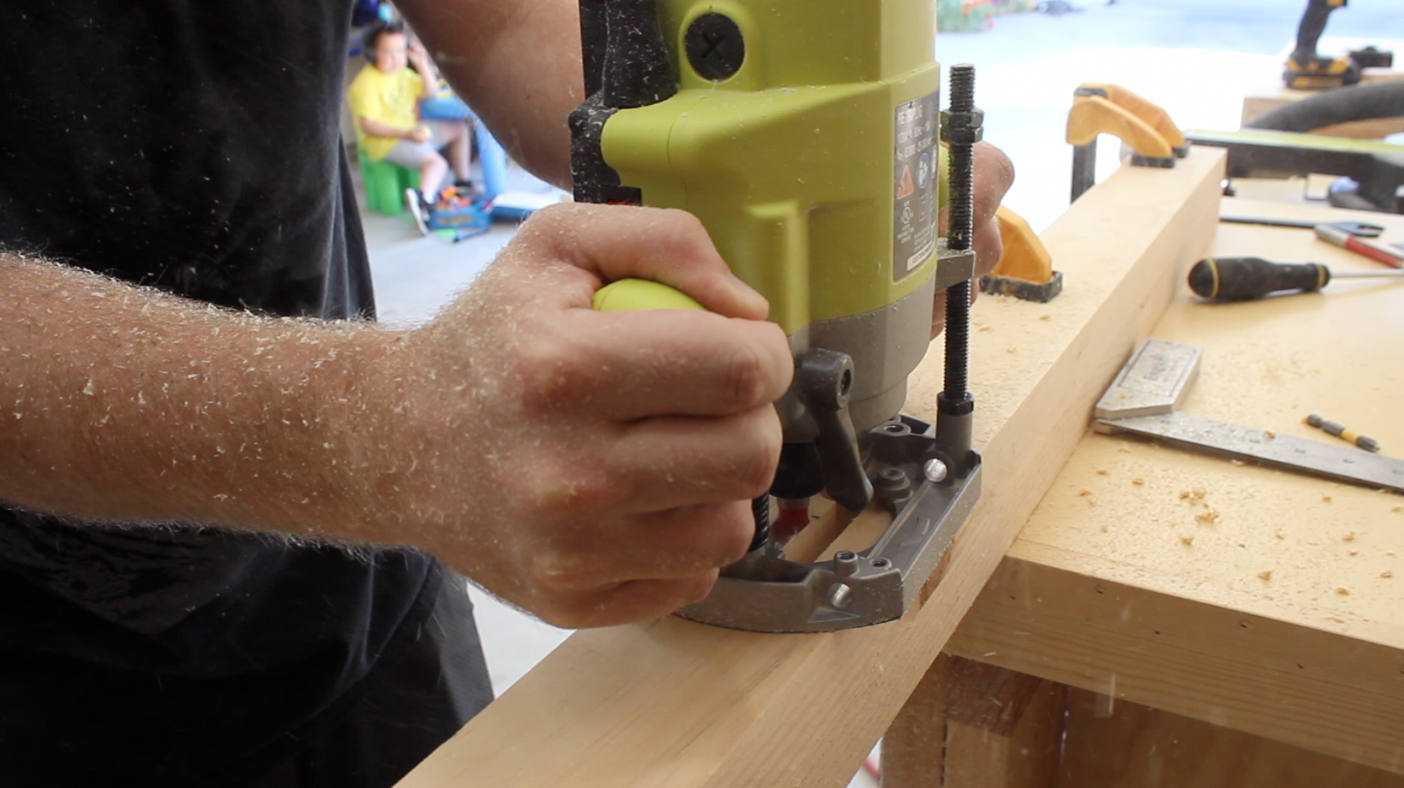
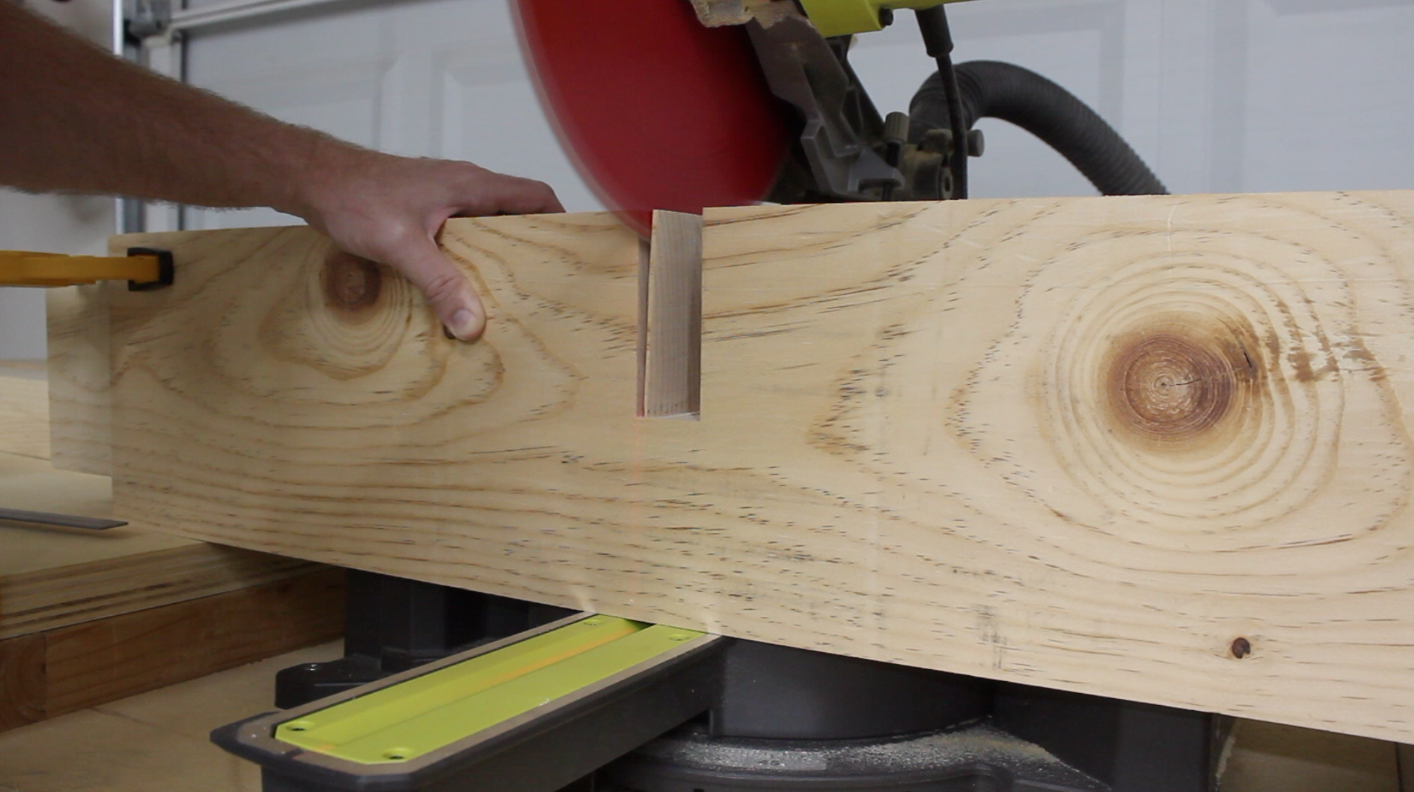
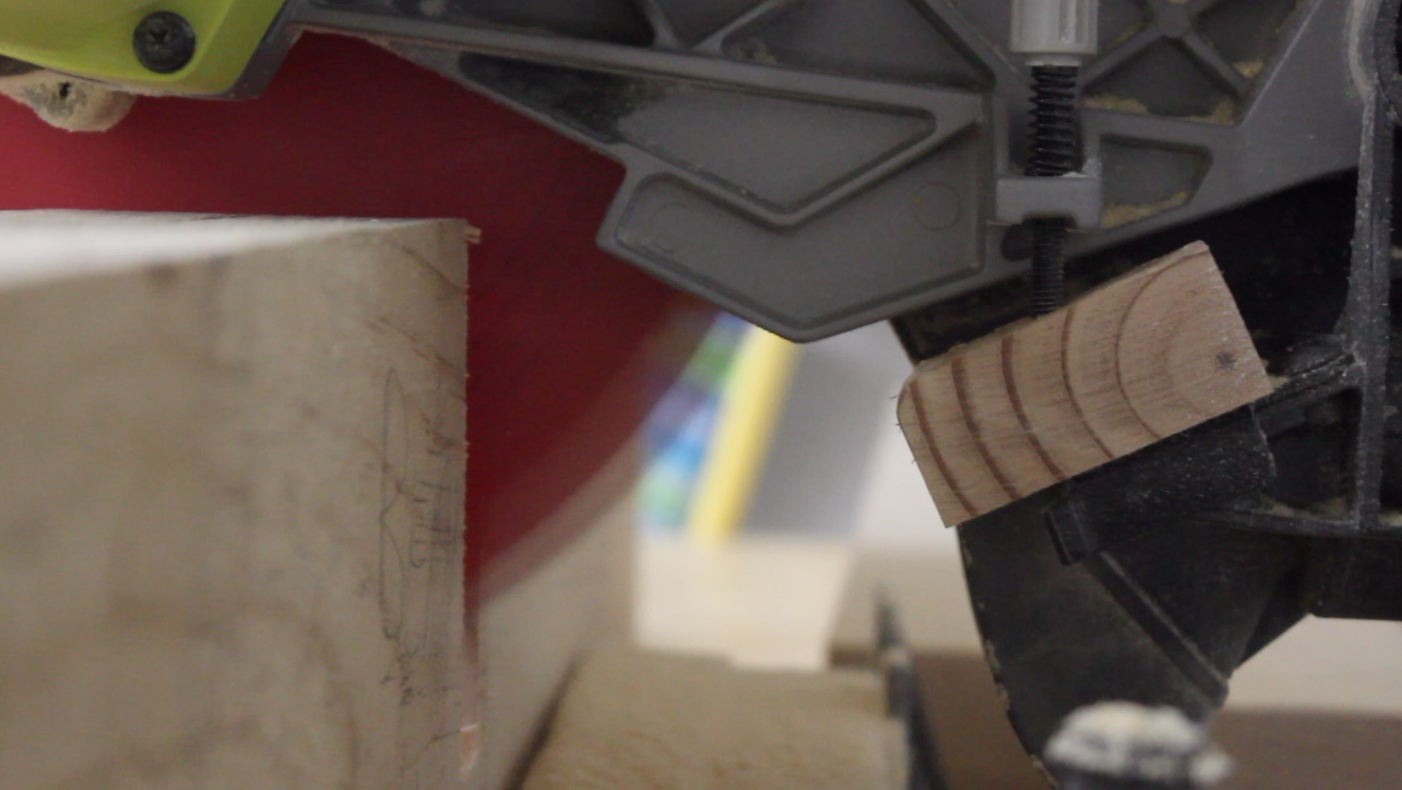
5. Cut the table leg mortises with a plunge router, and plunge only about 1/4-inch at a time – and don’t forget to clamp down he jig and table leg. I used a 2-inch router bit for cutting the mortises, but that wasn’t deep enough to get all the way through the table leg. To complete the through mortise…

Next, flip over the table leg, and having a rough idea of where the mortise is on the other side, drill a hole using a spade bit (or a some bit large enough to accommodate a router bit). This hole will create and opening for the router, using a flush trim bit, to complete the mortise.

6. Remove the rounded corners of the mortises with a chisel. I used a very sharp 1-inch chisel for this. To ensure that the chisel is always angled straight down into the mortise, it helps to have a block of wood clamped down on top of the table leg. This helps guide the blade of the chisel. I was surprised at how easily the chisel cut through the soft white pine without the help of a mallet. You will probably need a mallet when working with hardwoods.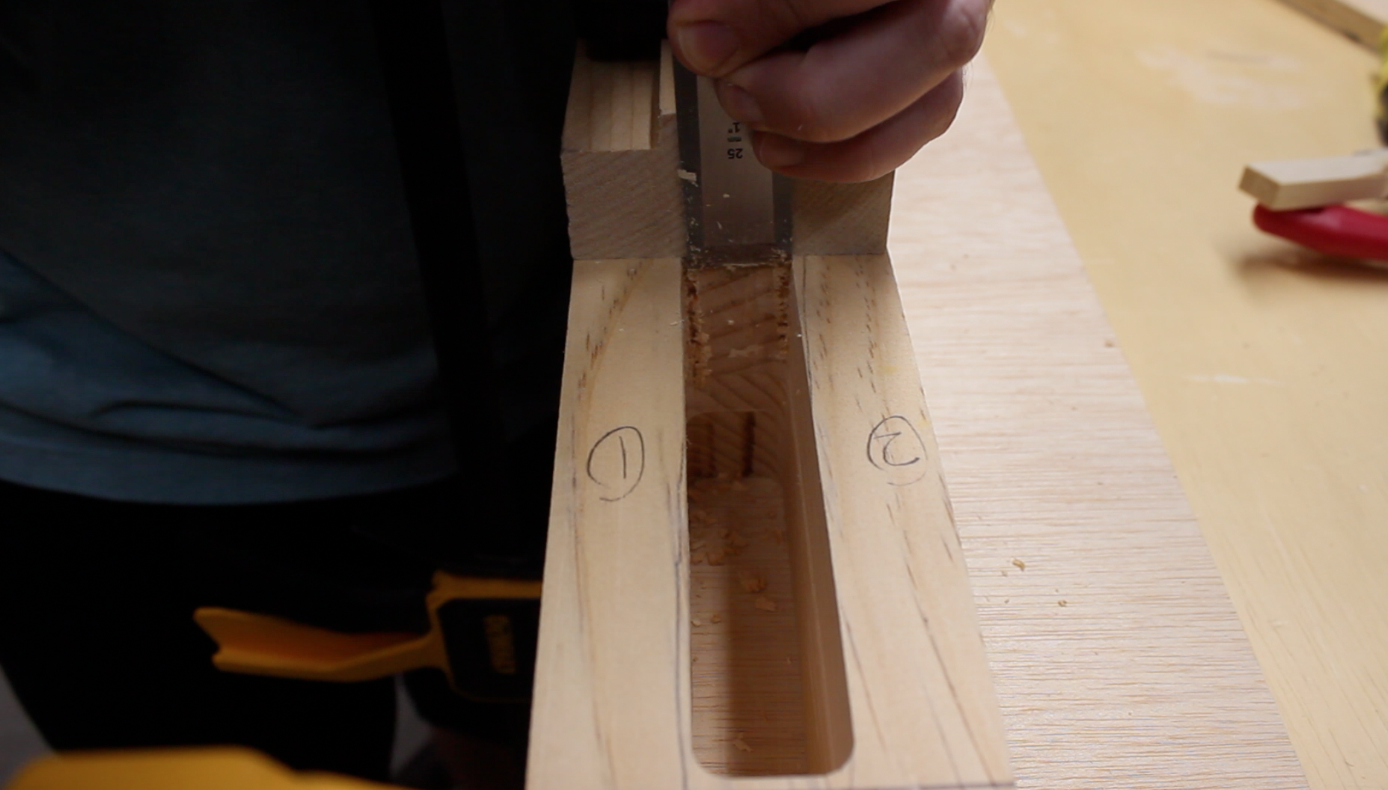
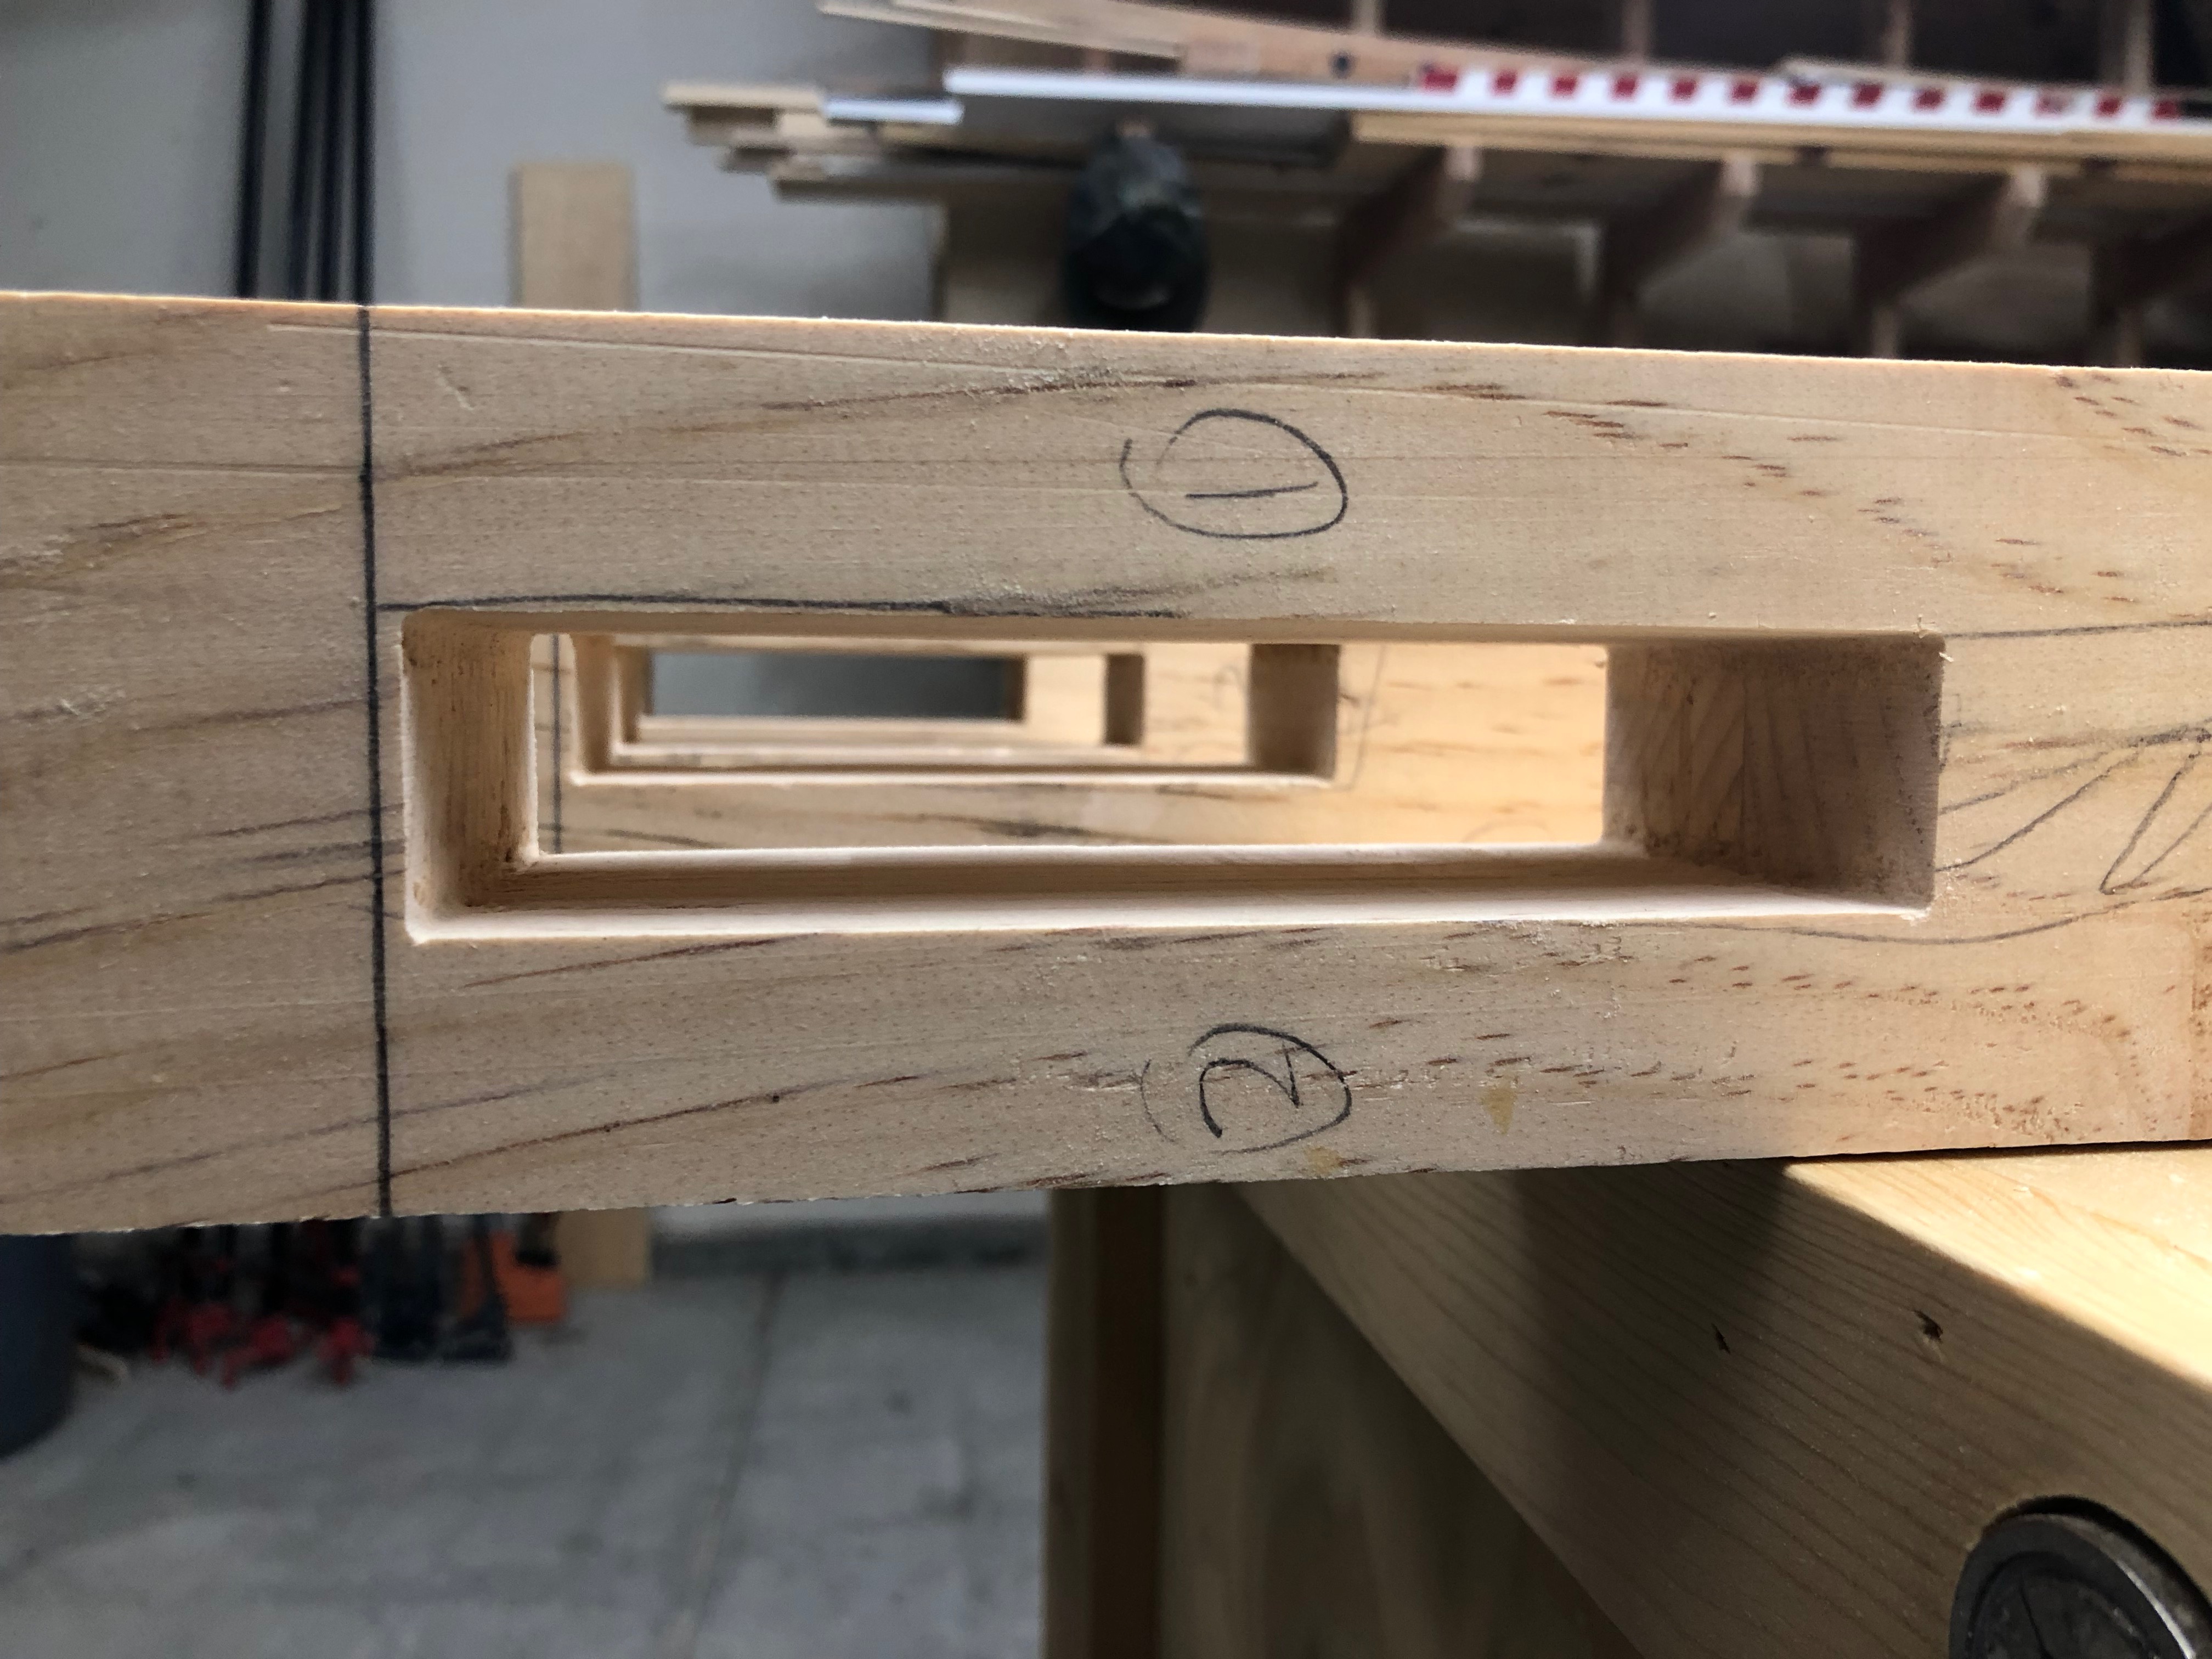
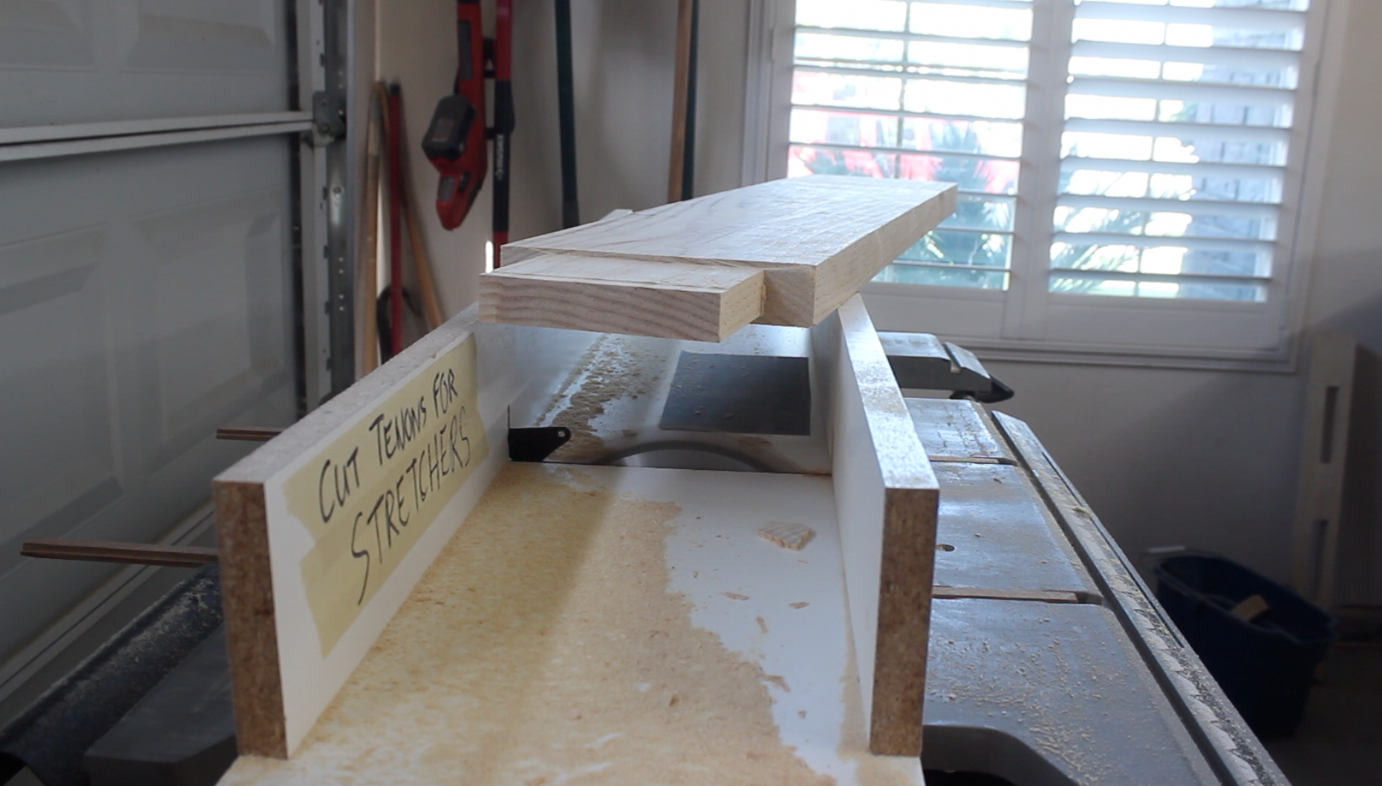
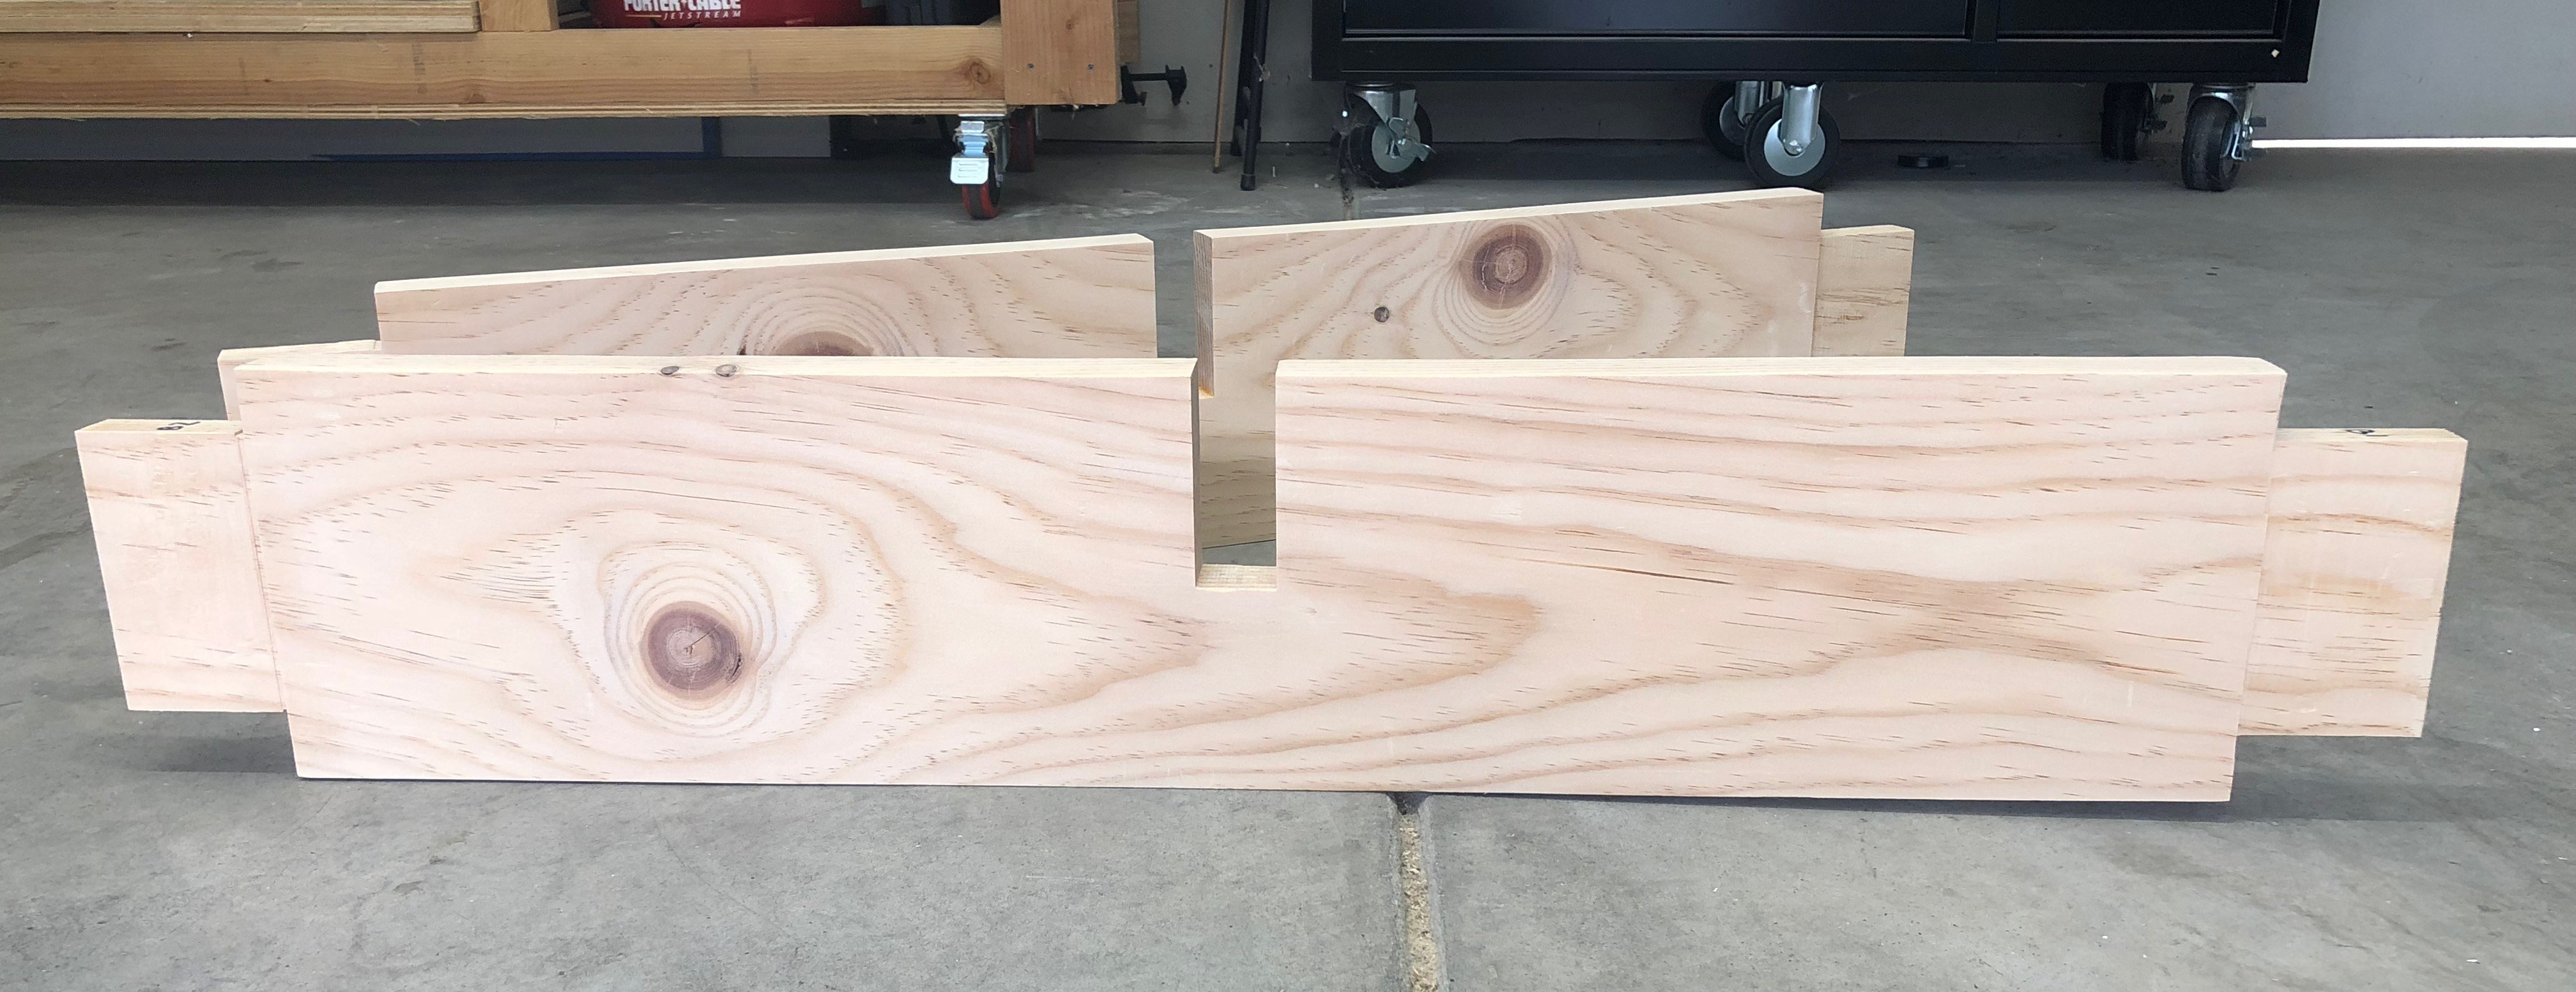
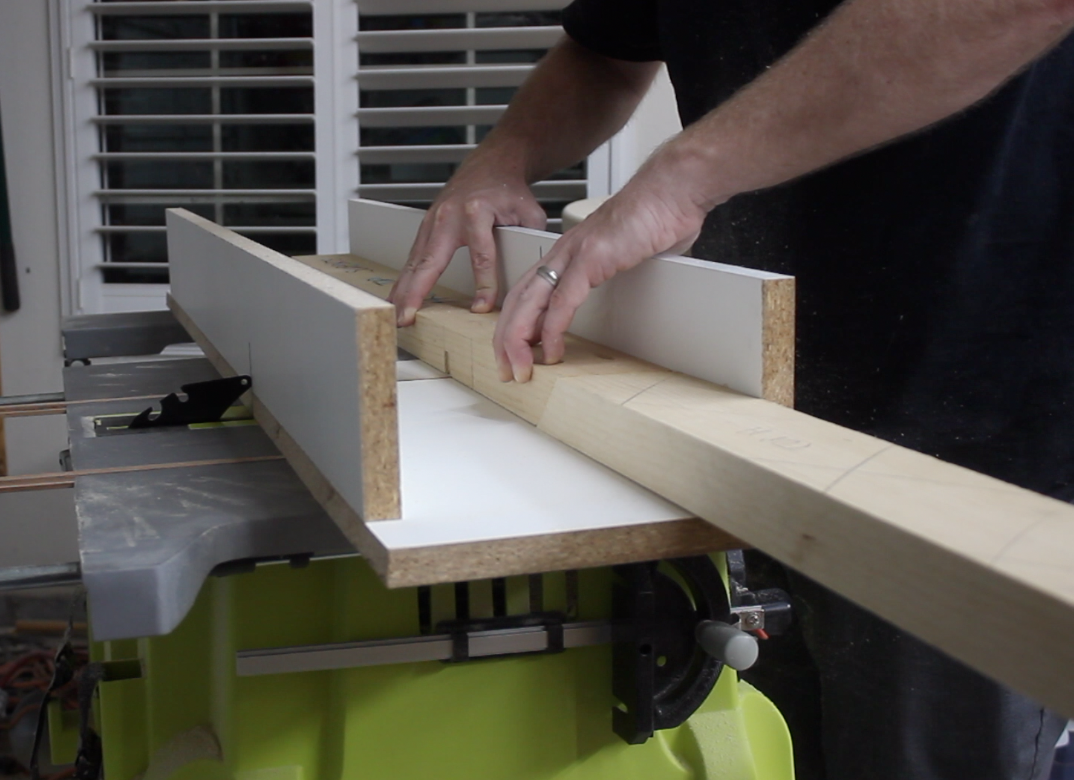
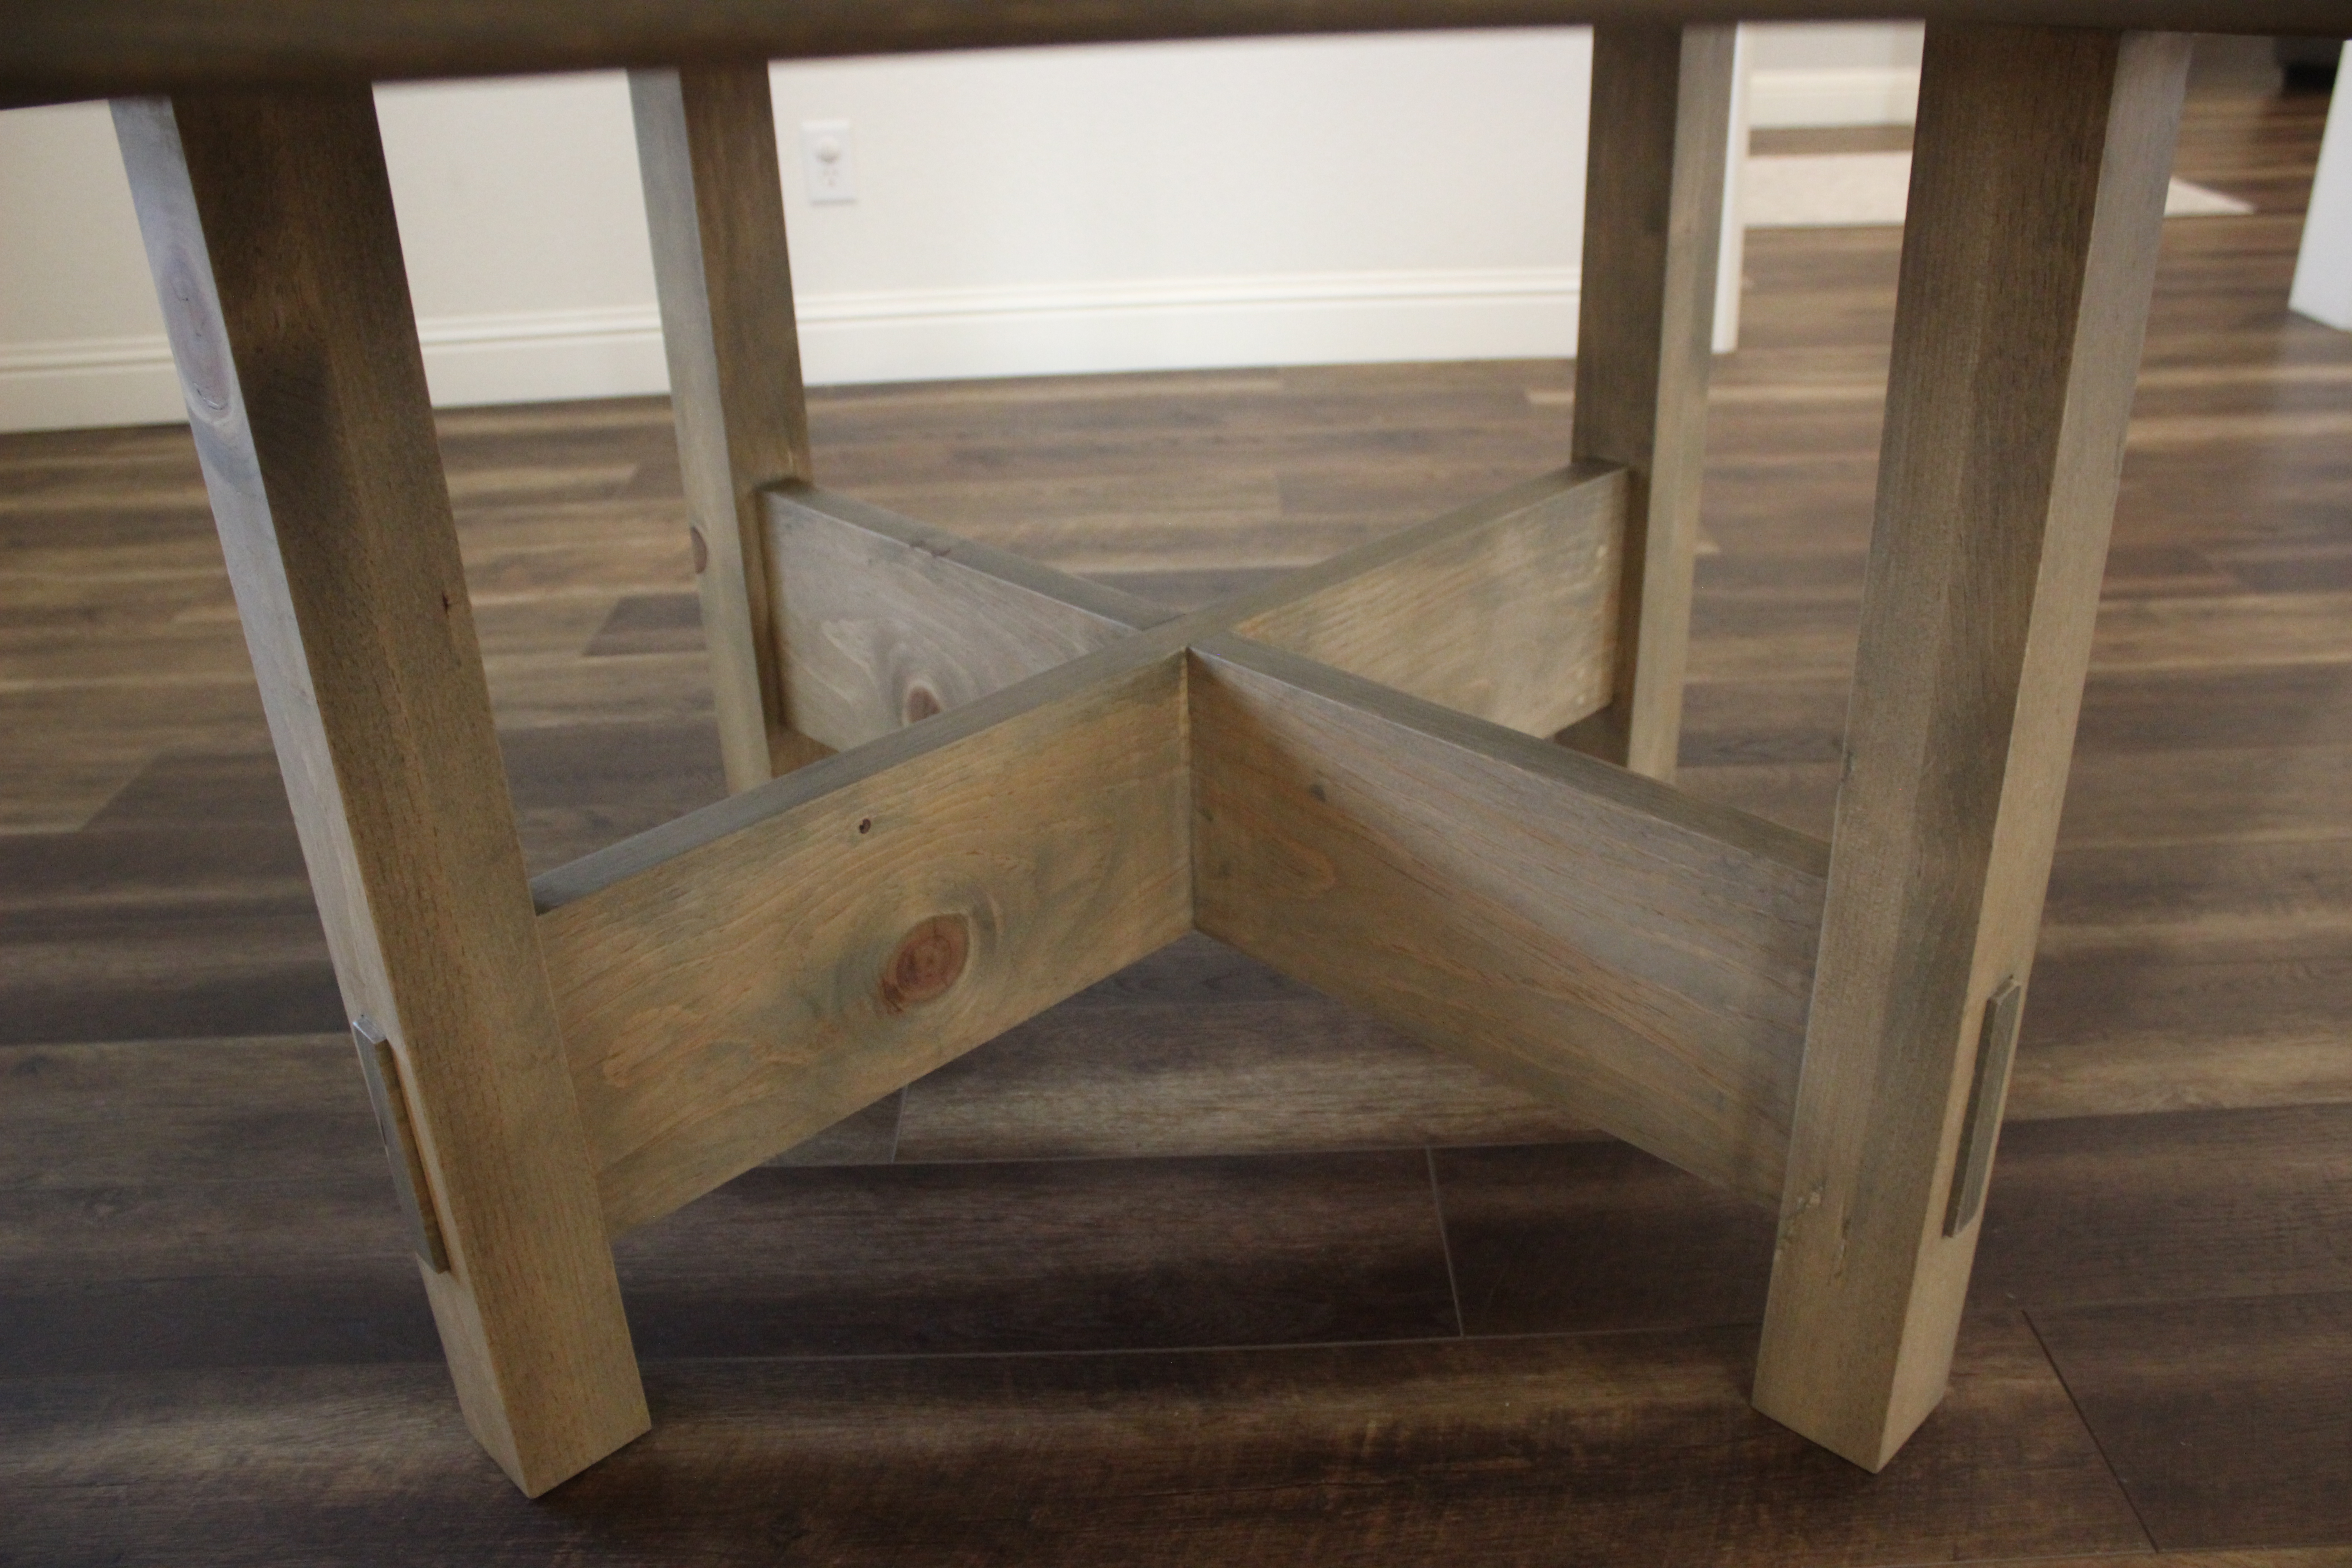
7. Cut the through tenons for the table base stretchers by taking into account the size of the mortises. A simple table saw sled is needed to remove material on the stretchers. This work is very tedious – especially on the table saw but just be patient and always allow yourself to sneak up on the cut. Start by only cutting the tenons to the needed width, and once you find that you have got that down, dry fit it into the table leg mortise. Then, cut the tenon to the necessary height. Also keep in mind that none of the mortises nor tenants will all be the same size, despite your best efforts. I labeled which side of my stretchers were aligned with a specific table leg – I even kept track of their top and bottom orientation.
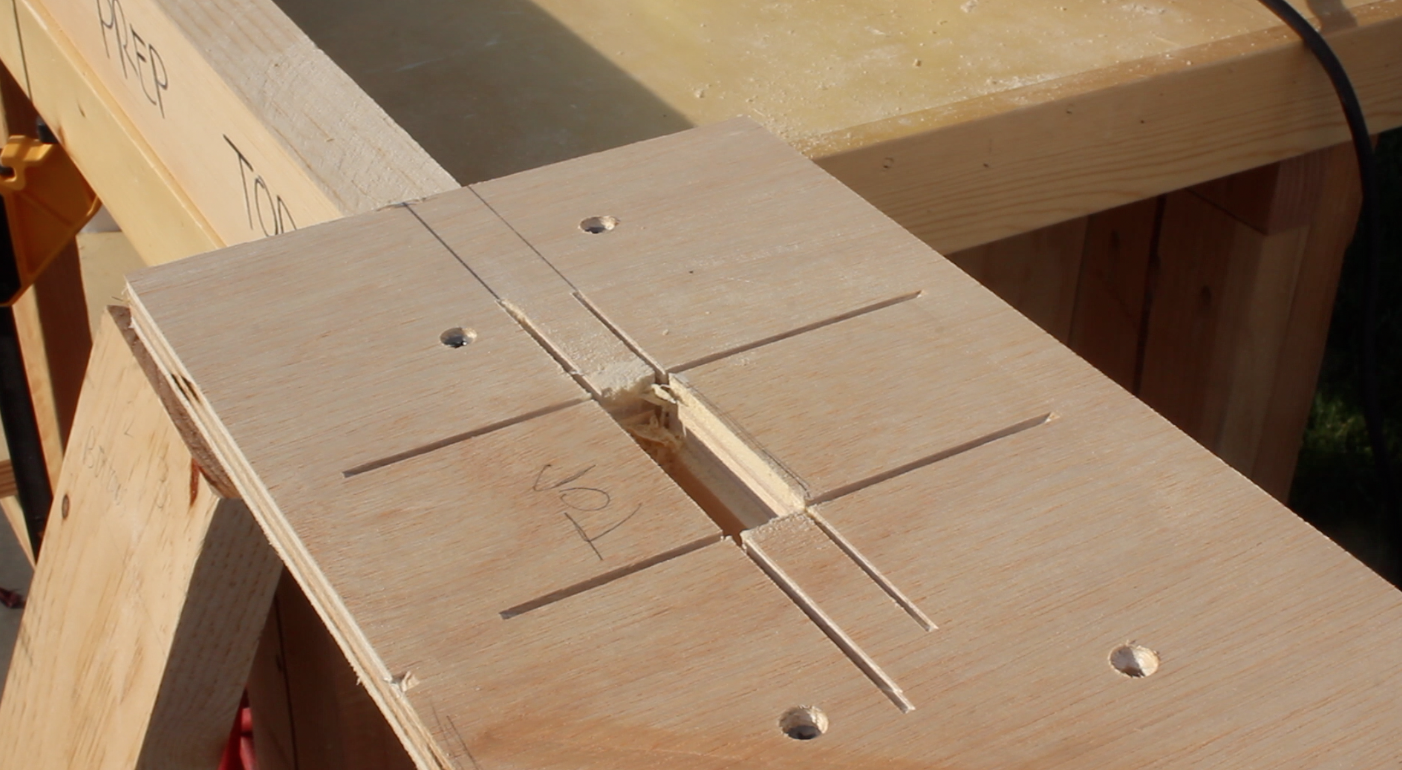
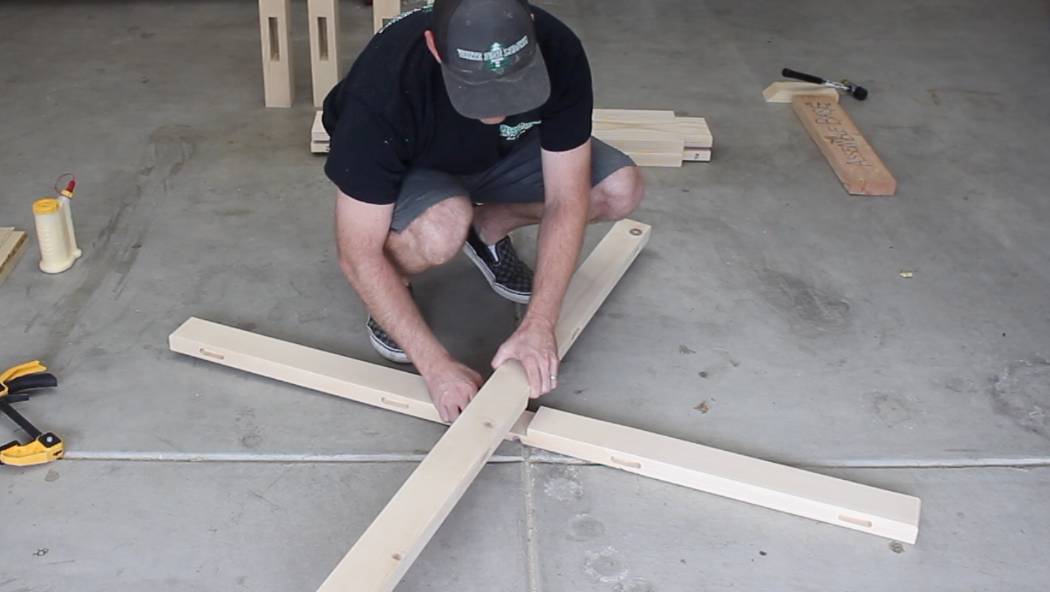
8. Cut rabbets into the top and bottom of the stretchers so that they can be glued together in a crisscross orientation using a lap joint. One would normally use a table saw to cut these rabbets, but since theses stretchers are 8-inches wide, I had to use my miter saw. To obtain a deep enough cut, and maintain a consistent cut depth, I added a stop block around the hinge of my miter saw. This effectively limited the saw from cutting and allow it to consistent make 4-inch deep cuts in the center part of the stretchers. To make sure that the rabbets were cut consistently across the two boards, I clamped them together and cut both rabbets at the same time. I attempted to dry-fit the tenons into the mortise as I went along, and shaved off any excess material where necessary.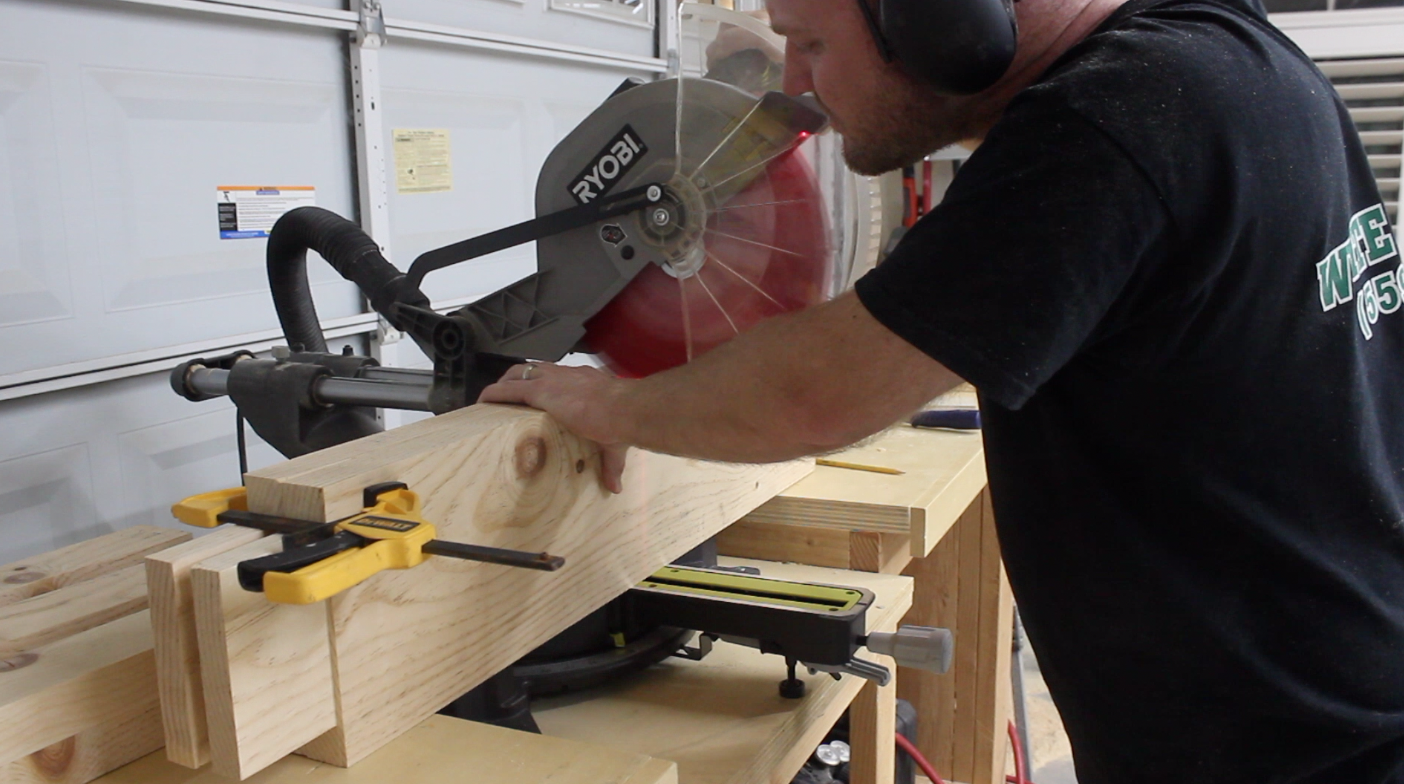
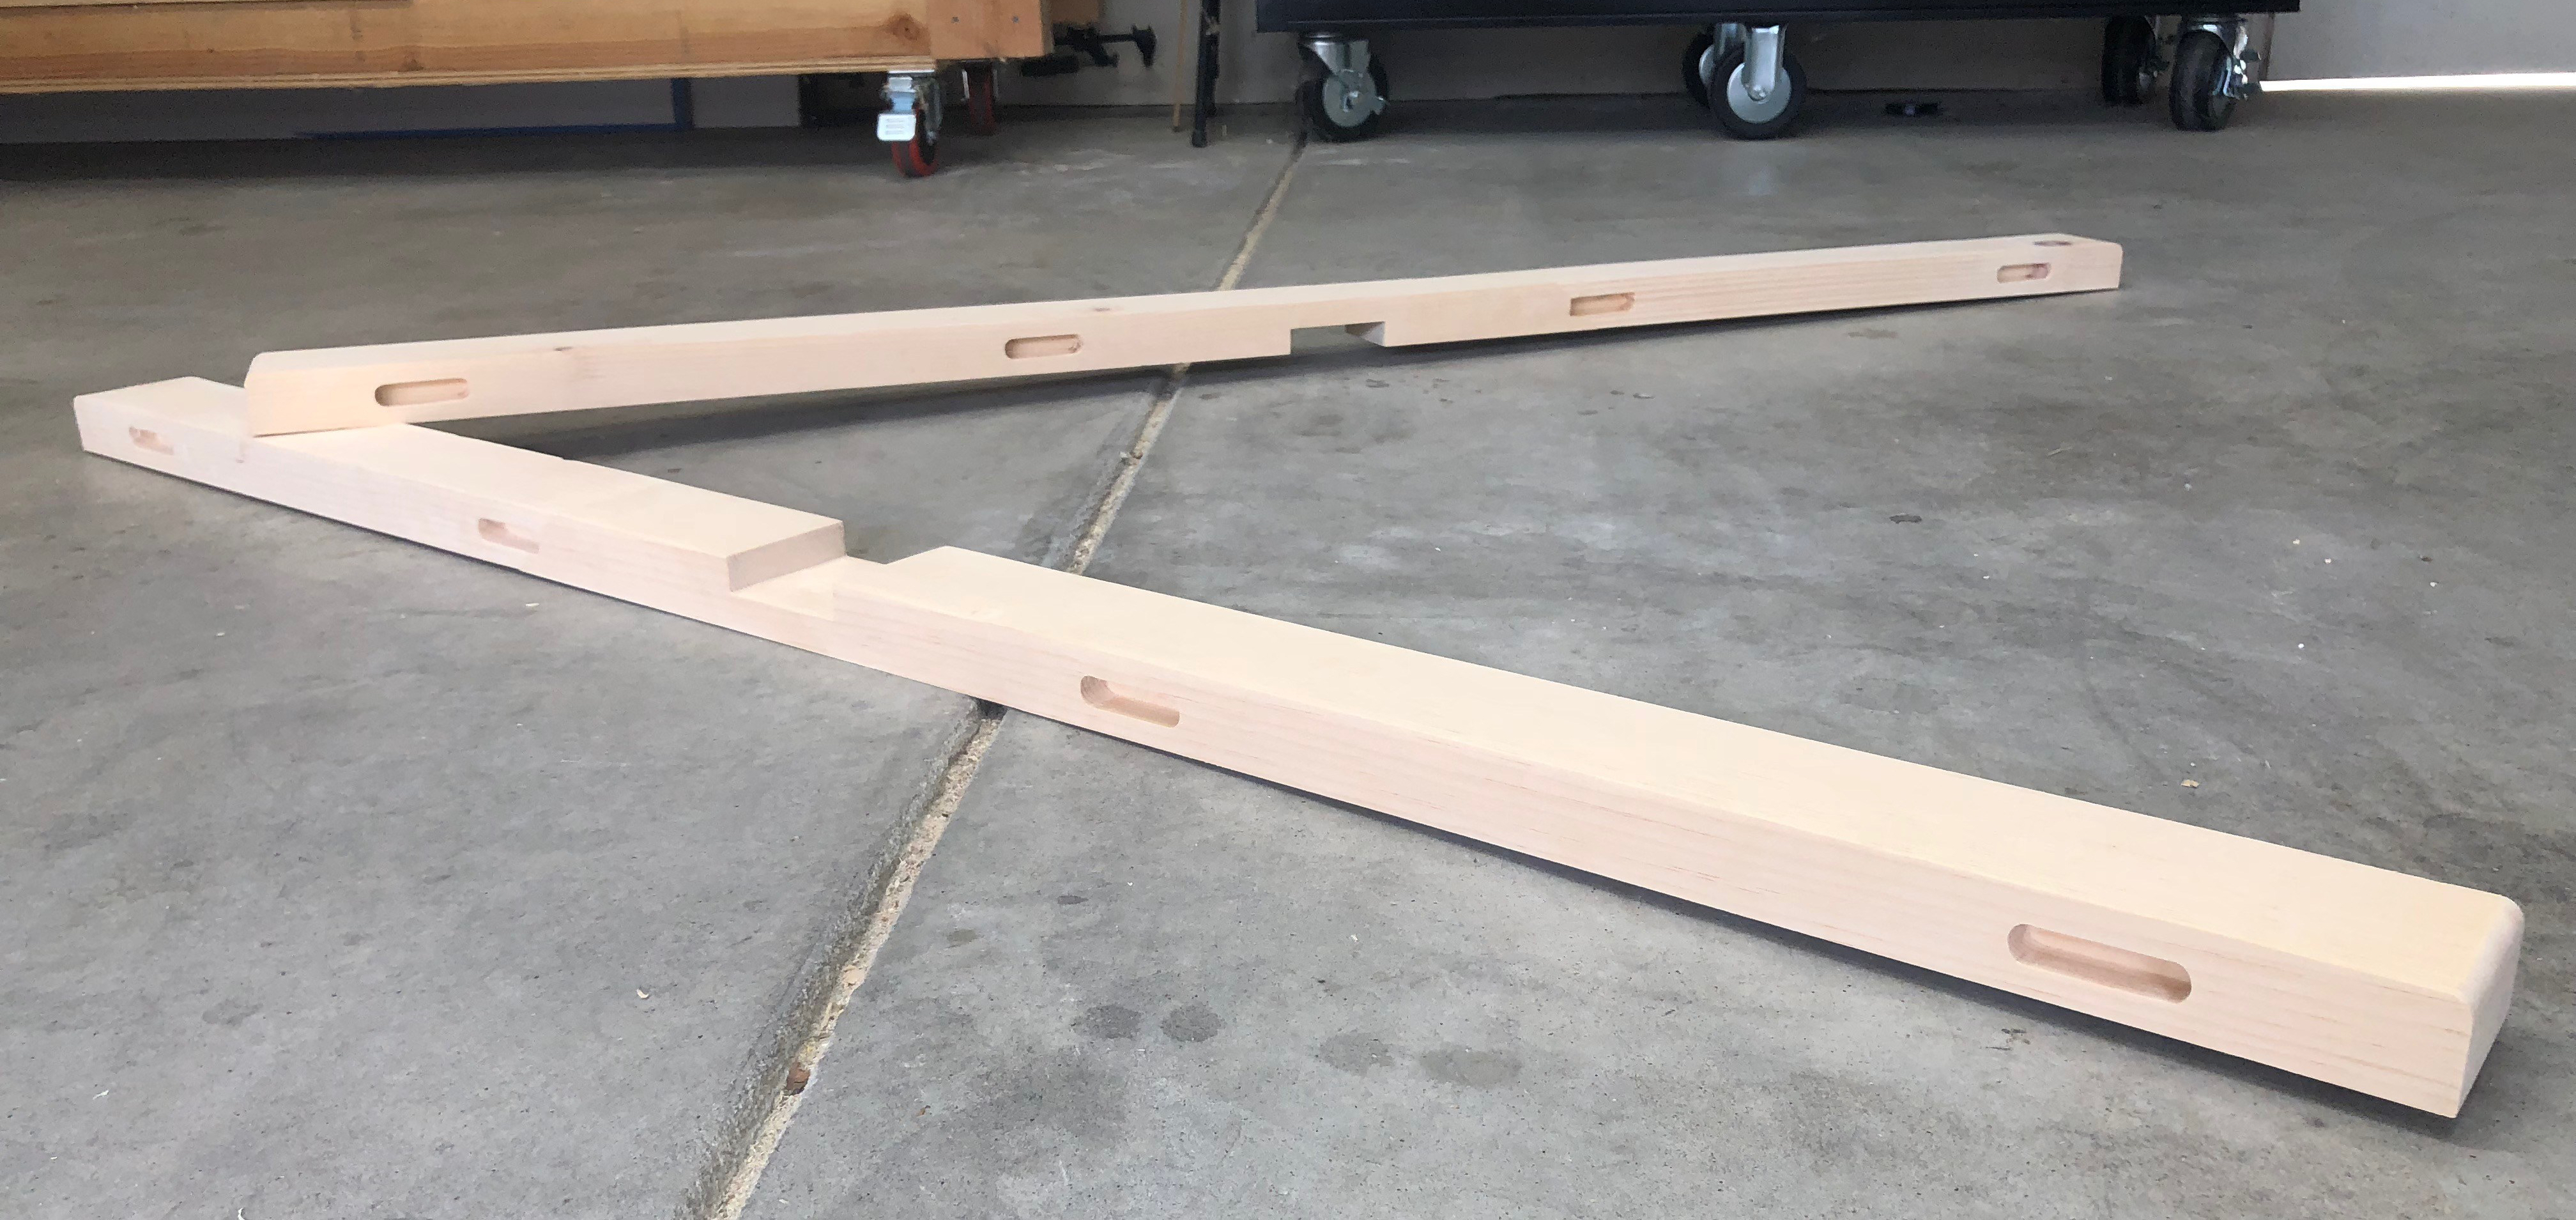
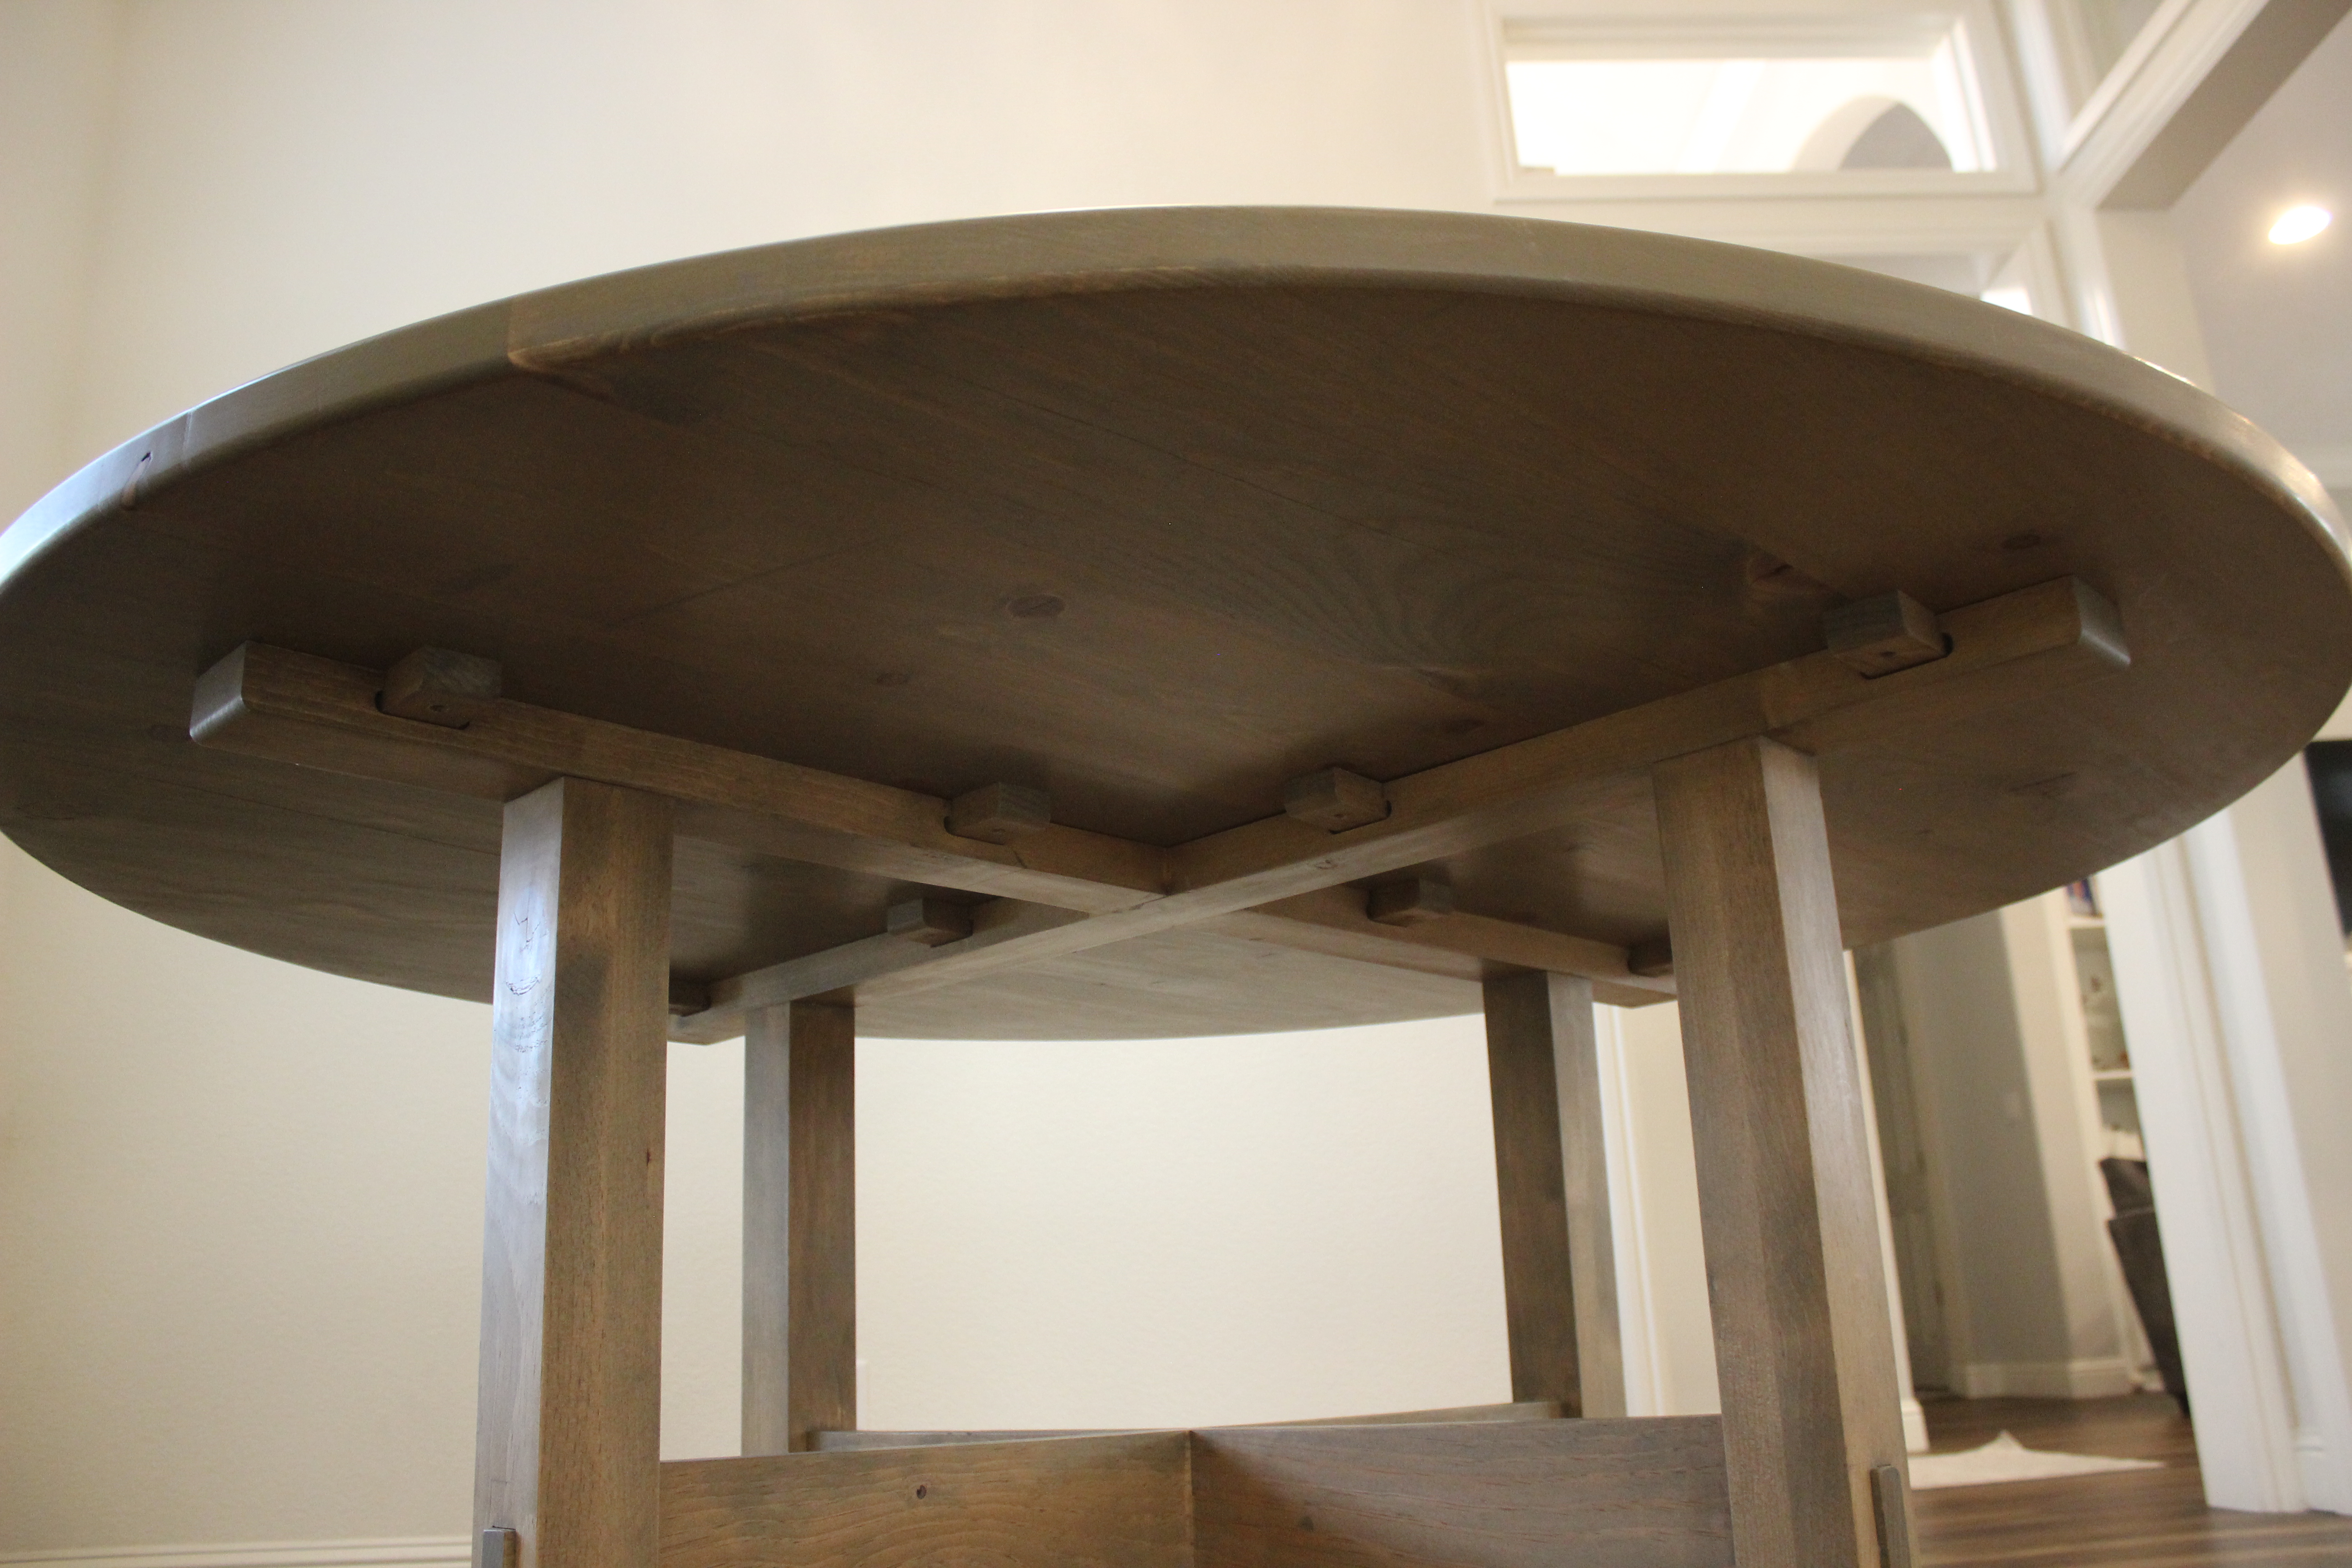
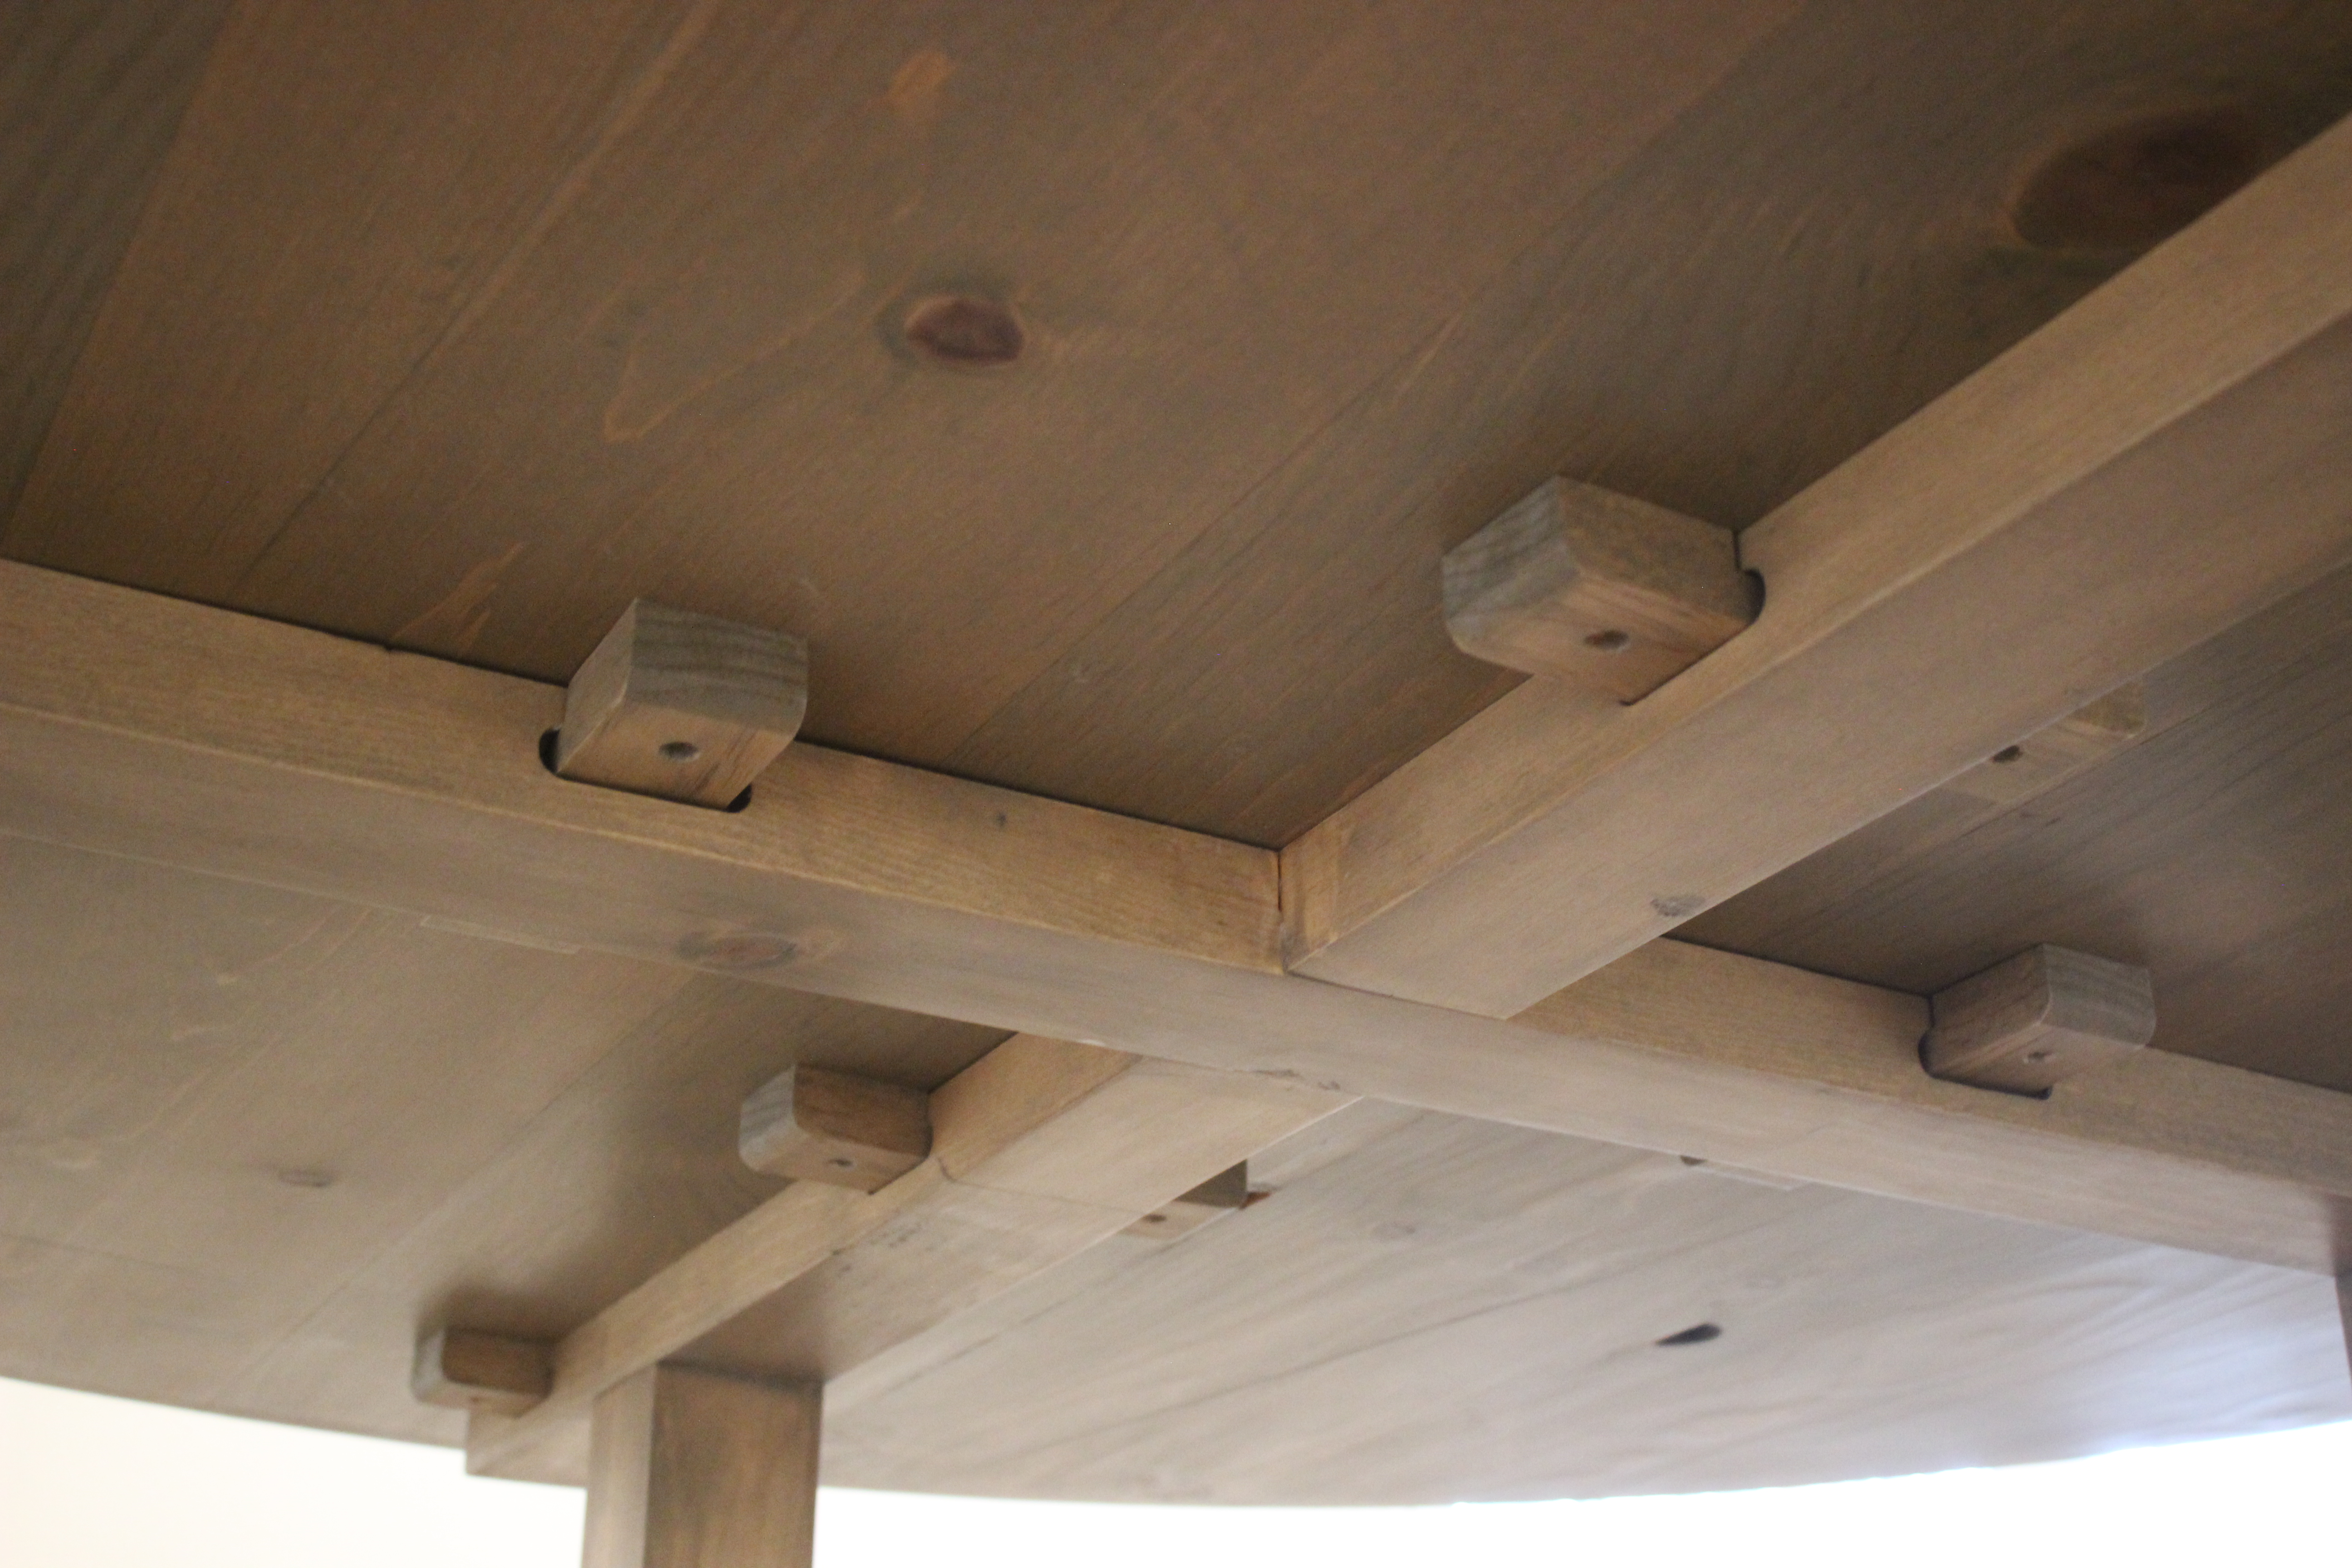
9. Cut the top support boards to their final length. These boards will sit on top of the table legs and also absorb the stress of the table top as well as give it rigidity. Note that the length for the supports needs to just be slightly shorter then the diameter of the table top. My table top is 68 inch diameter so this support board was about 60 inches long.
10. Cut rabbets into the very center of the top supports so they can later be joined together in a crisscross orientation with a lap joint. A table saw sled will easily shave away material, pass by pass. To avoid having the sharp ends on the supports, hitting dinner guests’ knees while they were sitting at the table, I decided to round the downward-facing ends with a the router and bevel bit.
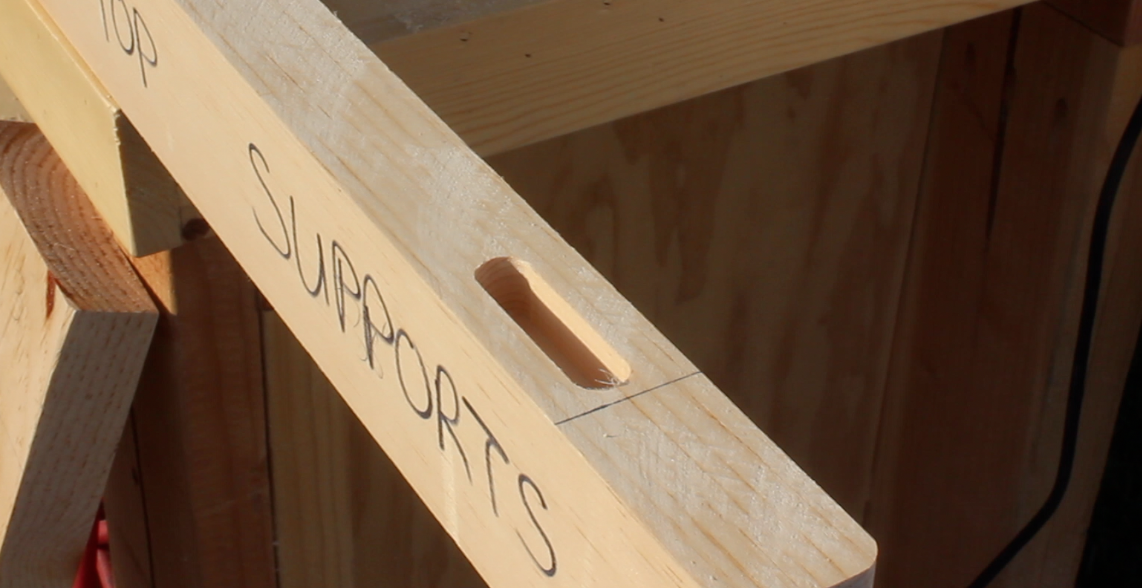
11. Cut small (5/8-inch by 1 1/2-inches) mortises into the sides of the top supports using a jig made out of plywood. Since the router will be equipped with a bushing to help guide the bit along the jig, keep in mind that the size of the jig’s opening must be slightly larger than the final size of the mortise. For example if the mortise is to be a 1/2-inch wide, and the bushing adds an 1/8-inch inch two each side of the router bit, the jig should have an opening that is 3/4 of an inch wide (1/2″ + 1/8″ + 1/8″ = 3/4″). I make 16 total mortises – 4 on each side of each support board.
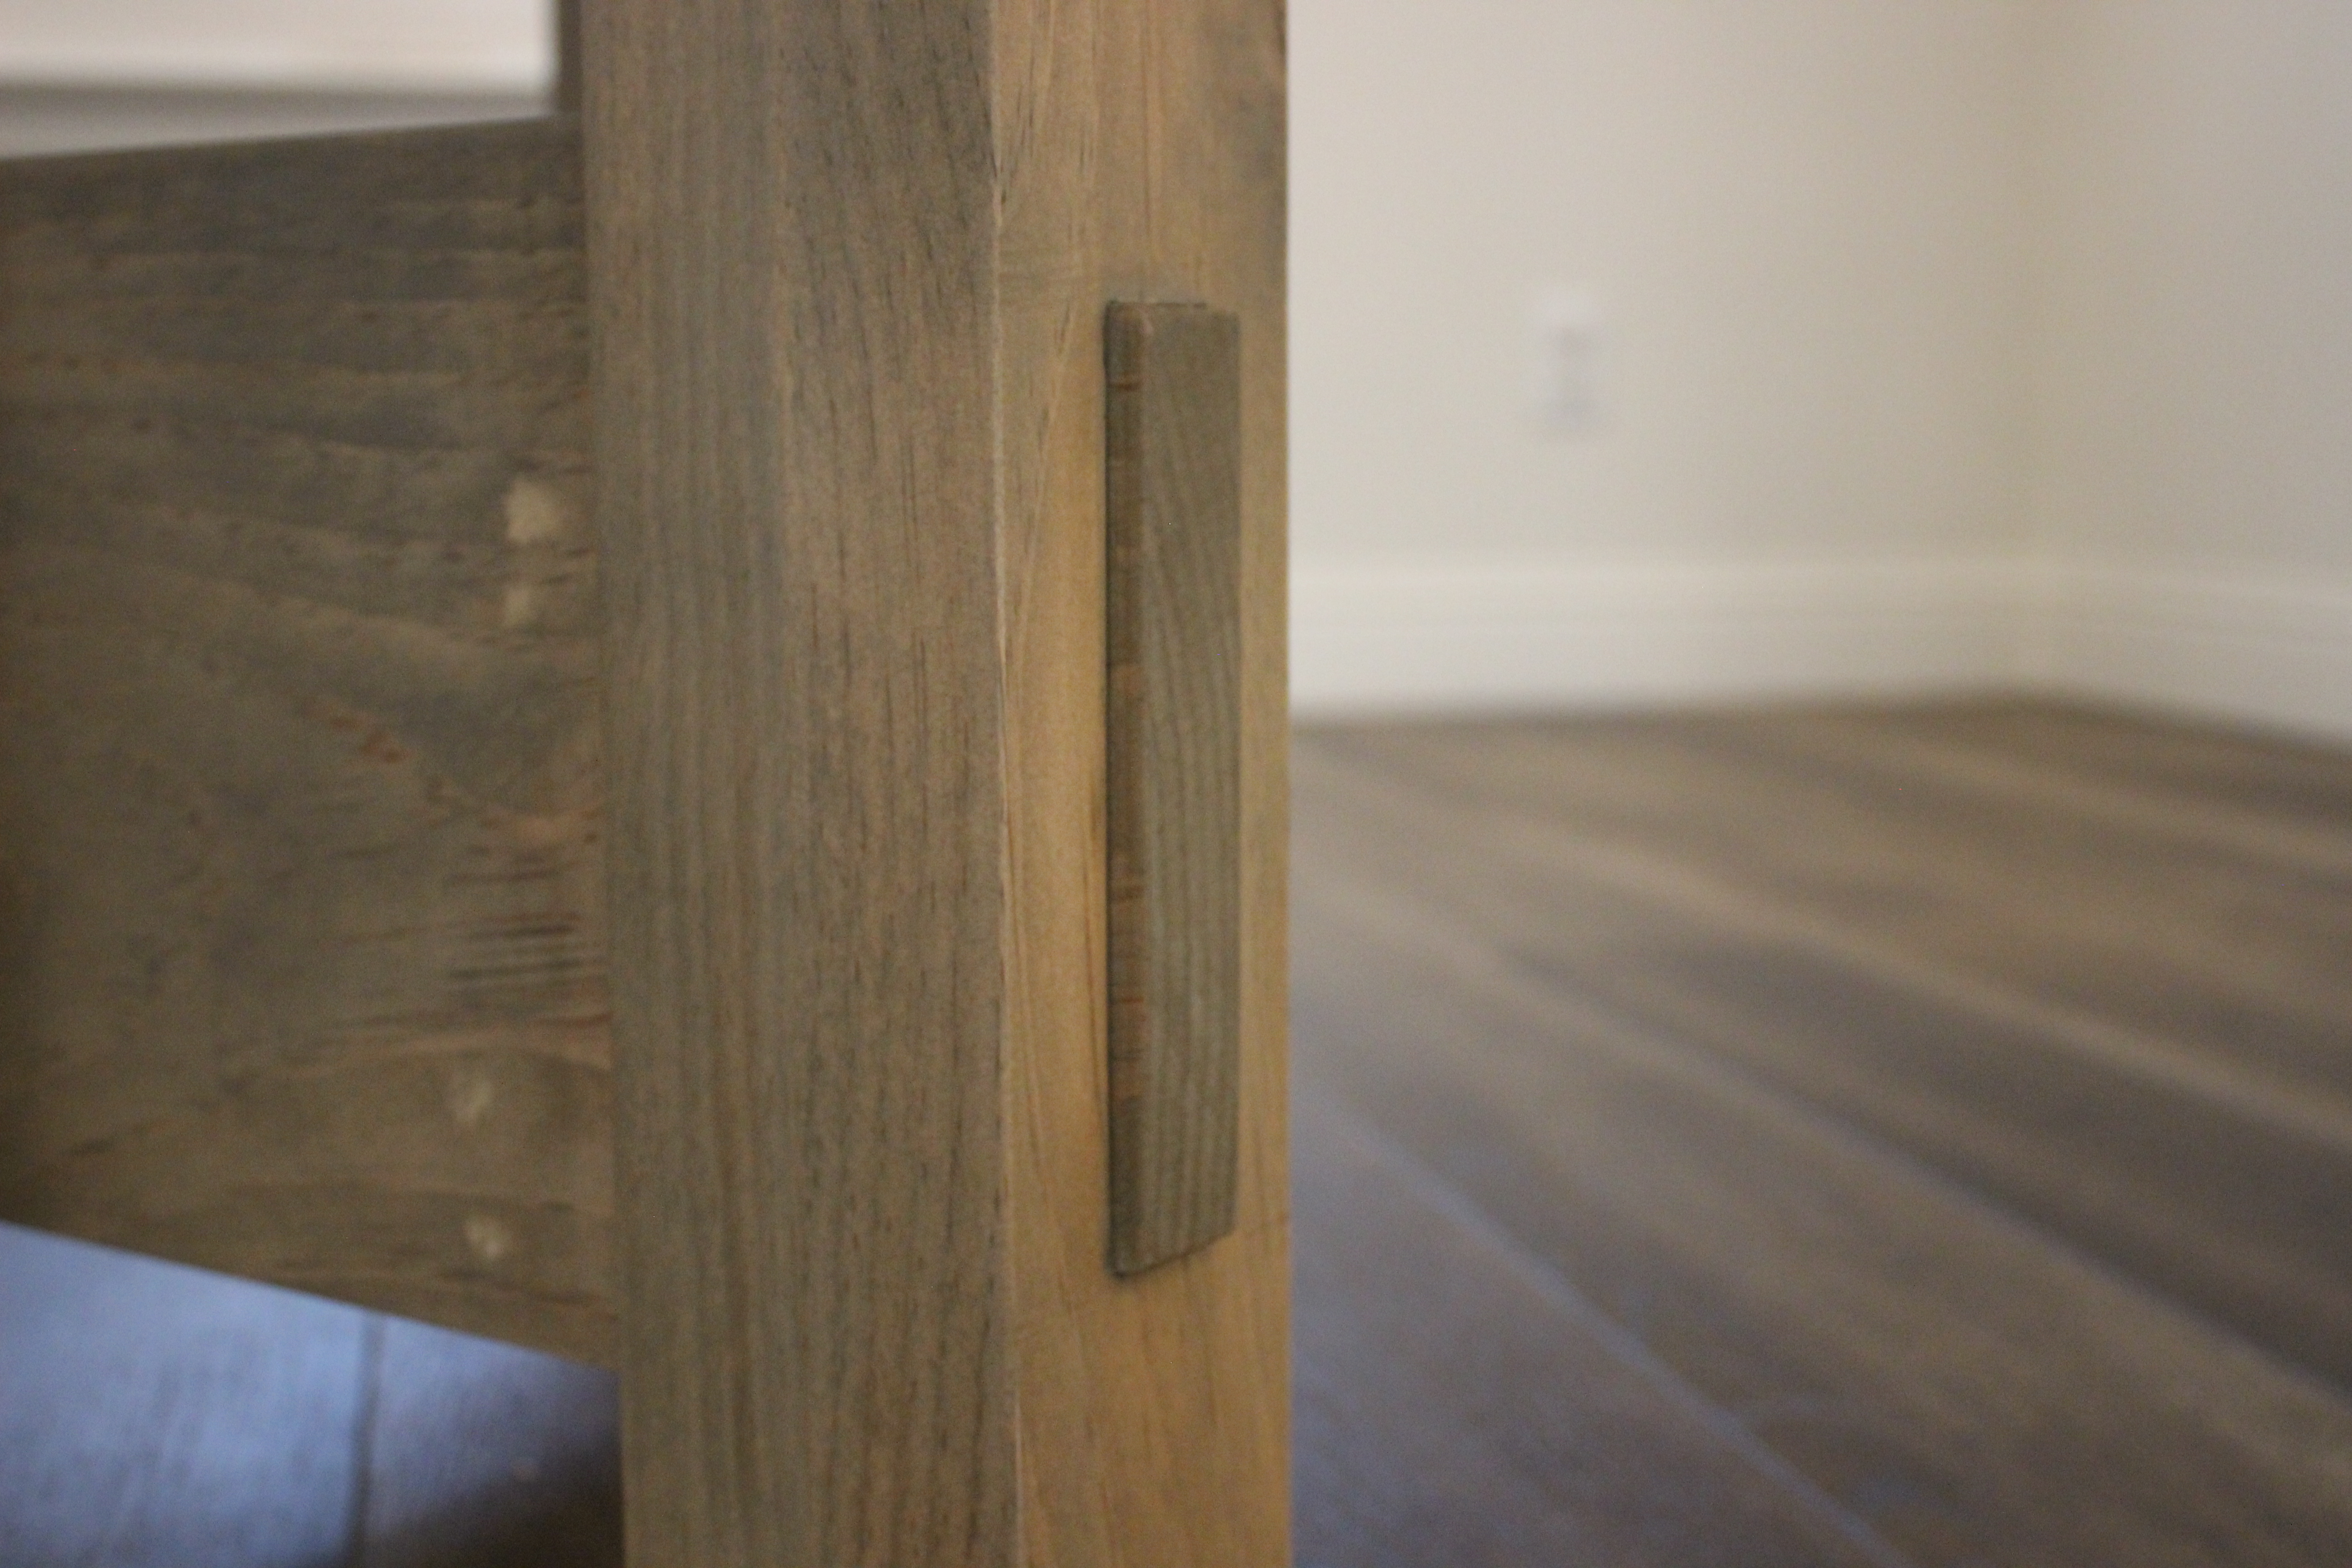
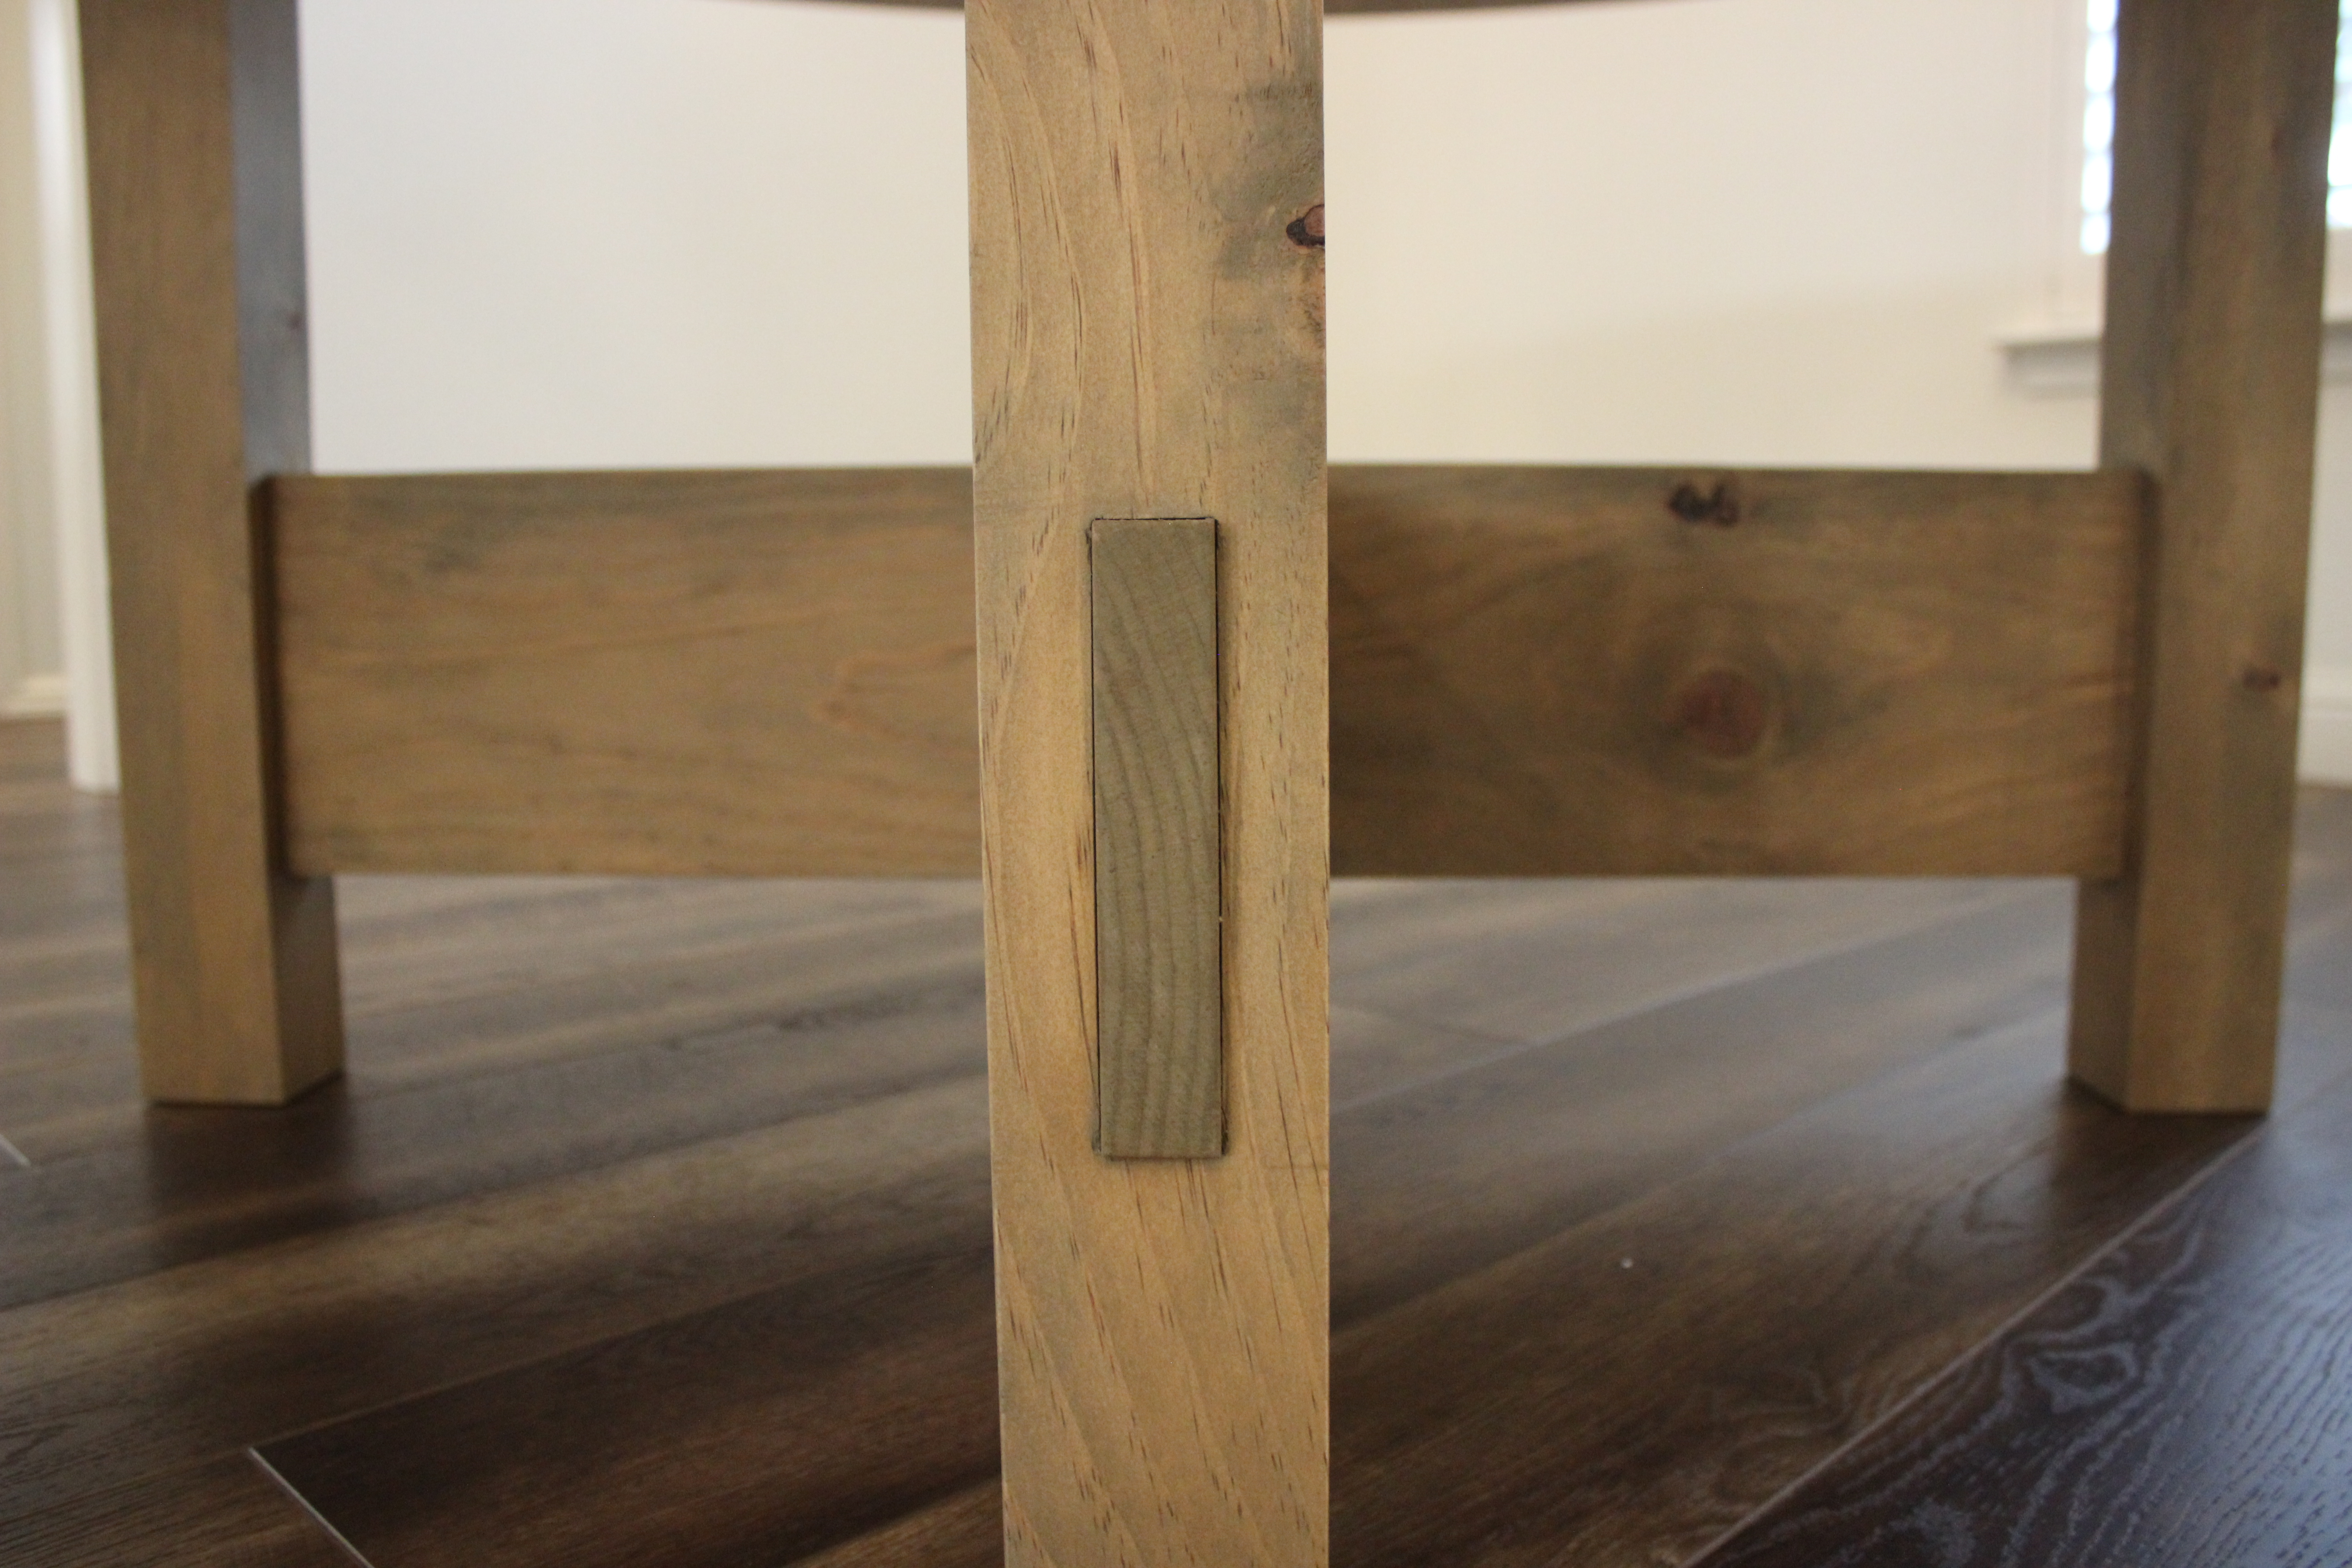
12. Make fasteners to attach the table top to the base. I used scrap pieces of white pine to fabricate these fasters on the table saw. For the fasteners to function properly, they height of their inner lip needs to be shorter than the from the edge of the table support to the nearest edge of the mortise. This will allow the fasteners to clamp down on the support board when it screwed into the table top. Also, pre-drill and counter sink hole for screws in the fasteners.
The grain direction of the fasteners should be going perpendicular to the grain direction of the support boards. This will give the fasteners the most strength and reduce the risk of them breaking during installation or when he table is picked up. It’s also worth noting that this method of attaching the base to the table top will allow for the top to expand and contract throughout the seasons. You never want to screw the base directly into the table top as it will cause cupping – and no one wants to have their plate wobble at the dinner table.
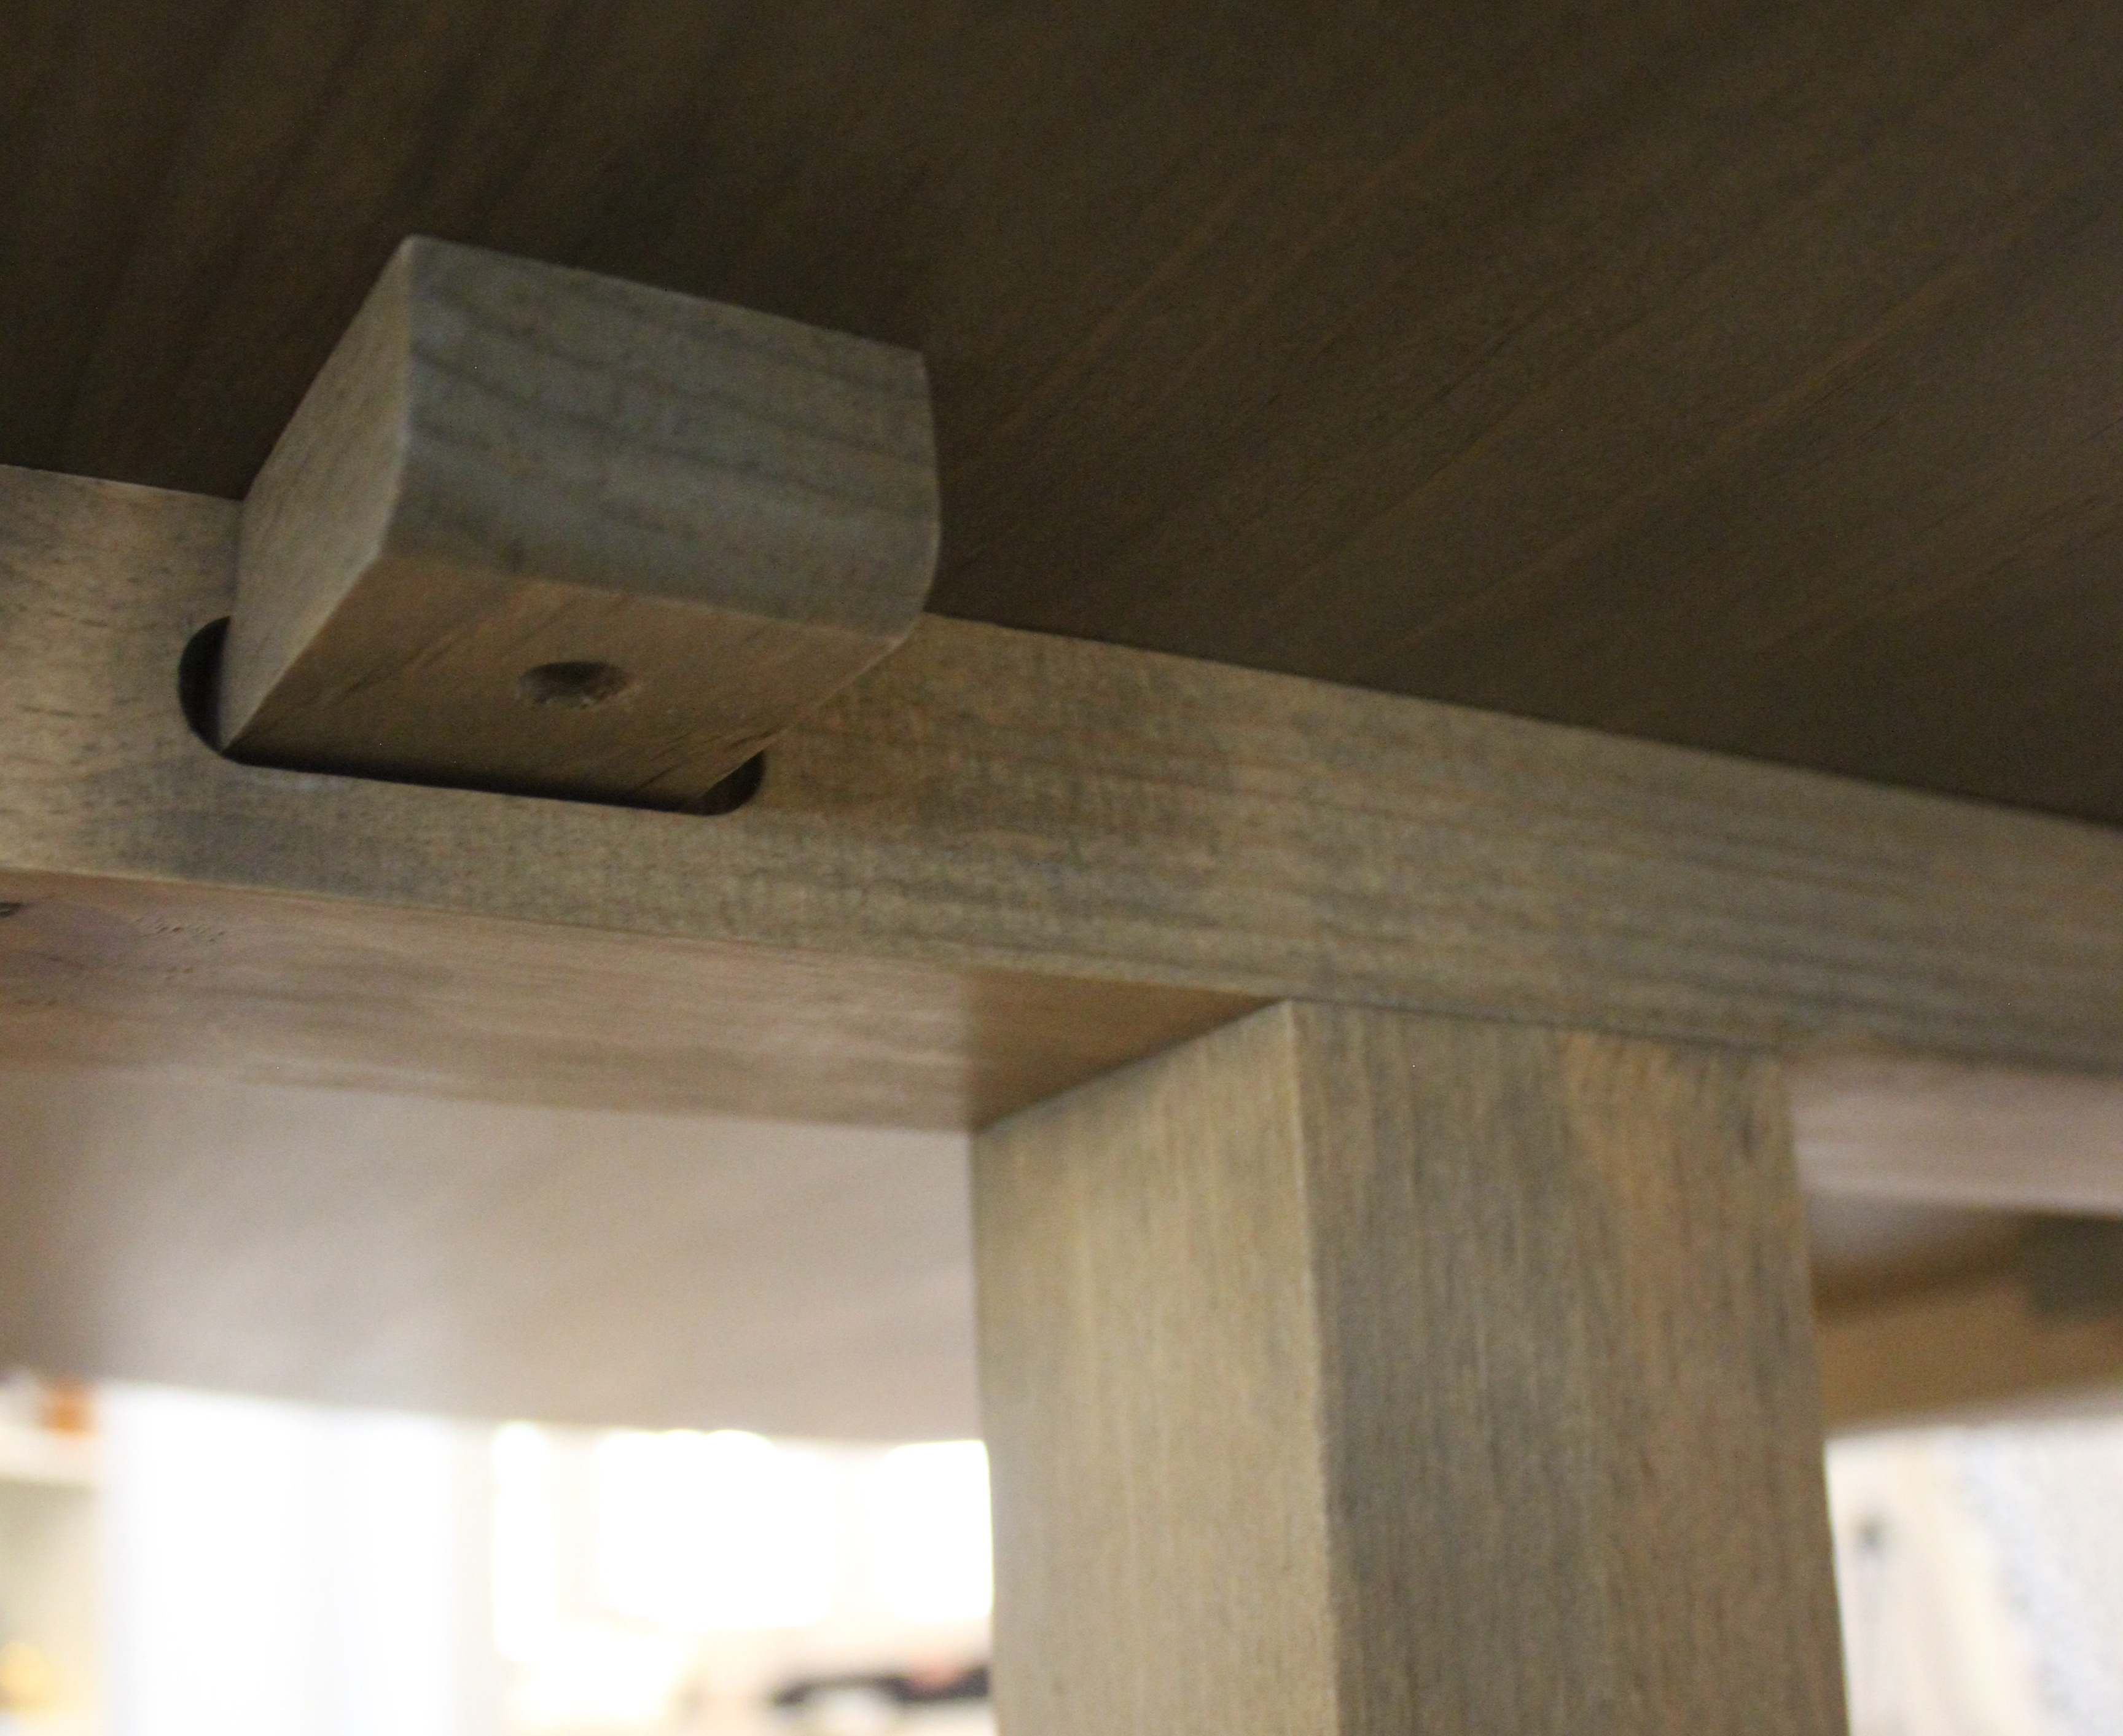
13. Sand all parts of the table base with 120-grit sandpaper. As mentioned previously, it’s likely that mortise and tenons are probably not identical, so it would be wise to keep specific joints matched with one another. Sanding will removing any markings on the wood parts, so keep track of which tenons match with which mortises by labeling them with masking tape and a pencil.
14. Assemble table base components with wood glue. Start by applying glue to the through tenons and inserting them into the table leg mortises. If you need a mallet to give pieces some extra encouragement, use a block of scrap white pine to absorb the blows – white pine is a very soft wood. Glue one mortise and tenon at a time. Connect the lap joint in the stretchers, then attach the top supports with wood screws and glue. Remove any squeeze-out immediately form all components to save yourself from sanding later on.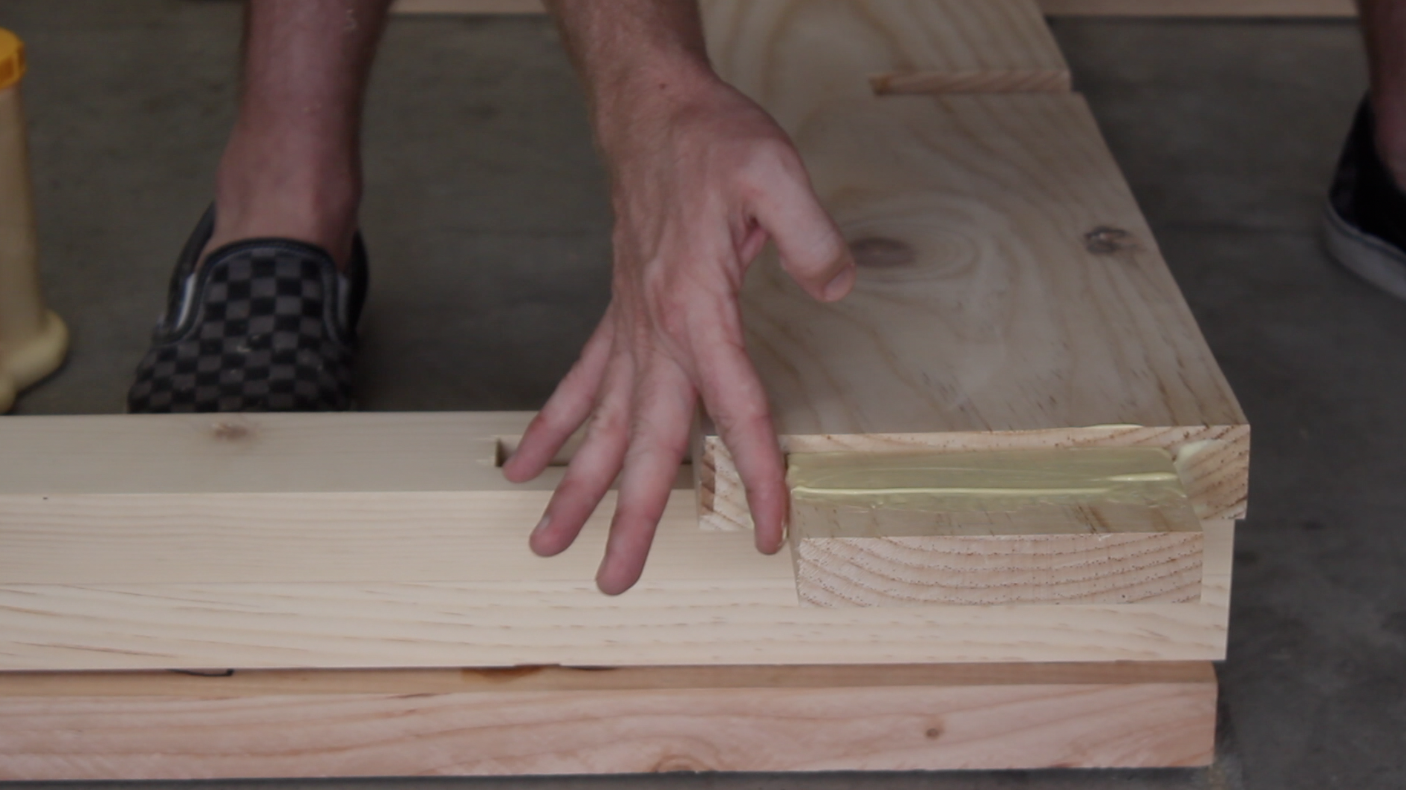


15. Wipe down the base with mineral spirits to spot any dried glue, and sand it away with 120-grit sandpaper.
Staining and finishing the table
1. Apply a coat of pre-stain conditioner to the top, base and fasteners to help the wood do a better job of accepting the wood stain. Lightly sand the parts after the wood conditioner has dried.
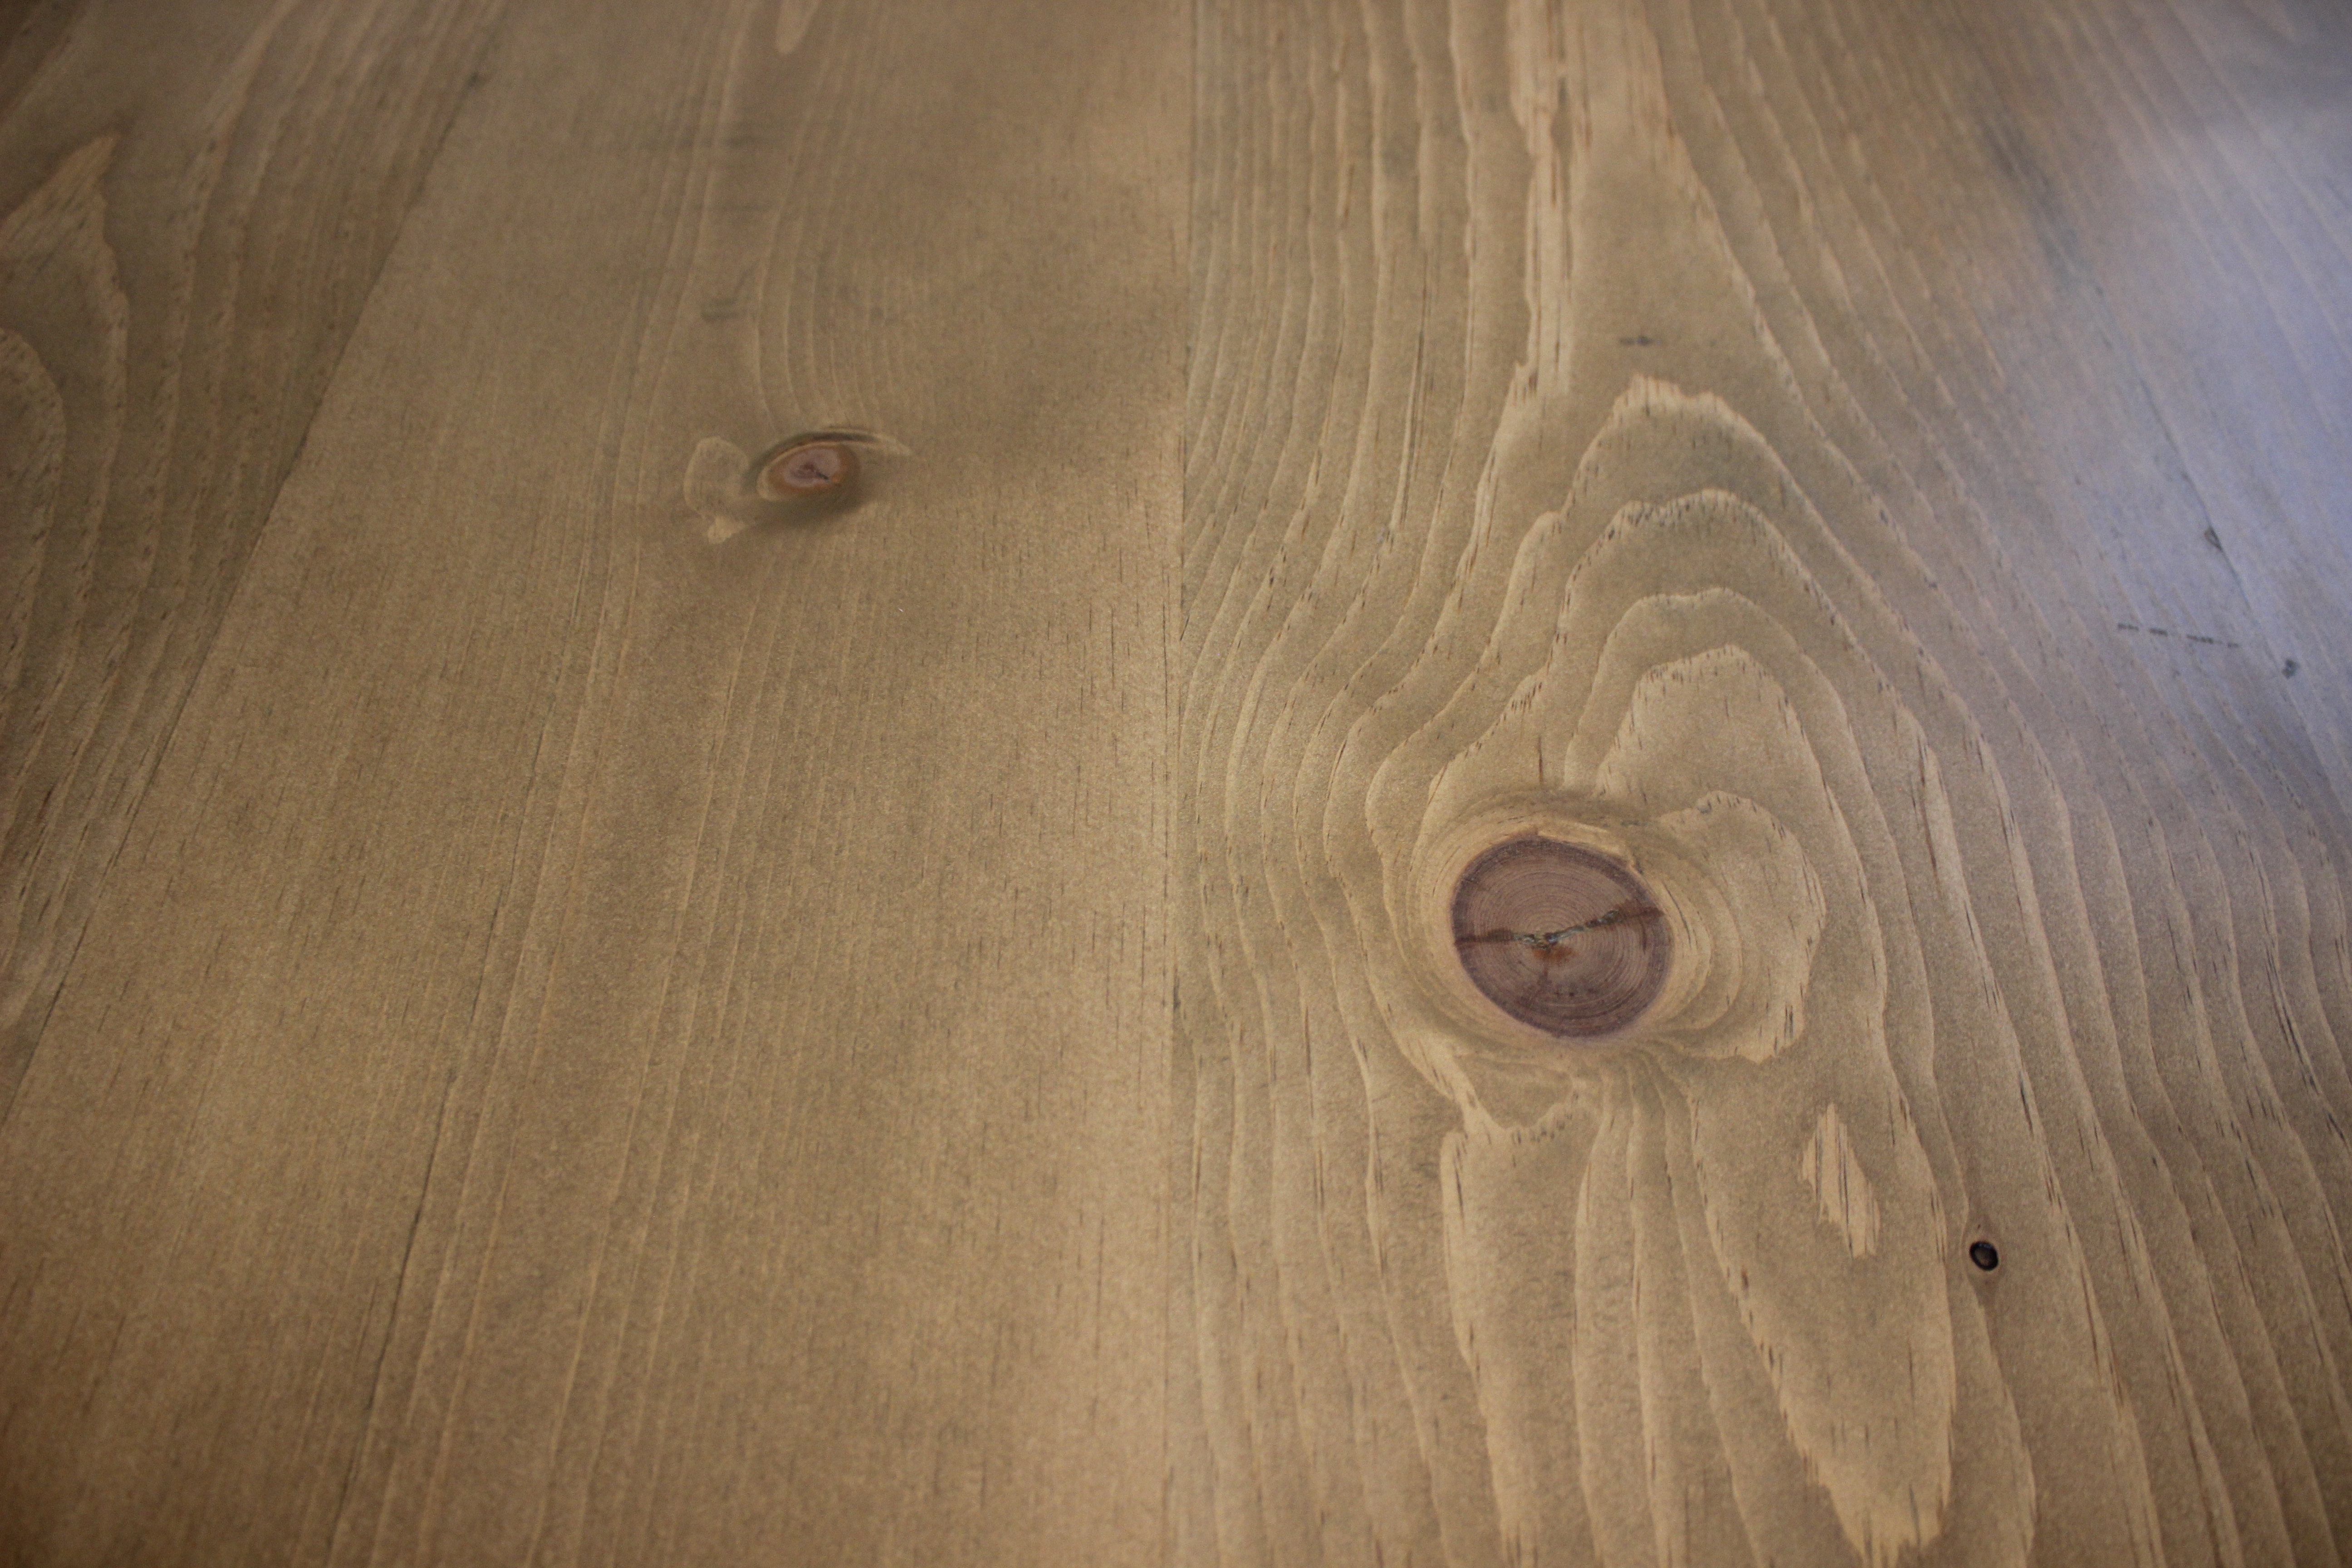
2. Apply your desired stain color to all table components. I had to match my table with our dining chairs, so to do that, I found it best to apply two separate coats of stain – one coat with Varathane’s “Weather Oak” stain, then a second cost with Varathane’s “Golden Oak” stain. Not only did this match the color I needed, but I found that produced a more natural looking color, producing beautiful variations across different parts of the wood grain. I highly recommend this technique, and be sure to test it out on some large scrap pieces.

3. Apply the appropriate coats of finish to all table components. I chose to first apply two coats of matte-finish polyurethane, sanding very lightly with 400-grit sandpaper in between. I then follow up with three coats of a one-half polyurethane, one-half mineral spirits mixture, again, sanding with 400-grit sandpaper after each coat. And finally, I applied two coats of a one-part polyurethane, two-parts mineral spirits mixture, sanding with 400-grit sandpaper after each coat.
How to attach the table top to the base
1. Align the center of the table with the table base by drilling a small hole in the top of the table base, were the top supports intersect. Make the hole large and deep enough to fit a nail head. Insert a nail into the hold and then, using the nail hole in the bottom side of the table top which was used to attach the plunge router jig, guide the nail into the table top. This should perfectly center the table on the base.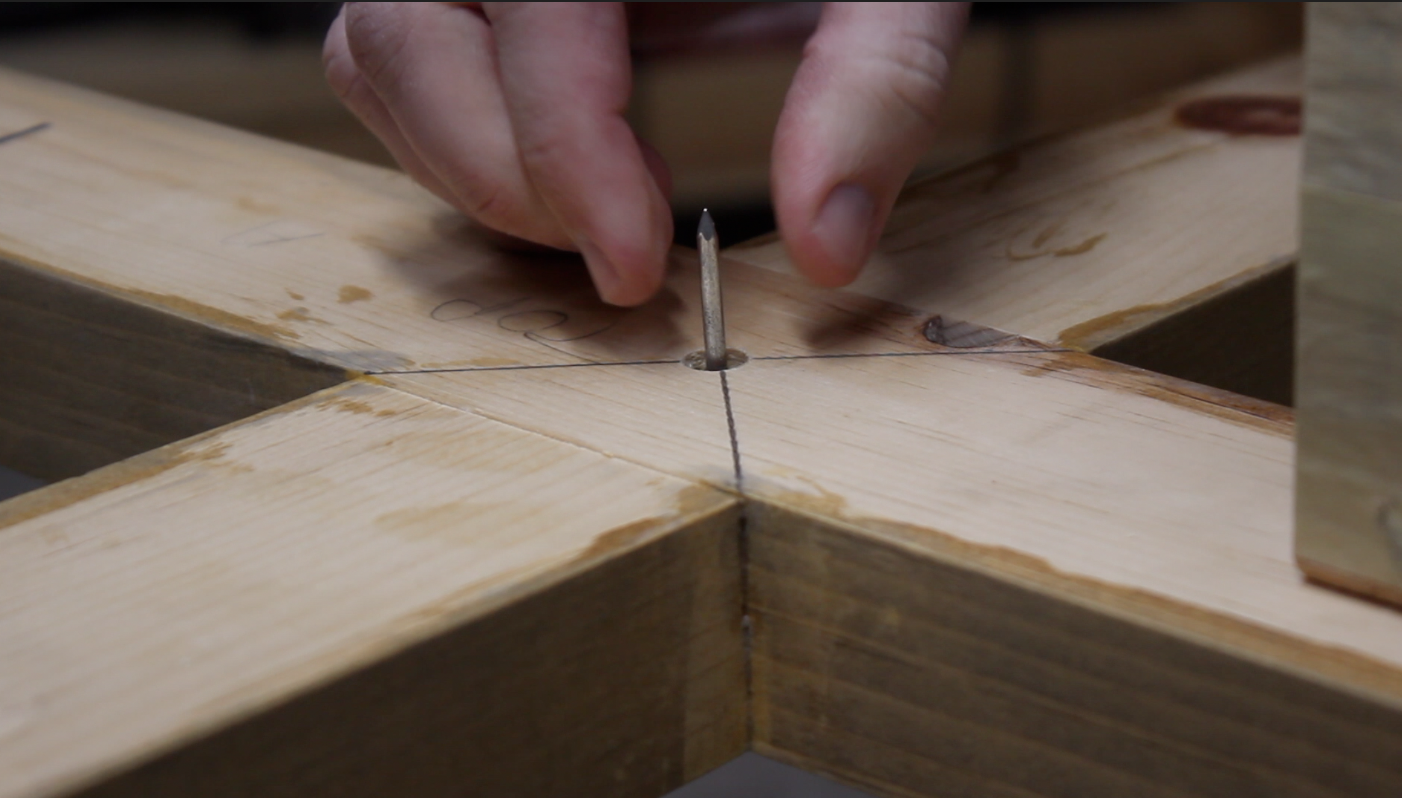
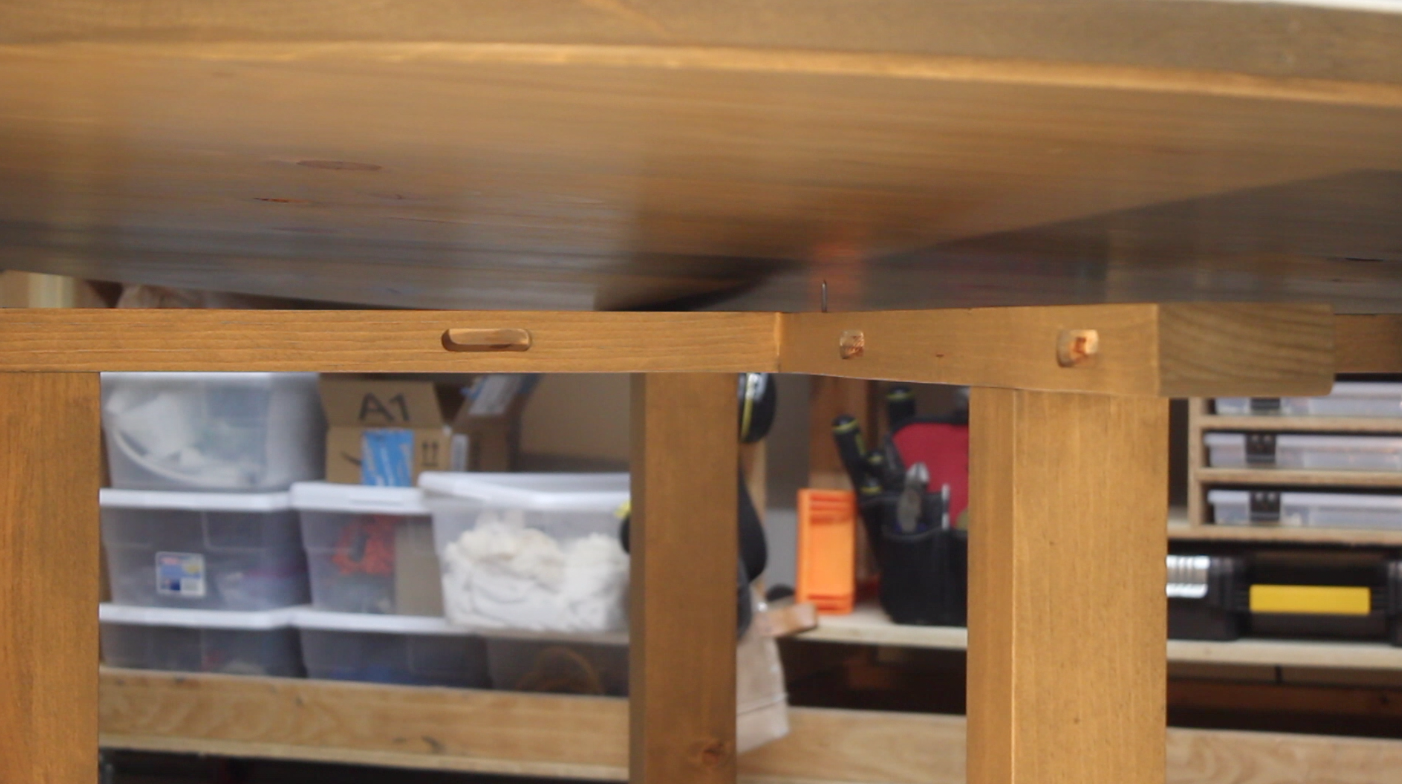
2. Pre-drill holes on the bottom side of the table top for the wood fasteners. While drilling the holes, use finished faster as a guide for the placement placement of the pilot holes.
3. Screw the fasteners into the table top to secure it to the table base. And you’re done!
Check out the photos below so see the finished dining table close-up. And feel free to buy your equipment, supplies and materials through the affiliate links in this blog post – a portion of your purchases gets kicked back to Gadgets and Grain, so any help is much appreciated. As always, let me know if you have any questions.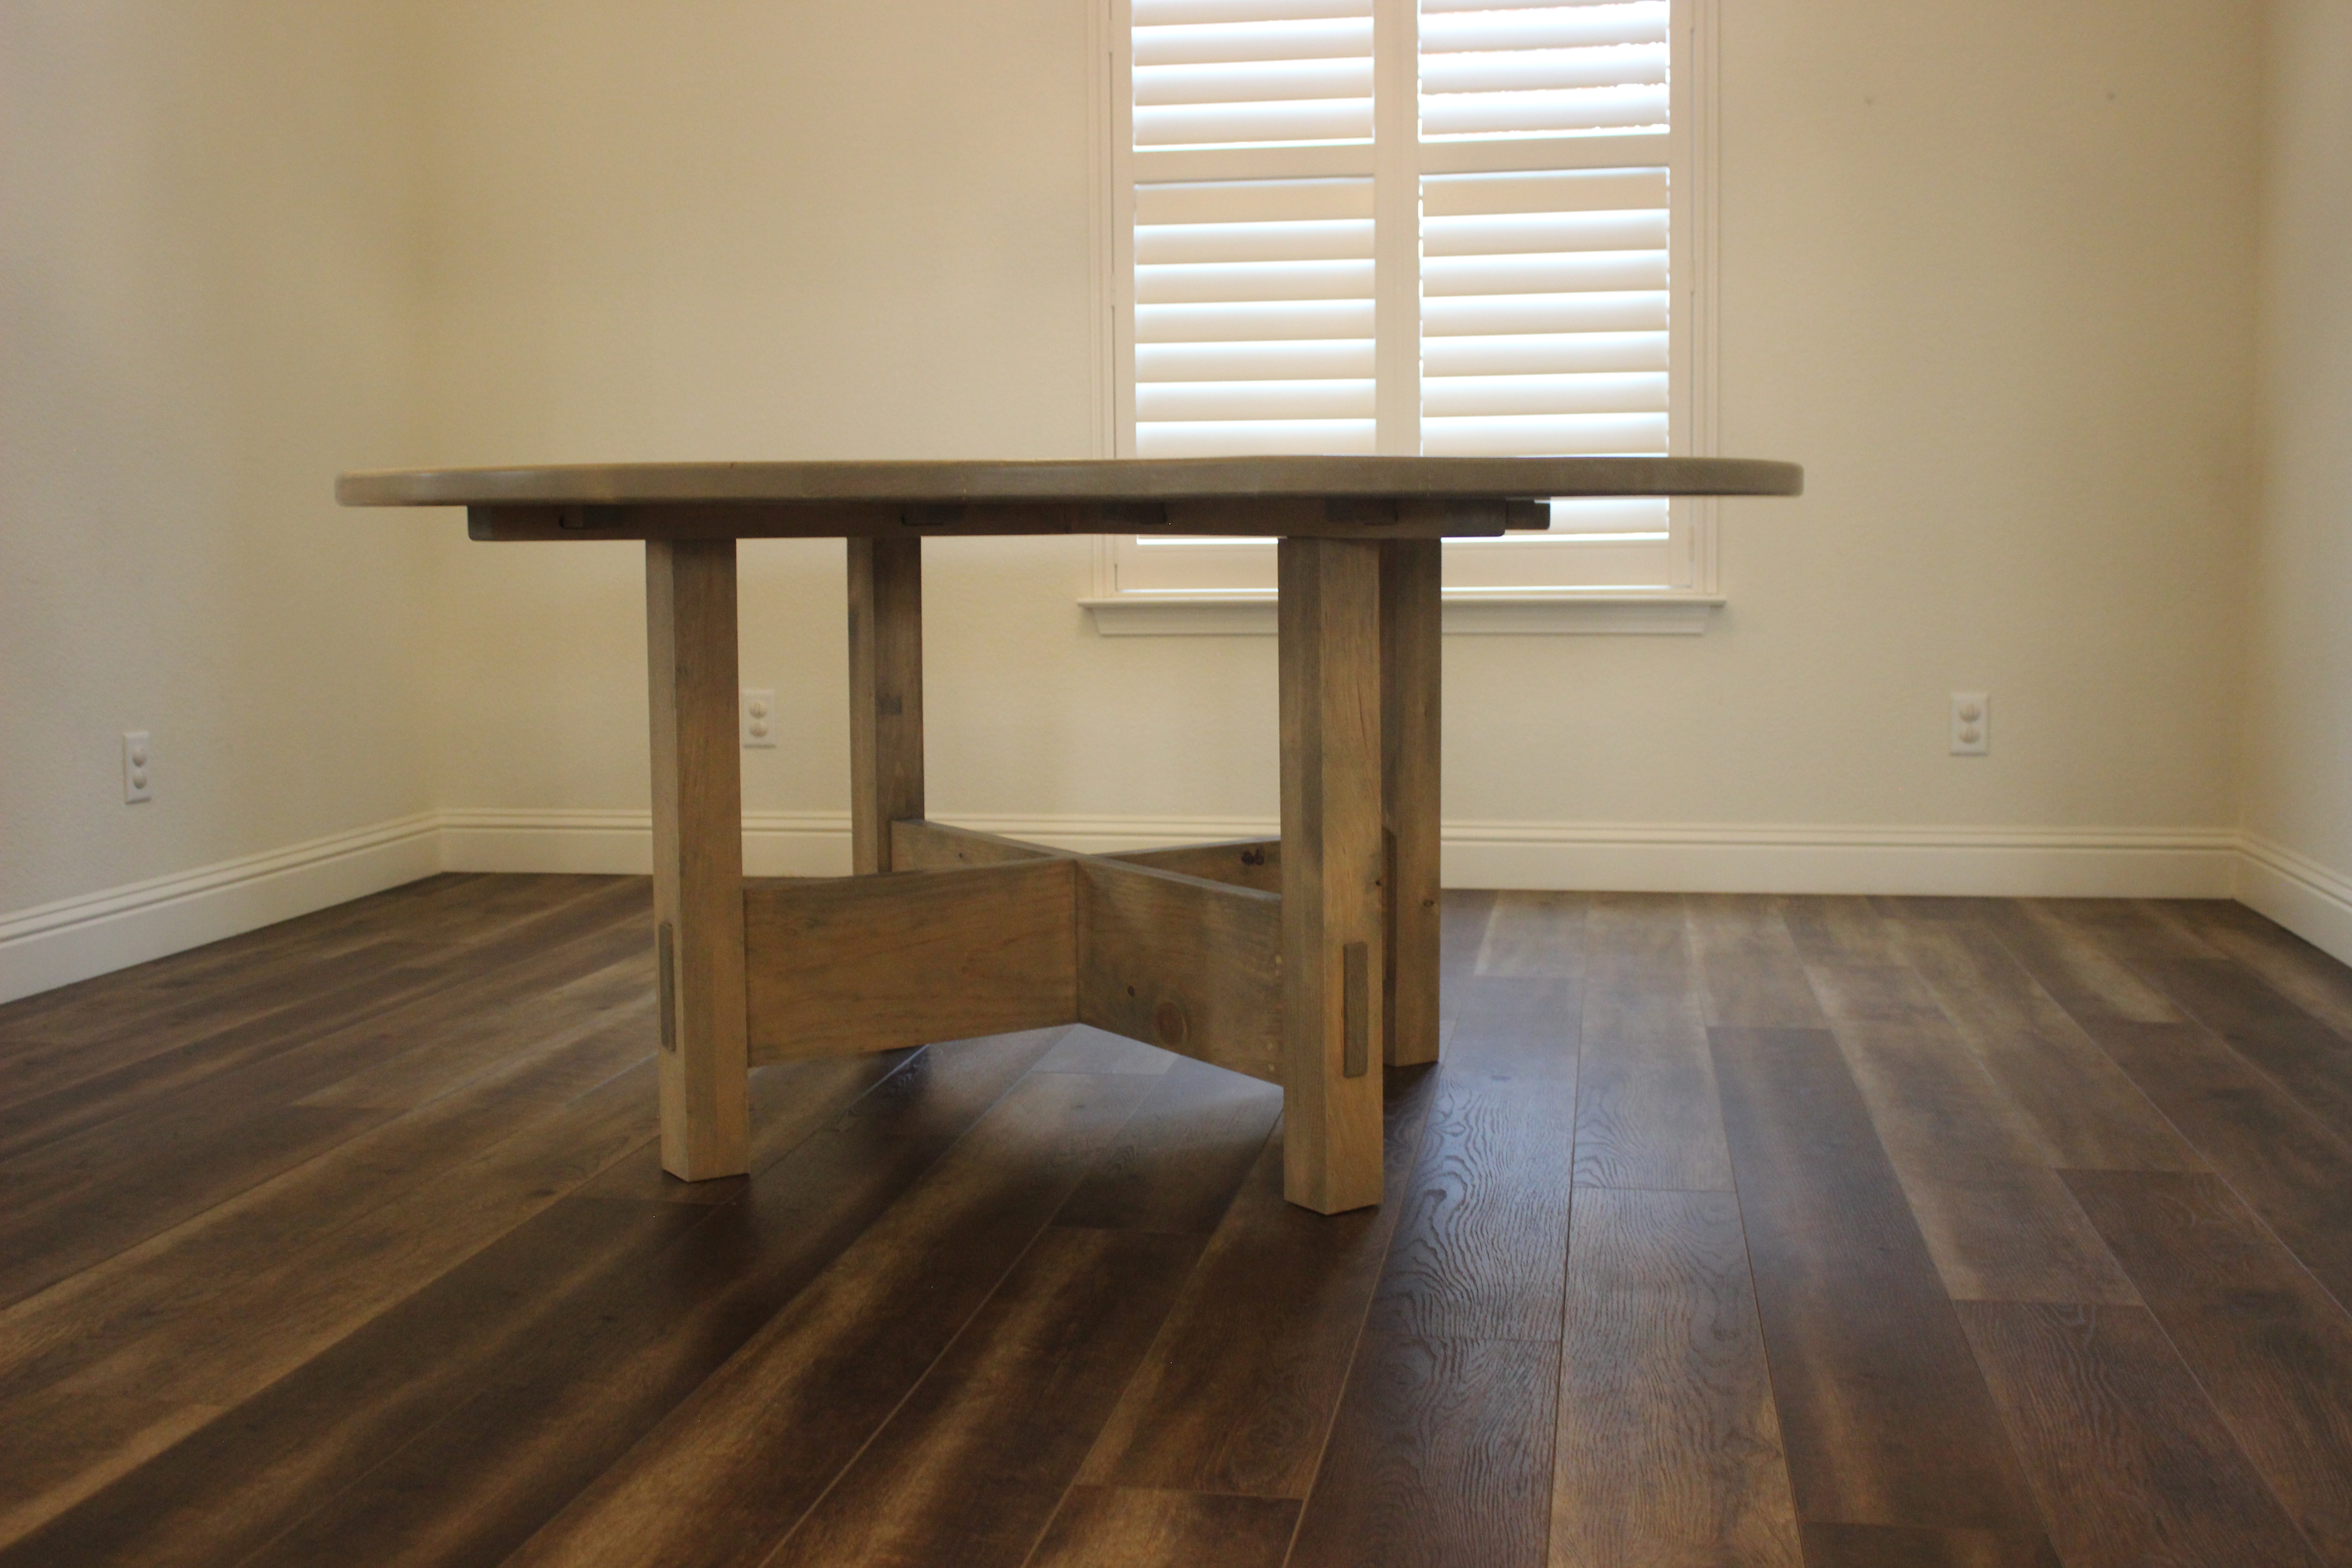


Dining table shopping list
Skip this part if you already have everything you need of this project, but if you would like a little help stocking up or some ideas for new equipment, below are links to the tools, materials and supplies used in this video. Just a heads up that I get a small commission from these links, so any support is much appreciated.
- Sliding miter saw
- Table saw
- Random orbit sander
- Cordless drill
- Speed square
- Parallel bar clamp
- Circular saw
- Trigger clamps
- Glue bottle
- Forstner drill bits
- Bluetooth headphones


Simply brilliant work – you make it look easy but it’s clearly not and you enjoy it. I love how in your videos you show the next steps in writing. Thank you
LikeLike
Thanks for watching, Niren. And I really appreciate the kind words.
LikeLike
I have a question….I’m doing a similar project…I’ve completed my table top which is 59” round…where as your table top is 68”…how did you determine the size of your base in order to keep your table top stable? Thank you in advance
LikeLike
Hey Michael. In the beginning, I placed my table top on some sawhorses and tested various placements by sitting on the table. If the table top didn’t flip over, then I knew it was going to be stable – plus once I secure the top to the base, the additional weight of the based would added extra stability. But learning from this, I can tell you that you want the distance from the outside measurement of opposite table legs to be about 65% of your table diameter. So with your 59″ table top, try to make the outside edges of opposite legs 38 1/4″ apart. Make sense? Let me know if you have any other questions.
LikeLike