Updated 11/28/18 – After receiving some great feedback in the comments section, I have added detailed plans and a cut list for all the boards used in the basic workbench. Let me know if you need anything else.
I tirelessly searched YouTube and Pinterest for workbench designs, and after taking into account the tools I have and the types of project I work on, there were essentially three main features I needed:
- Mobility – Hauling tools in and out of a garage is tiring and it eats up time during a build. Plus, if you’re like me, your garage is not quite a full-time woodshop, so being able to store a workbench to the side is a must.
- Size – I needed a workbench that could accommodate the largest material I might find myself working with: a 4’x8′ sheet of plywood. It takes a large workbench to act as a decent out-feed table for a table saw or to provide an adequate work area when assembling larger projects.
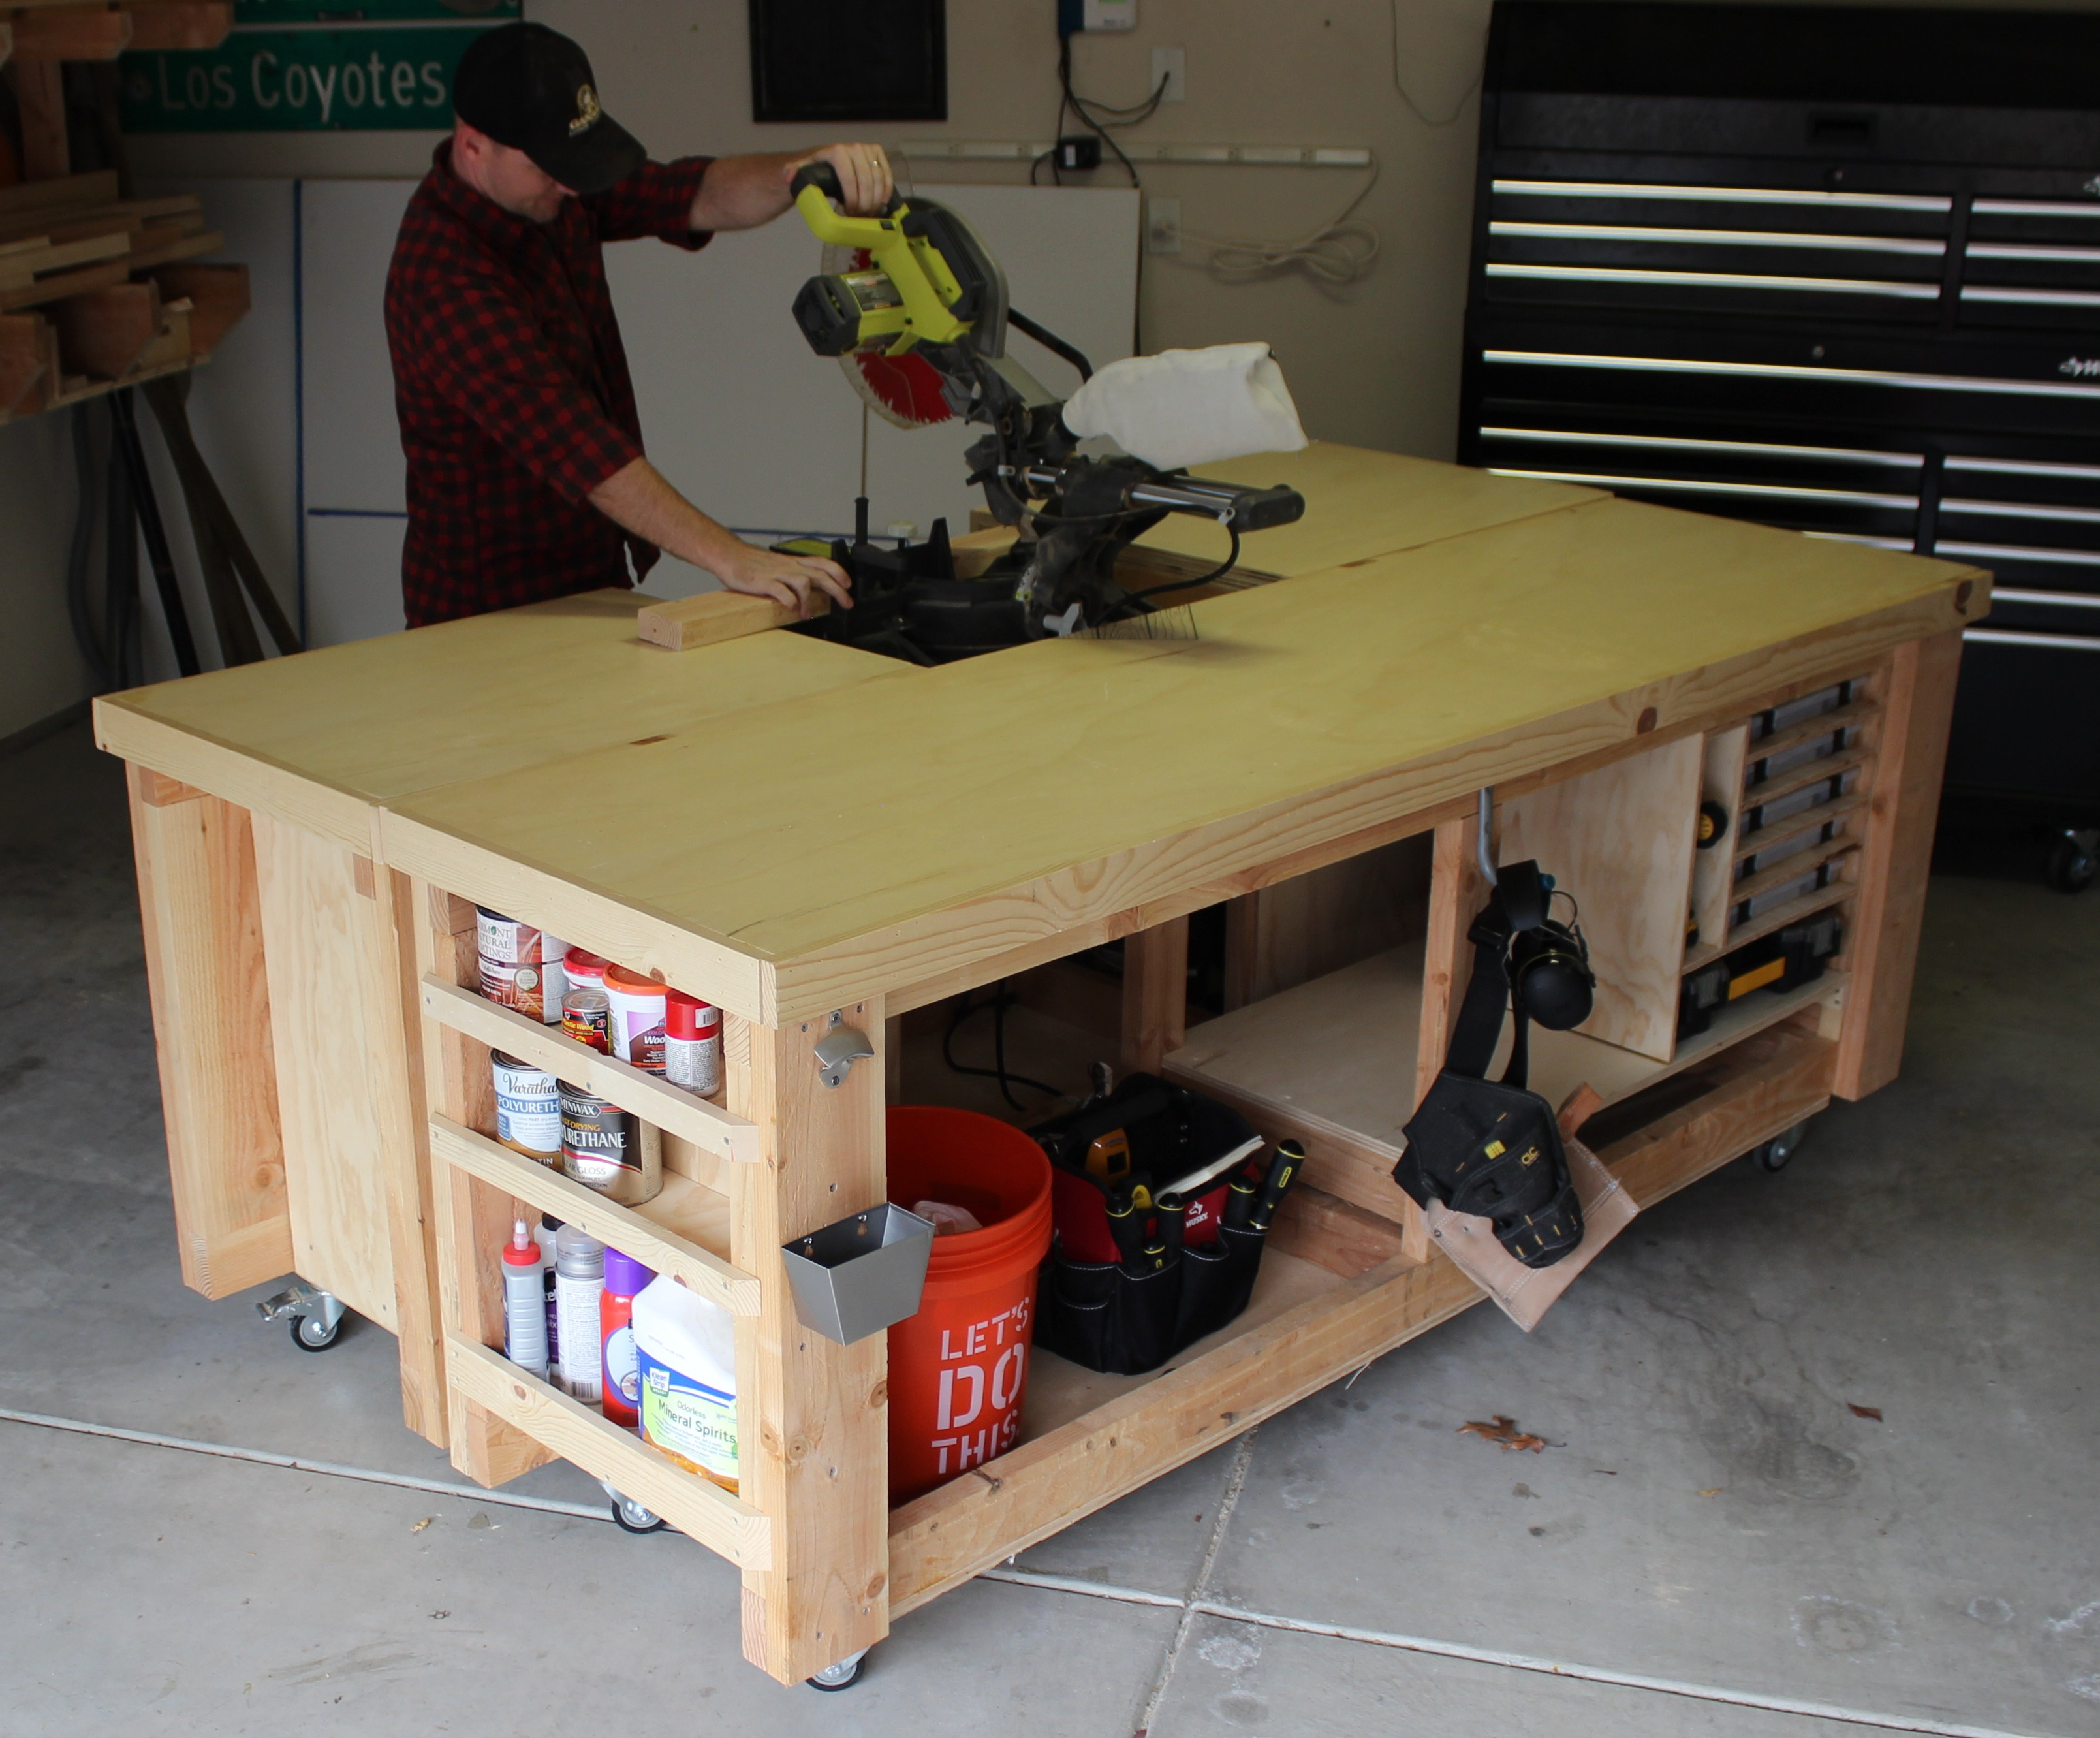
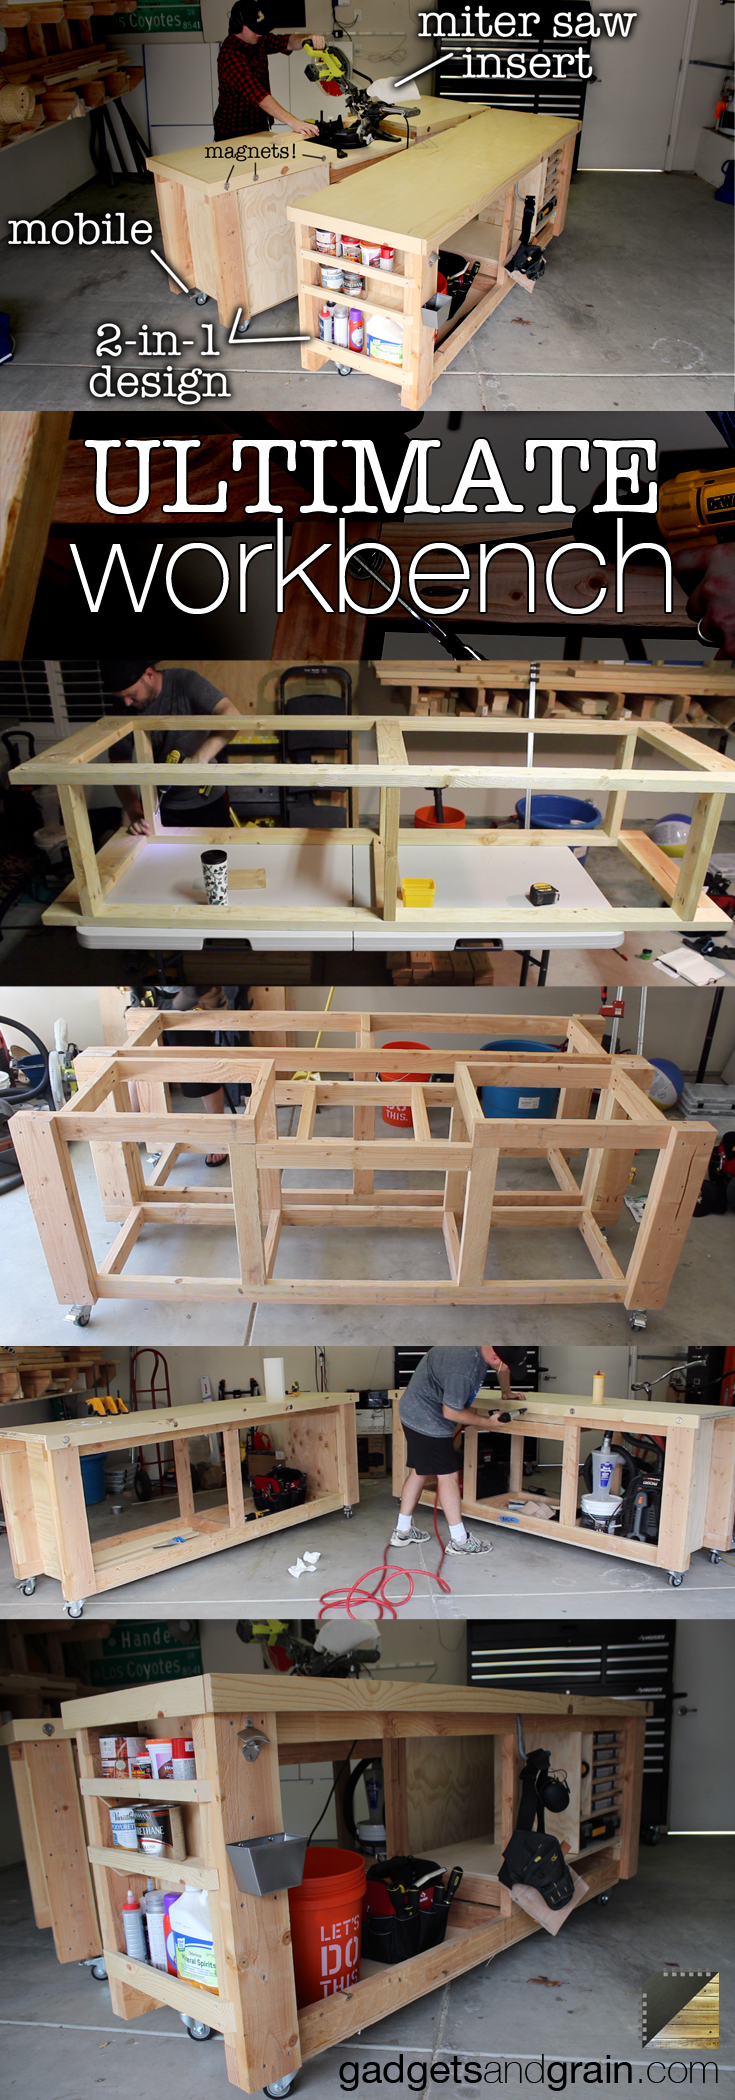
- Modular – A good workbench should be able to change with your needs, so I designed this workbench to either be two smaller halves or one big work area. I also built-in a slot to accommodate a variety of fixed tools such as a miter saw, pocket hole jig, router table, etc.
Before I start with the instructions, I have to give credit to Steve Ramsey at Woodworking for Mere Mortals and Bob at I Like to Make Stuff for the inspiration behind this design. I love the simplicity of Steve’s workbench, and the genius use of magnets with Bob’s work tables . I highly recommend checking out their videos (and their YouTube channels).
Workbench Plans & Cut List
Here are the measurements that I used to build the workbench you see in the video, but by all means, use these as a reference point to build your own bench. Perhaps you’ll want to tae your bench shorter, taller or longer – just tweak the respective measurement to suit your needs.
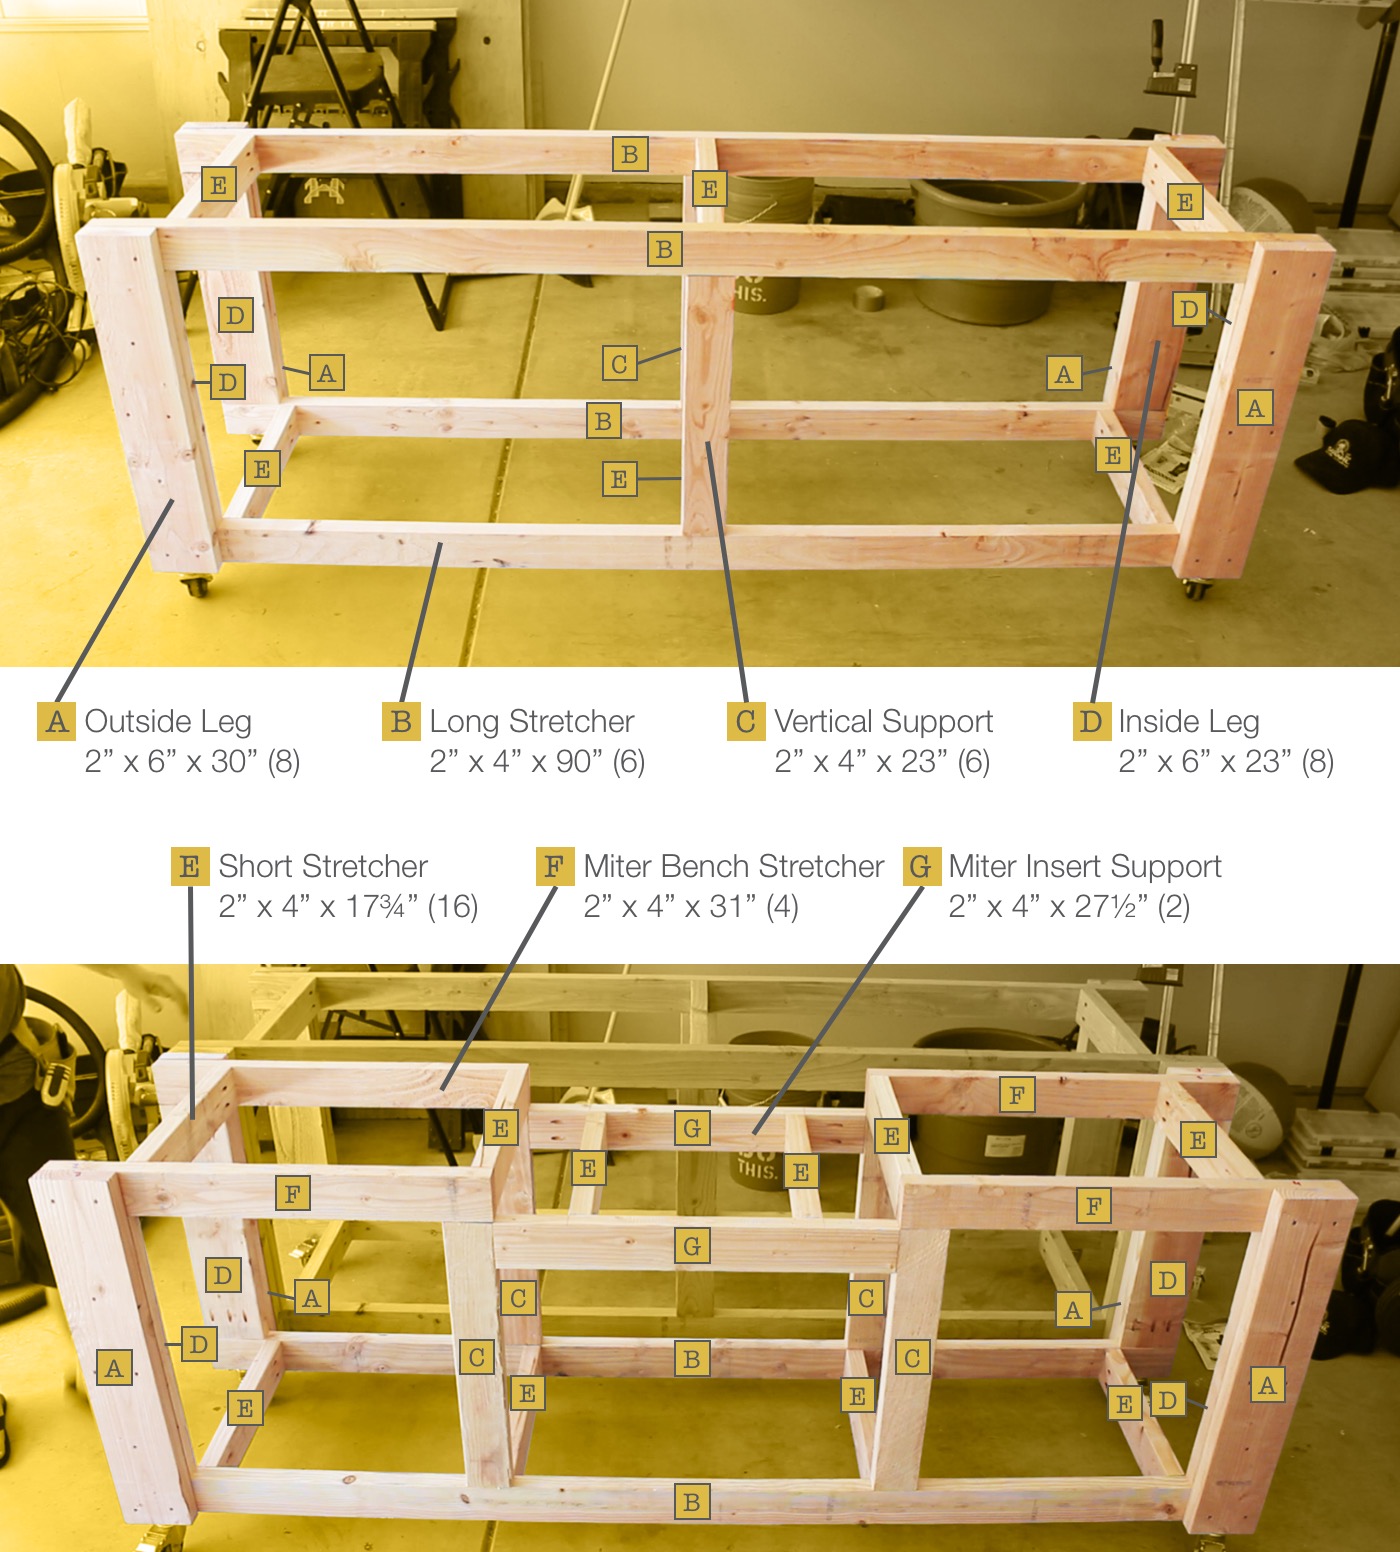
Workbench Frames
Workbench Tops, Side and Bottom Shelves
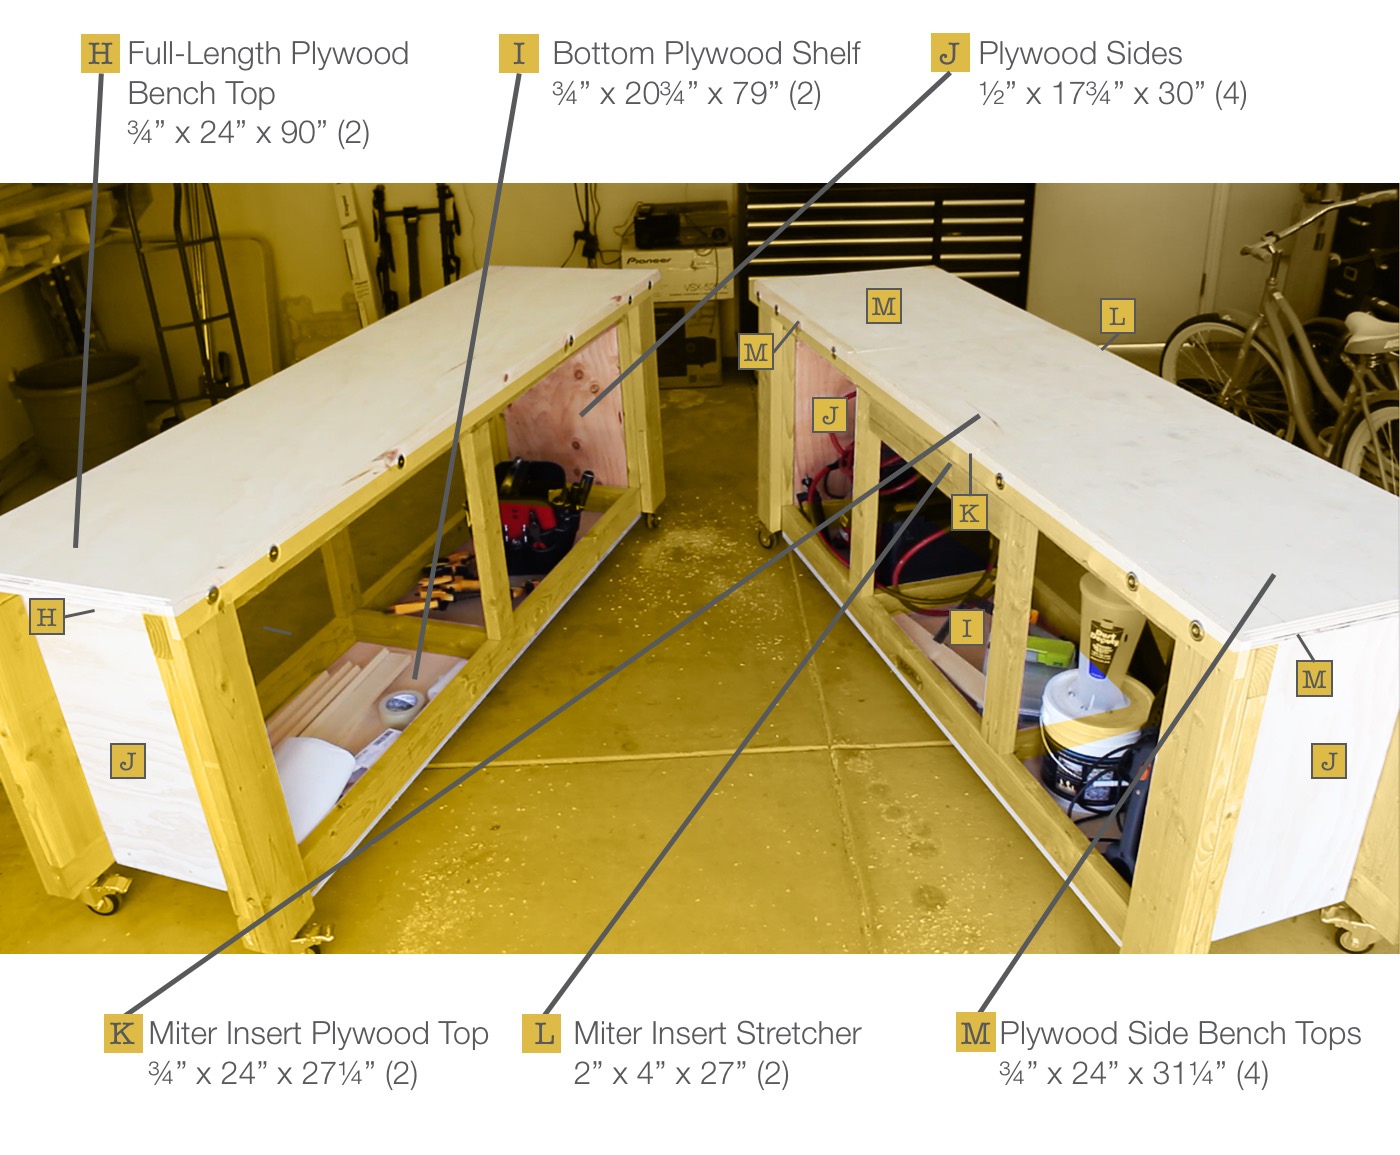 Cut List

Workbench Shopping List
Skip this part if you already have everything you need of this project, but if you would like a little help stocking up or some ideas for new equipment, below are links to the tools, materials and supplies used in this video. Just a heads up that I get a small commission from these links, so any support is much appreciated.
Tools & Equipment
- Sliding miter saw
- Cordless drill
- Speed square
- Pocket hole jig
- Parallel bar clamp
- Face clamp
- Circular saw
- Circular saw guide
- Trigger clamps
- Glue bottle
- Brad nailer
- Forstner drill bits
- Air compressor
- Bluetooth headphones
Supplies & Materials
- Pocket screws
- Wood glue
- Brad nails
- Pocket hole screws
- Poleurethane (Satin Finish)
- Foam Brushes
- Neodymium magnets
- 4-inch locking casters
Step-by-step Instructions
1. Build the Workbench Frame
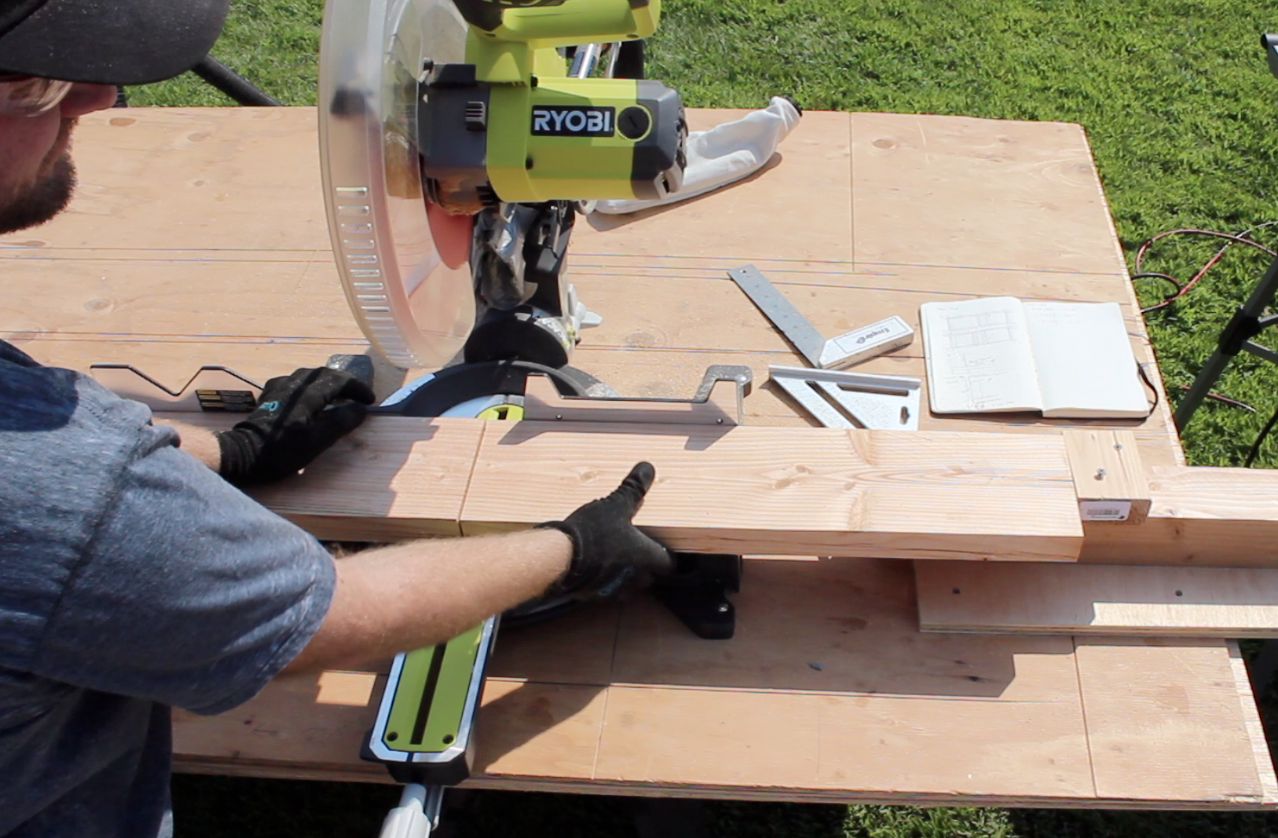
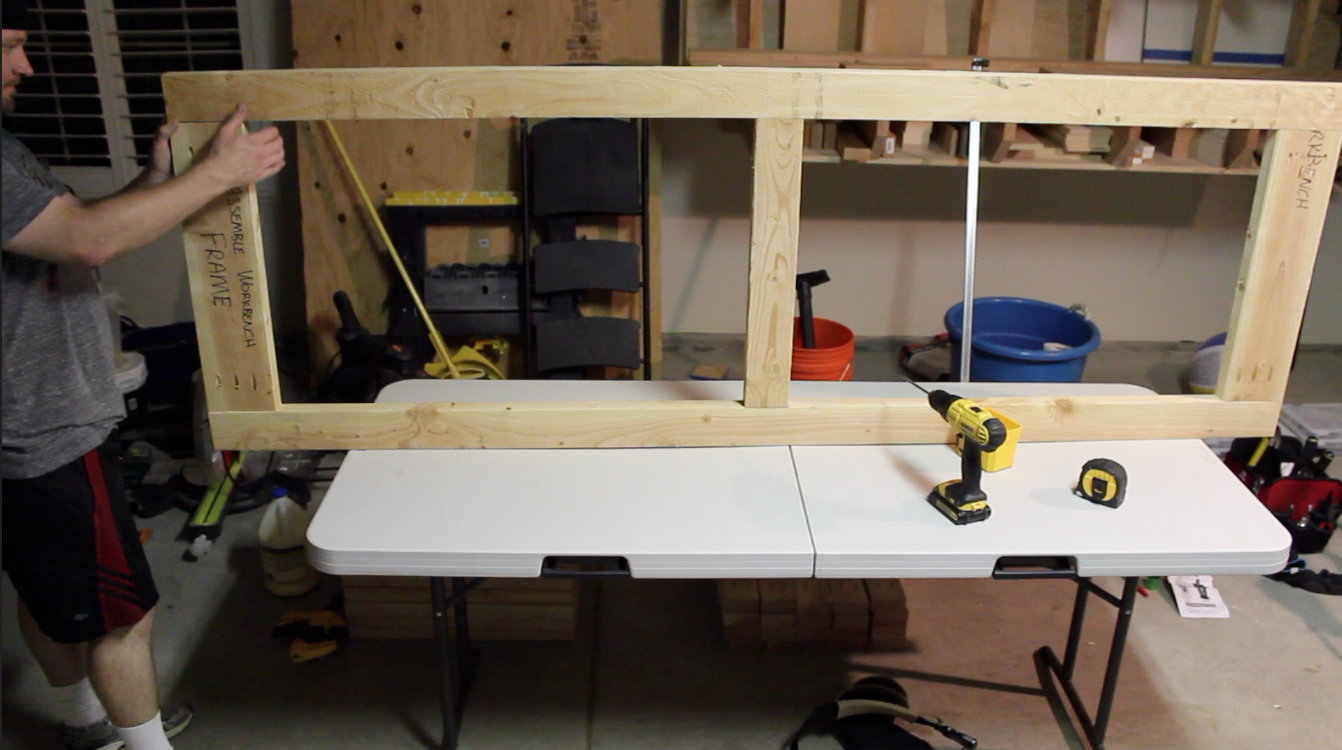
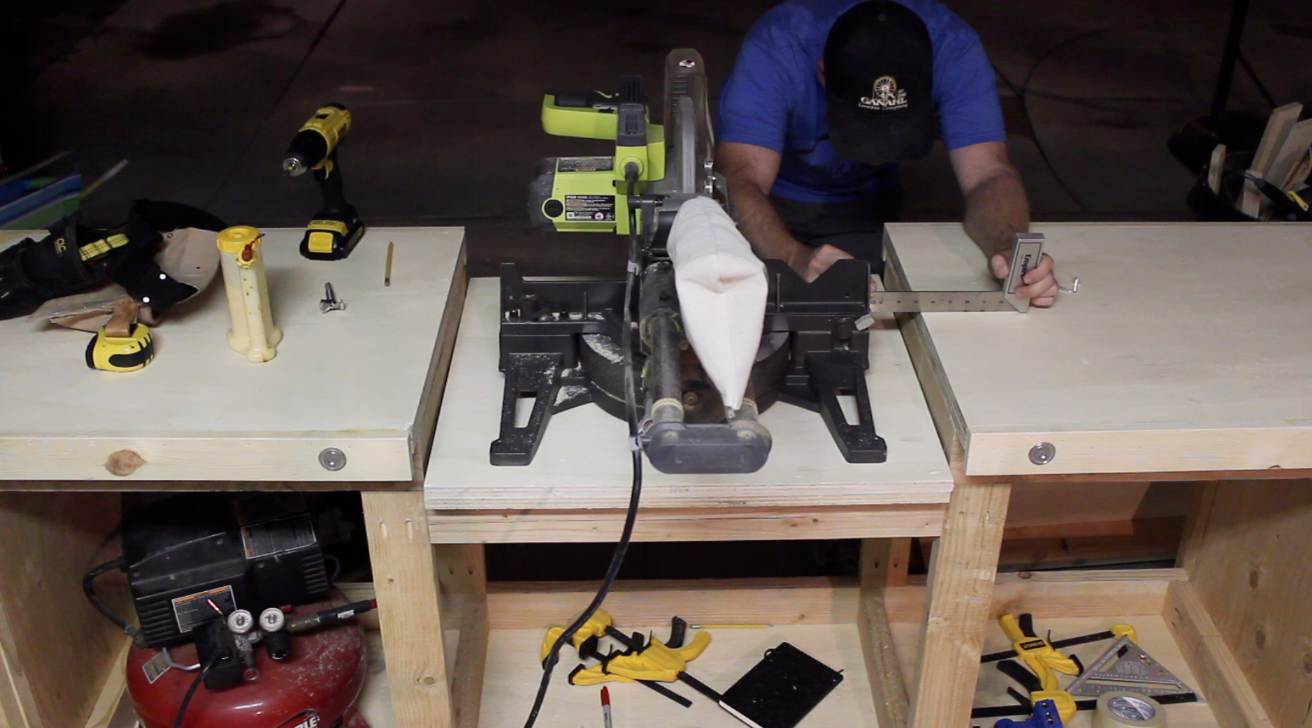
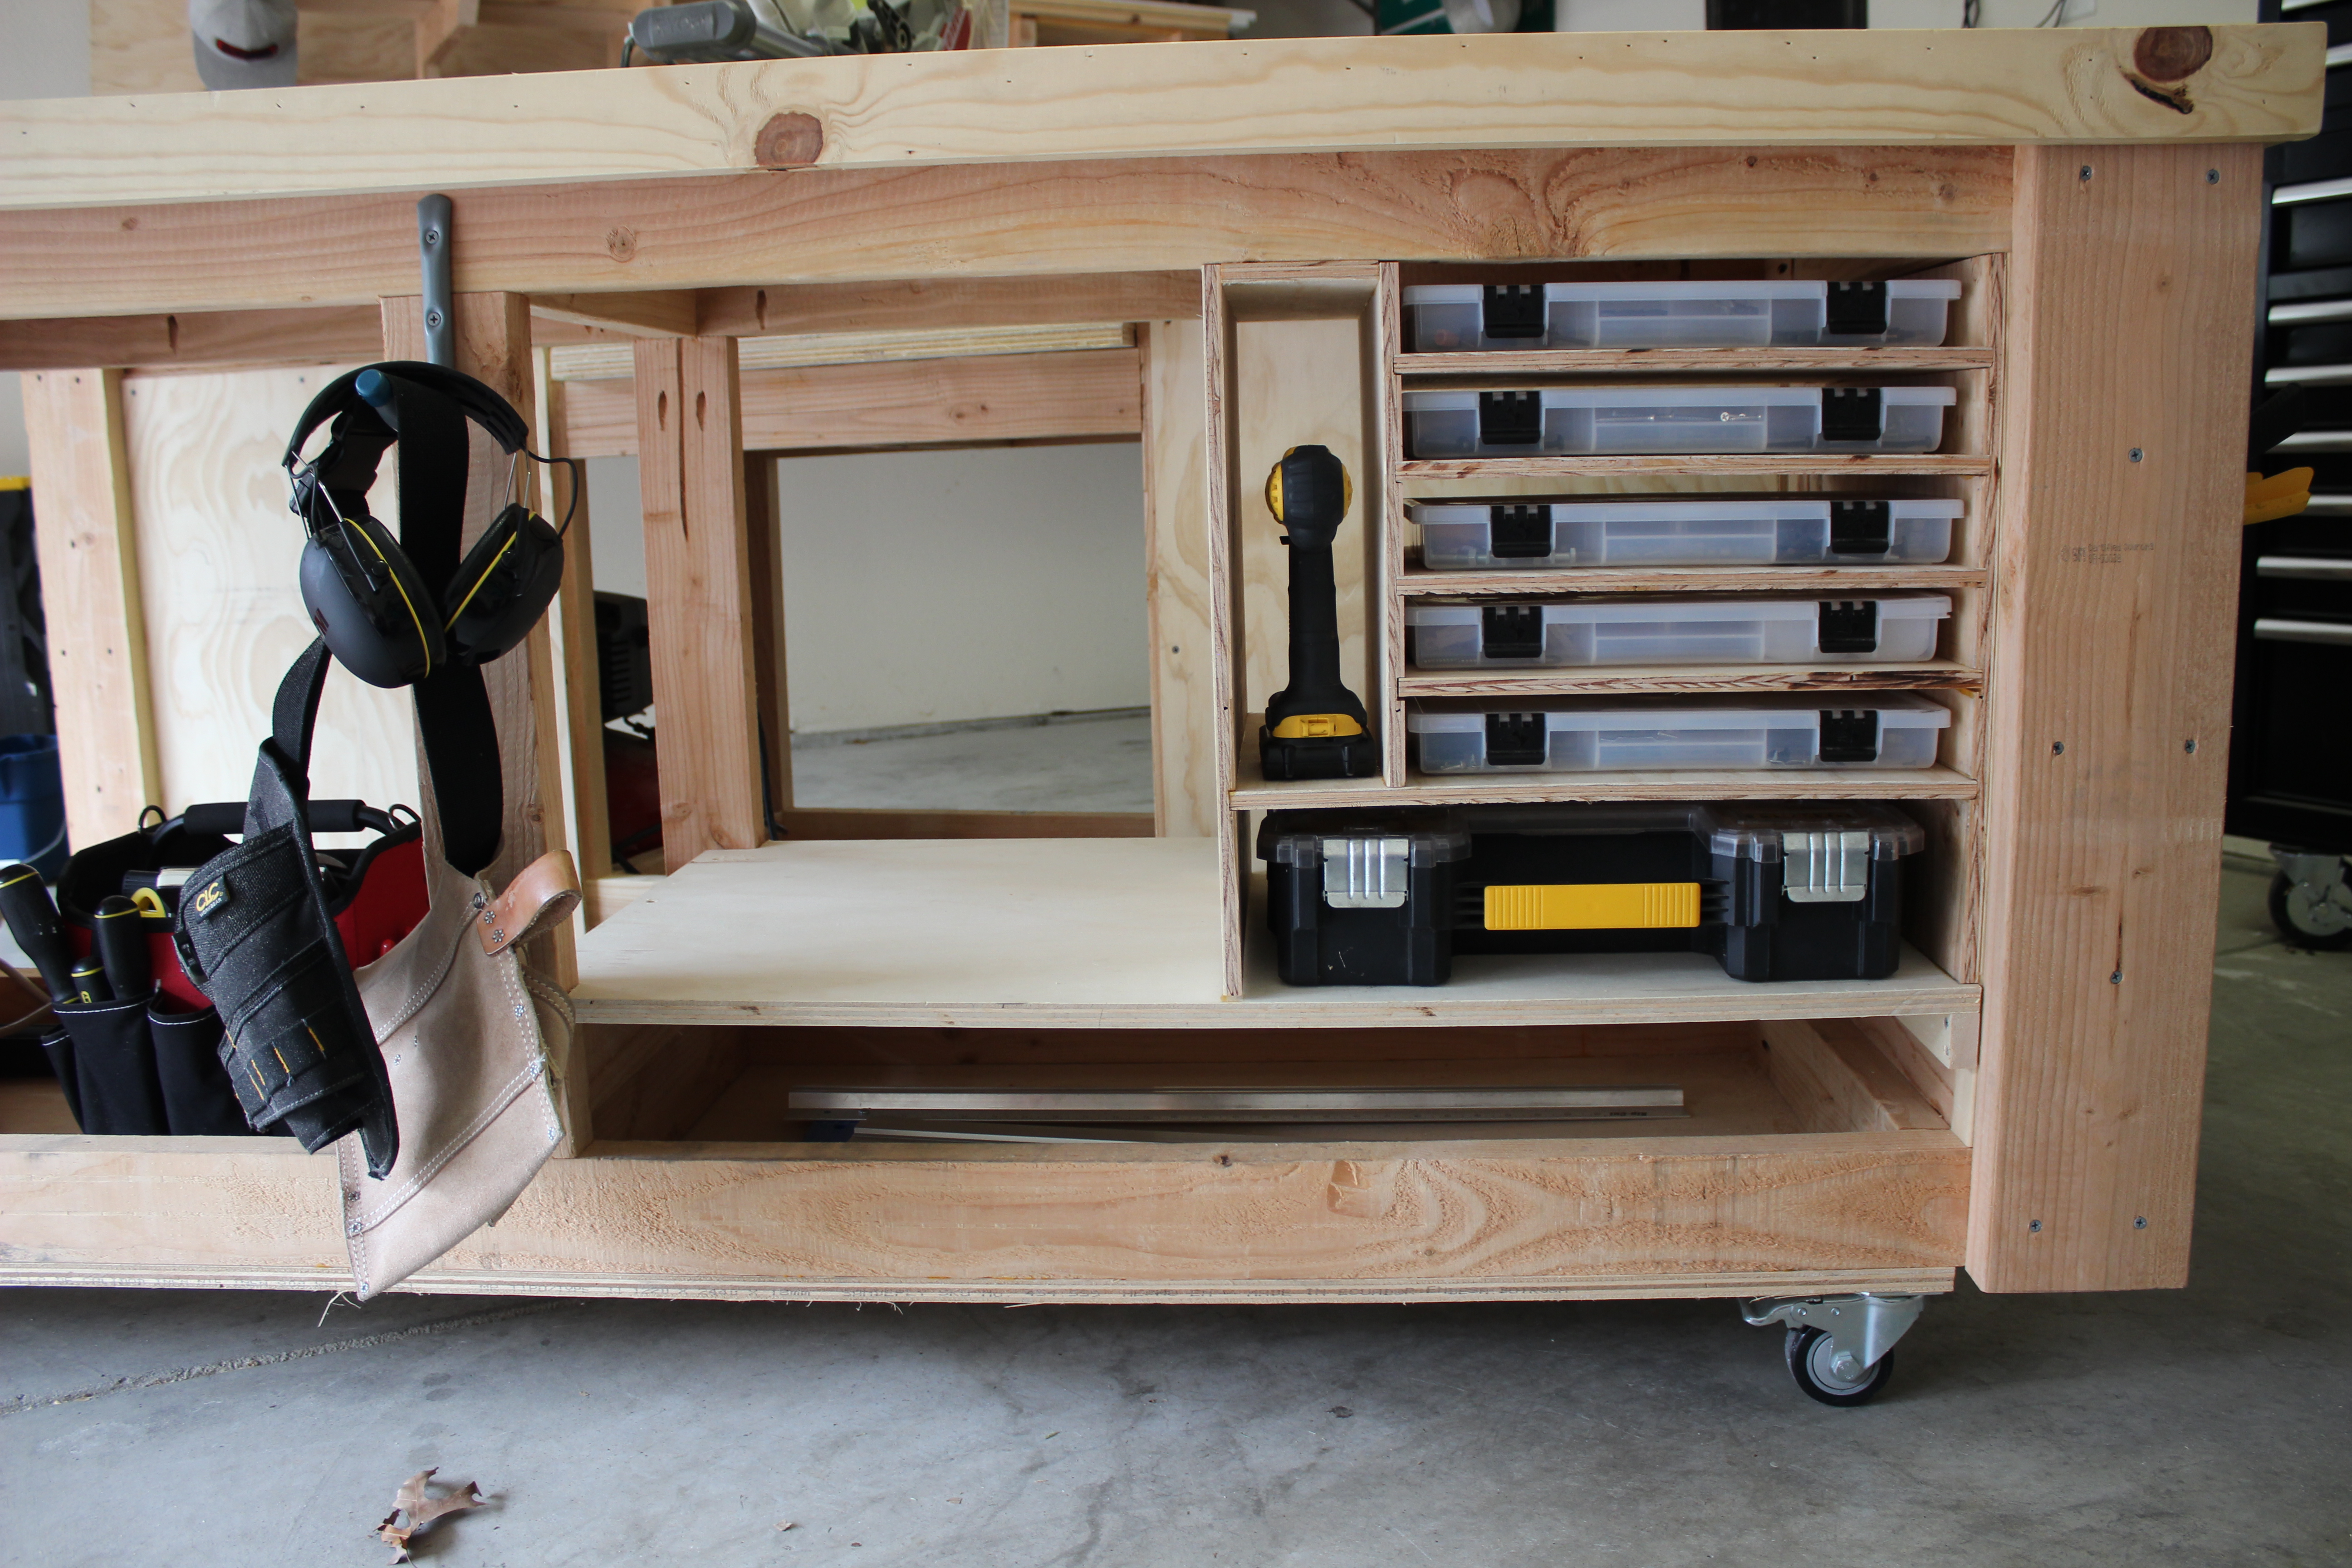
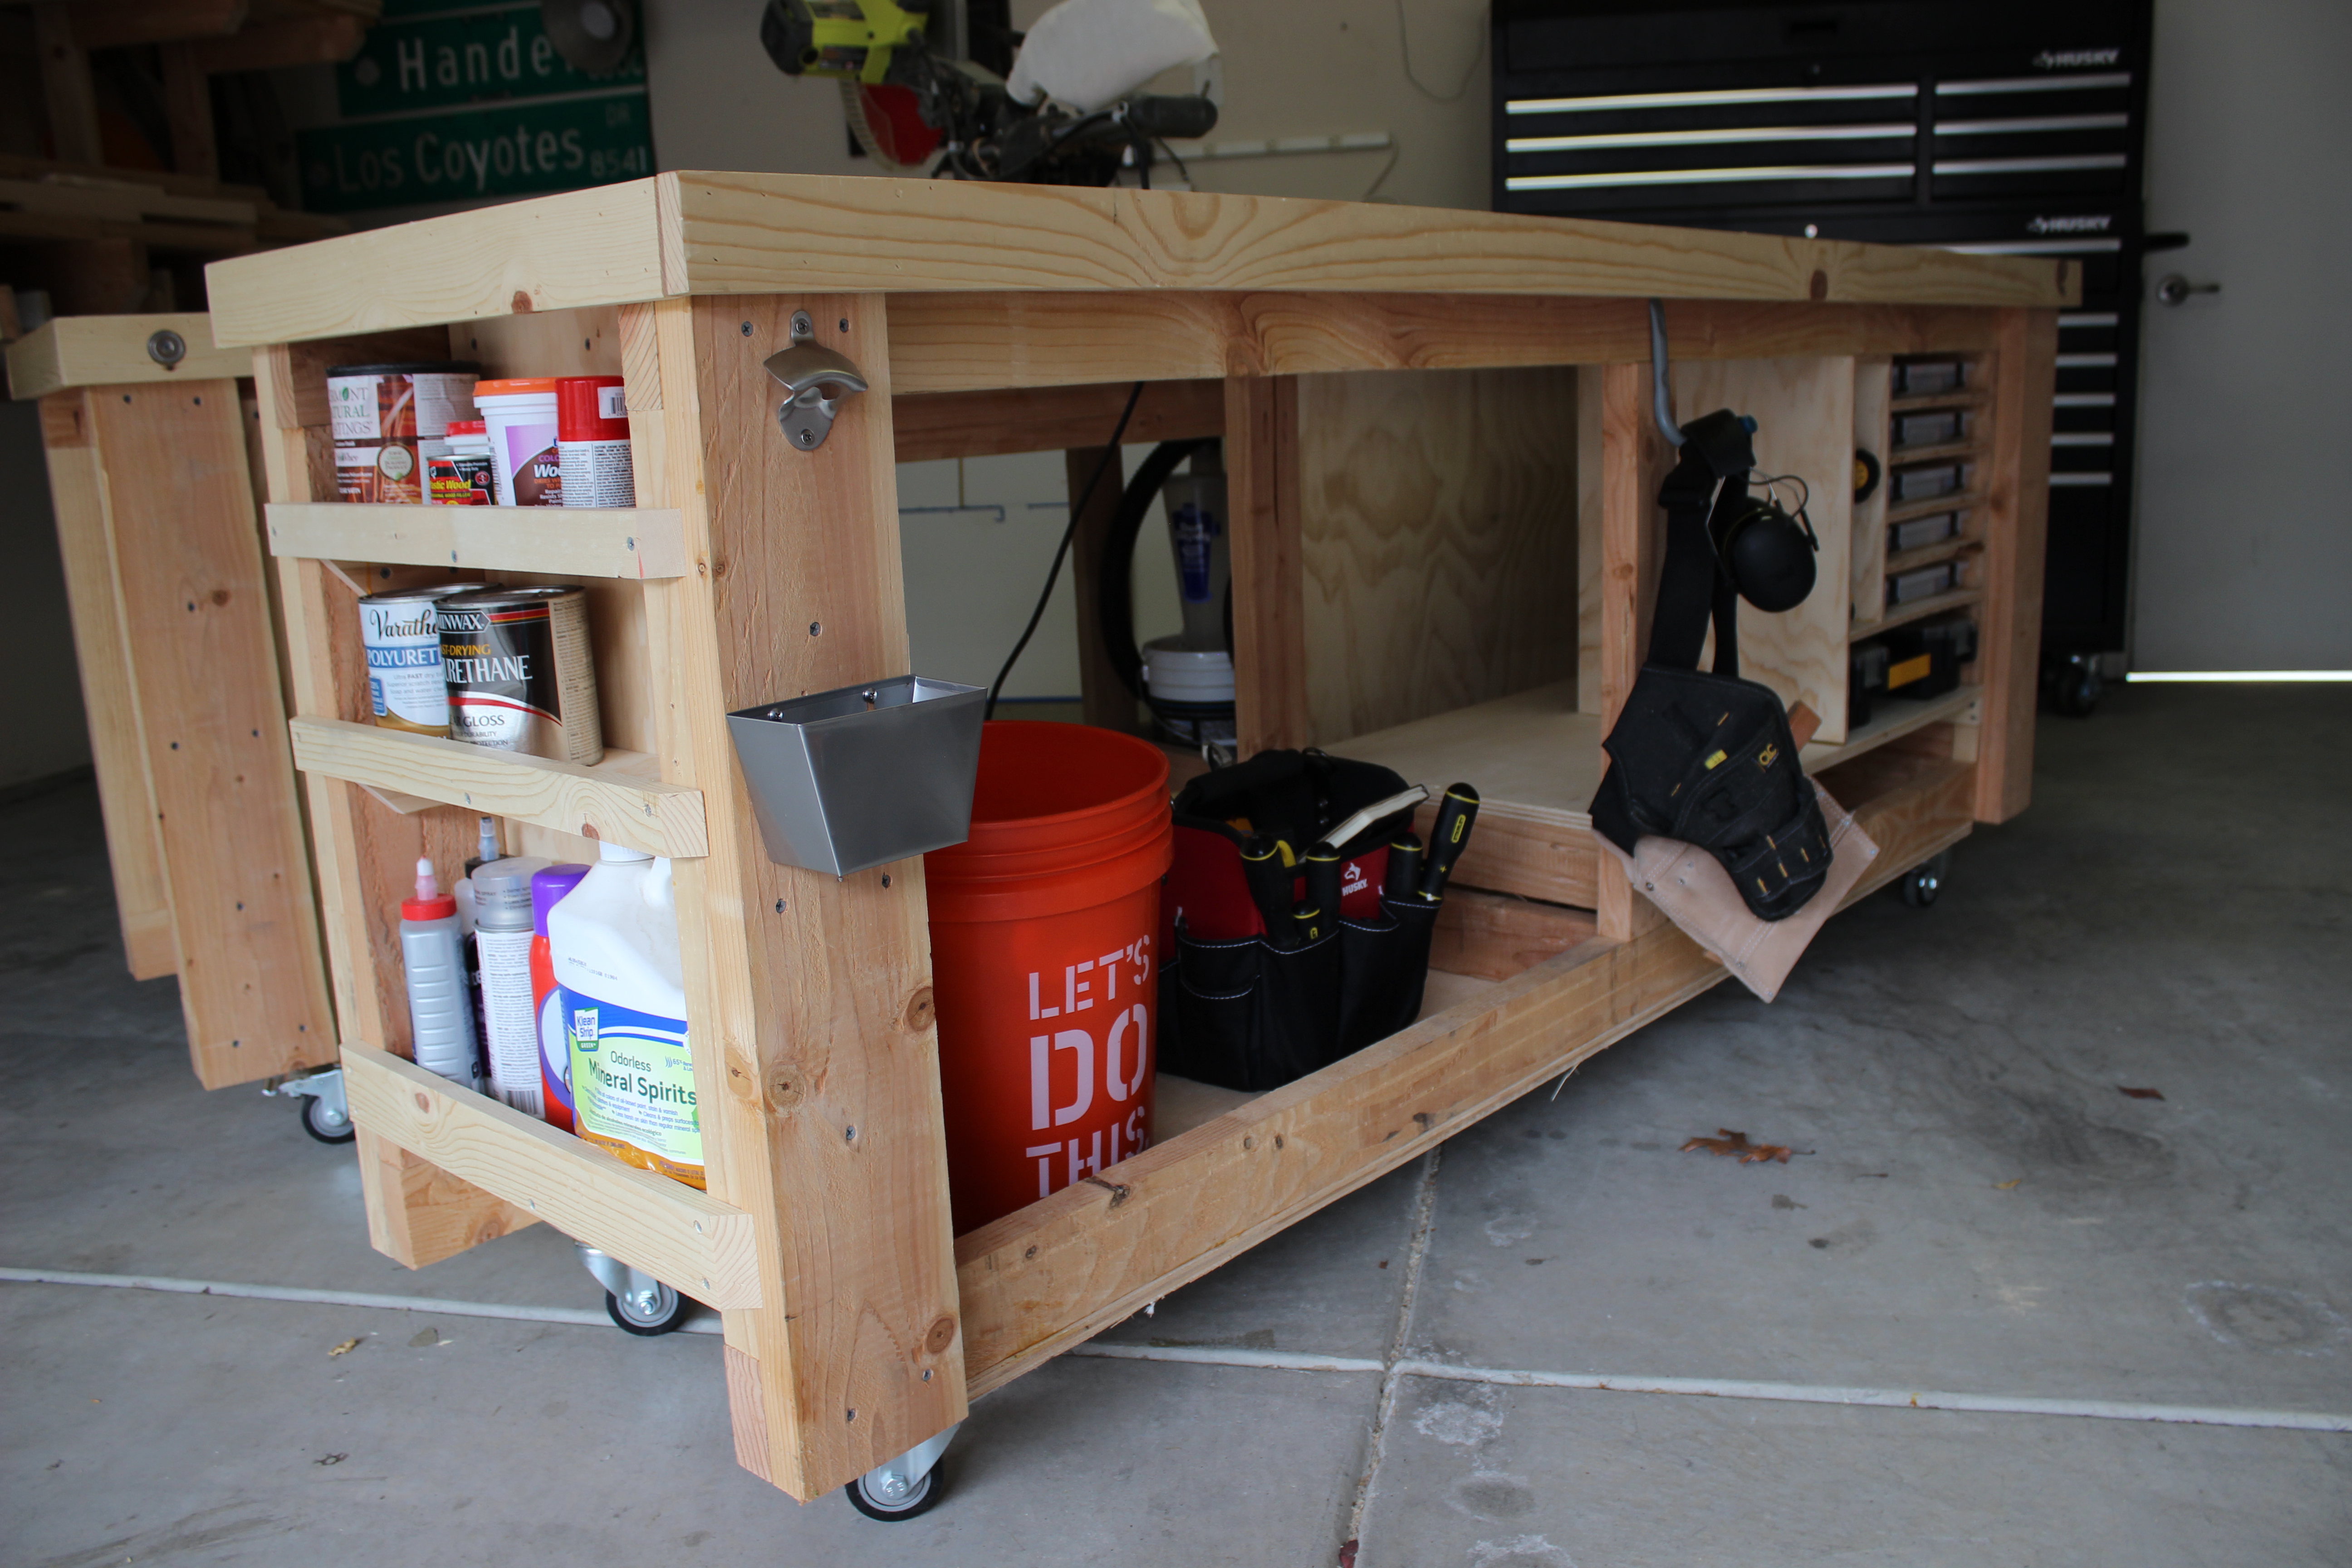
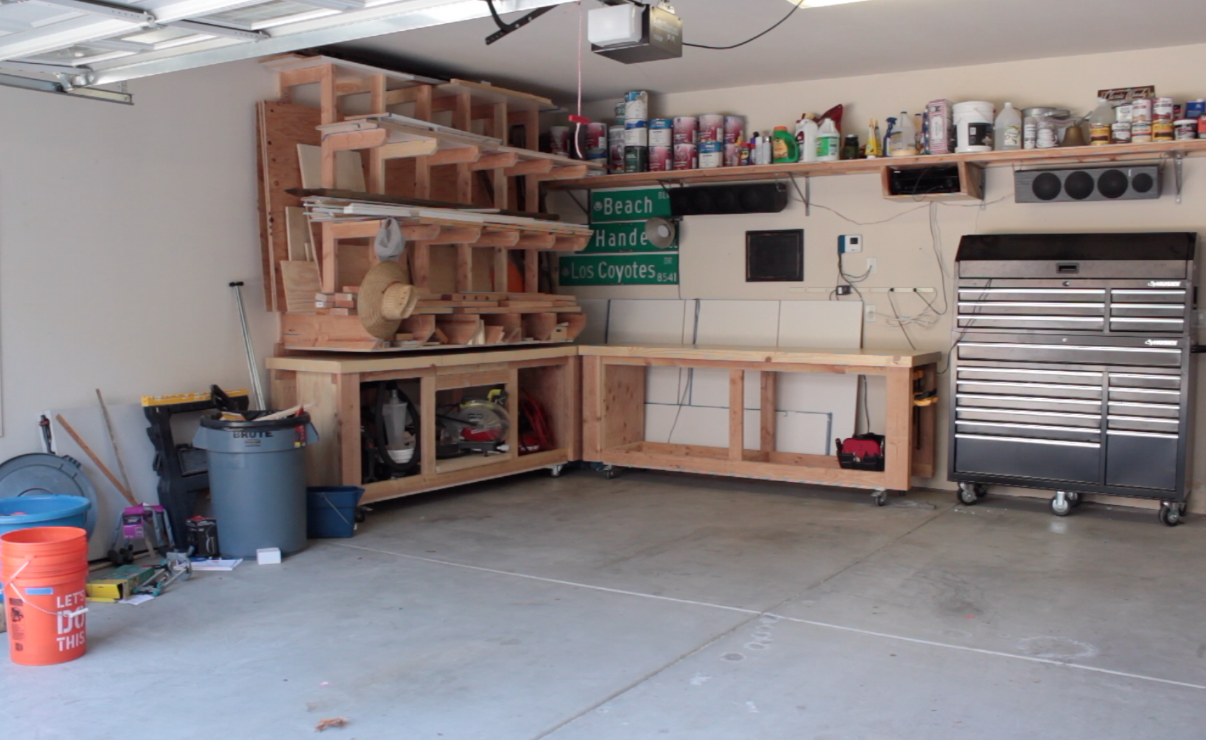
The frame of the workbench is comprised of 2×4 and 2×6 boards. I used 2×6 boards for the ends of the frame to add extra stability to the workbench, and also to create deep recesses for shelves for storing tools, cans of finish, clamps, etc. The overall height of the workbench is about about 36-inches, so take into account the thickness of the tabletop, height of the casters, and the cut boards for the frame accordingly. As pictured below, using a stop-block makes cutting consistent lengths much easier.
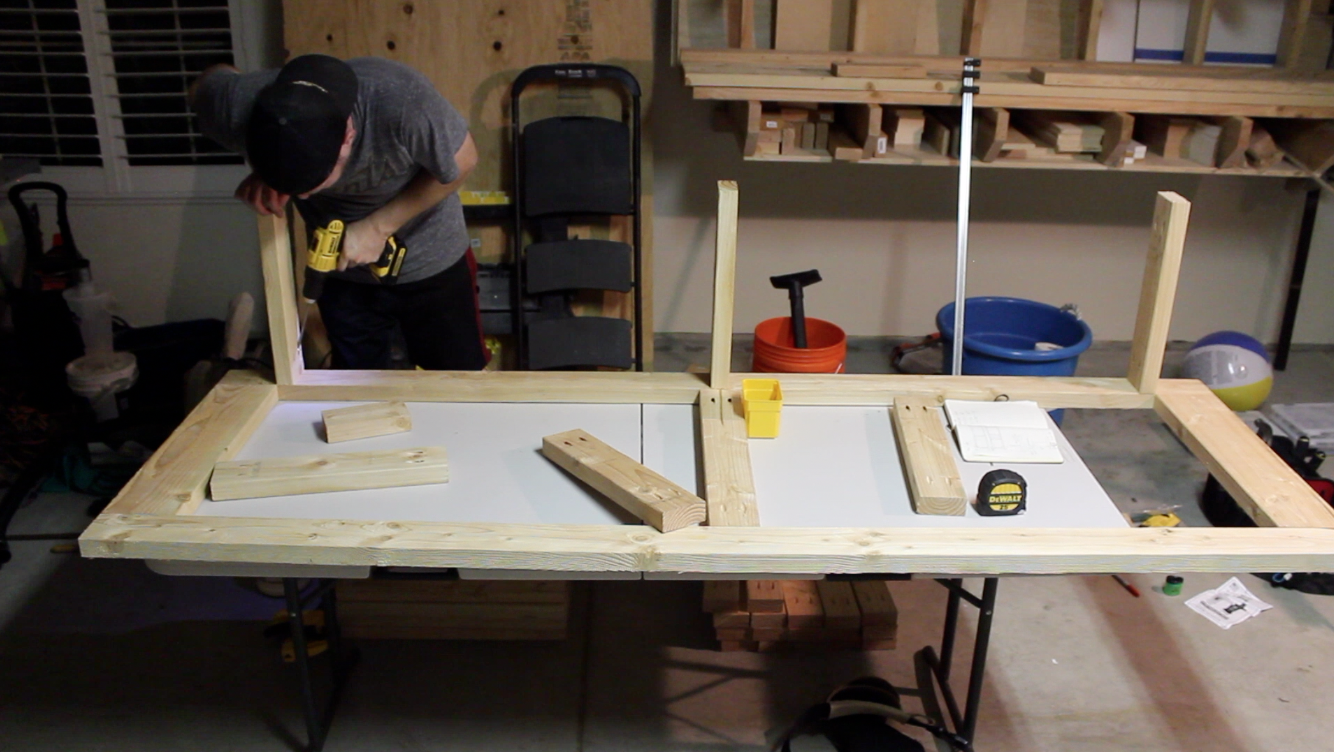
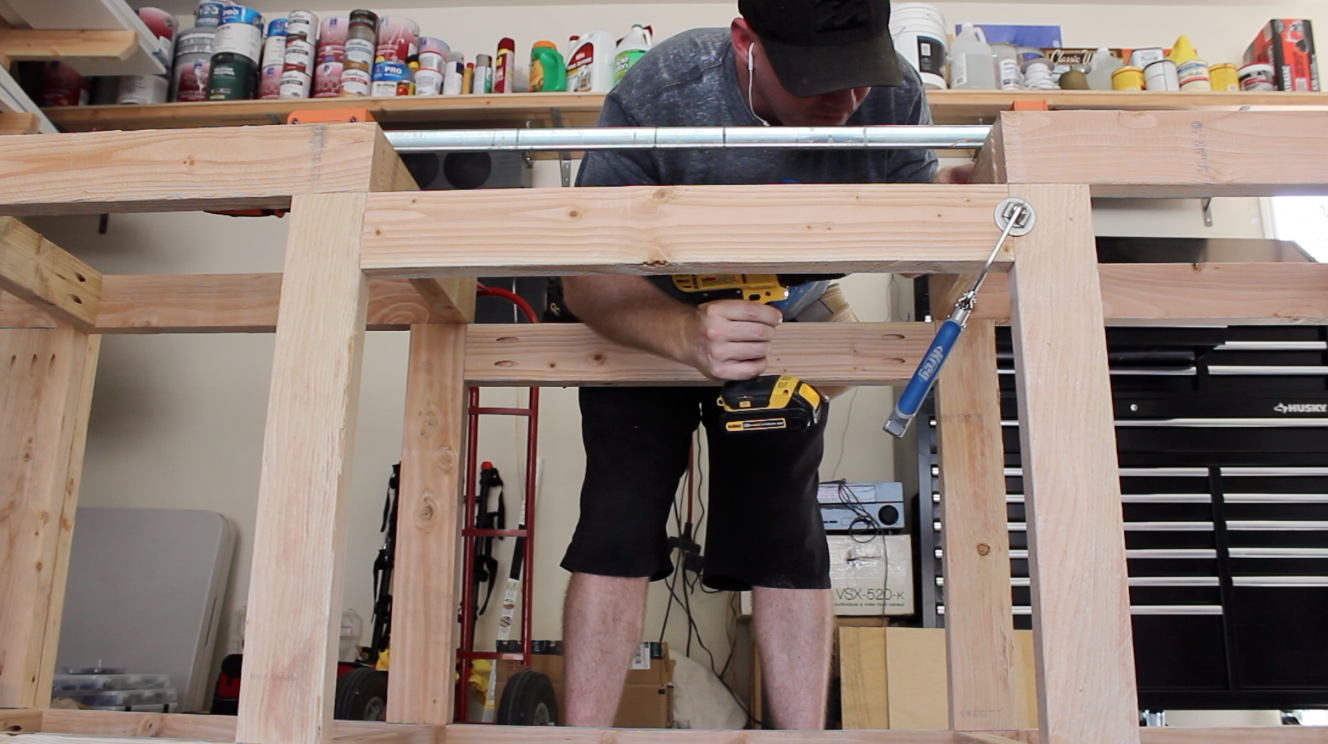
I used pocket hole joinery to assemble the entire frame. To do this, you will need a pocket hole jig to crank through the many, many pocket holes that need to be drilled. Pictured below is a Kreg K4 pocket hole jig which makes this whole process much easier. It also has a handy attachment for a shopvac to keep the work area clear and the drill bit cool.
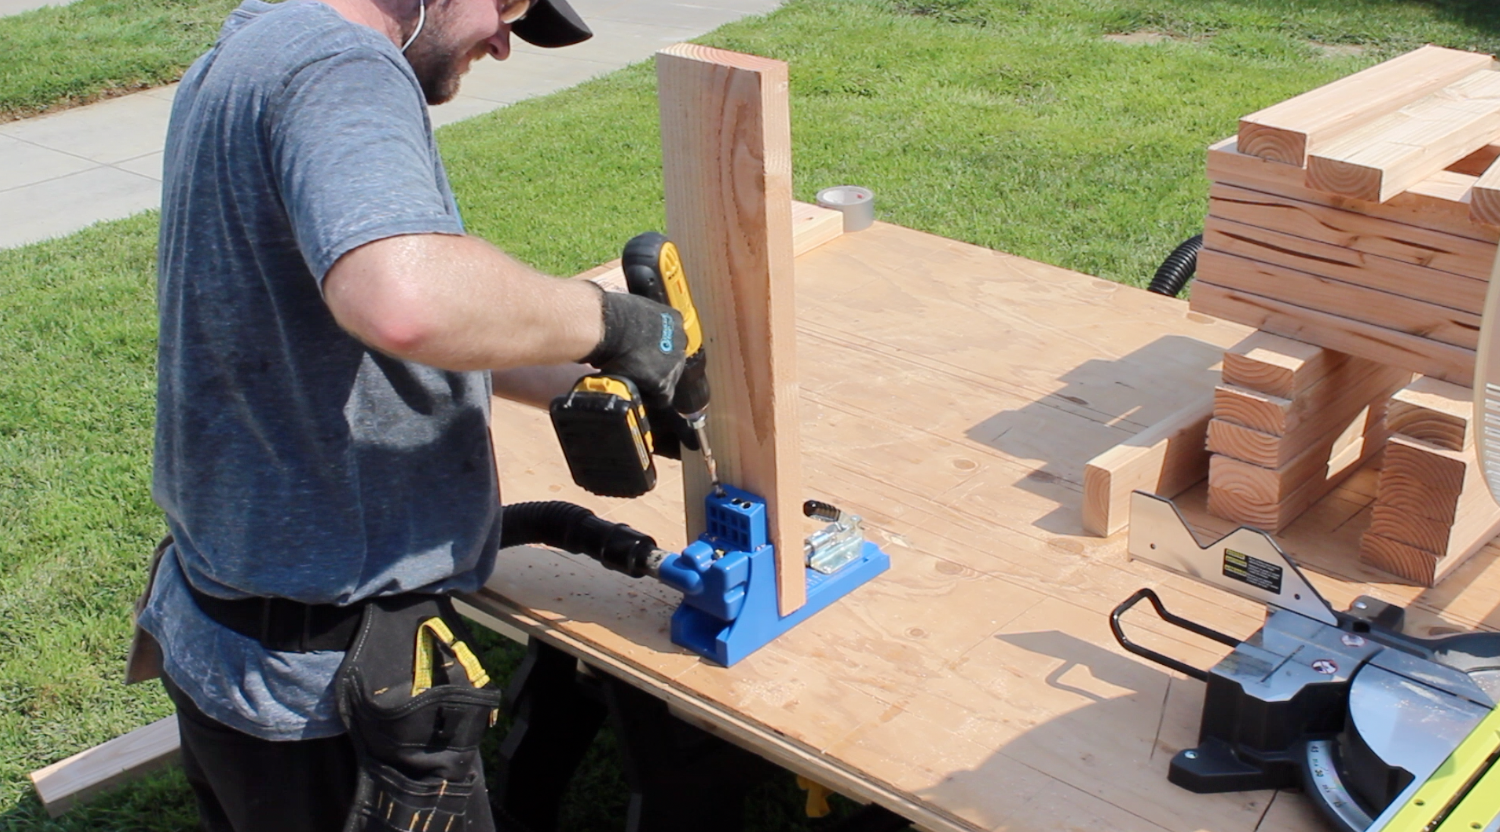
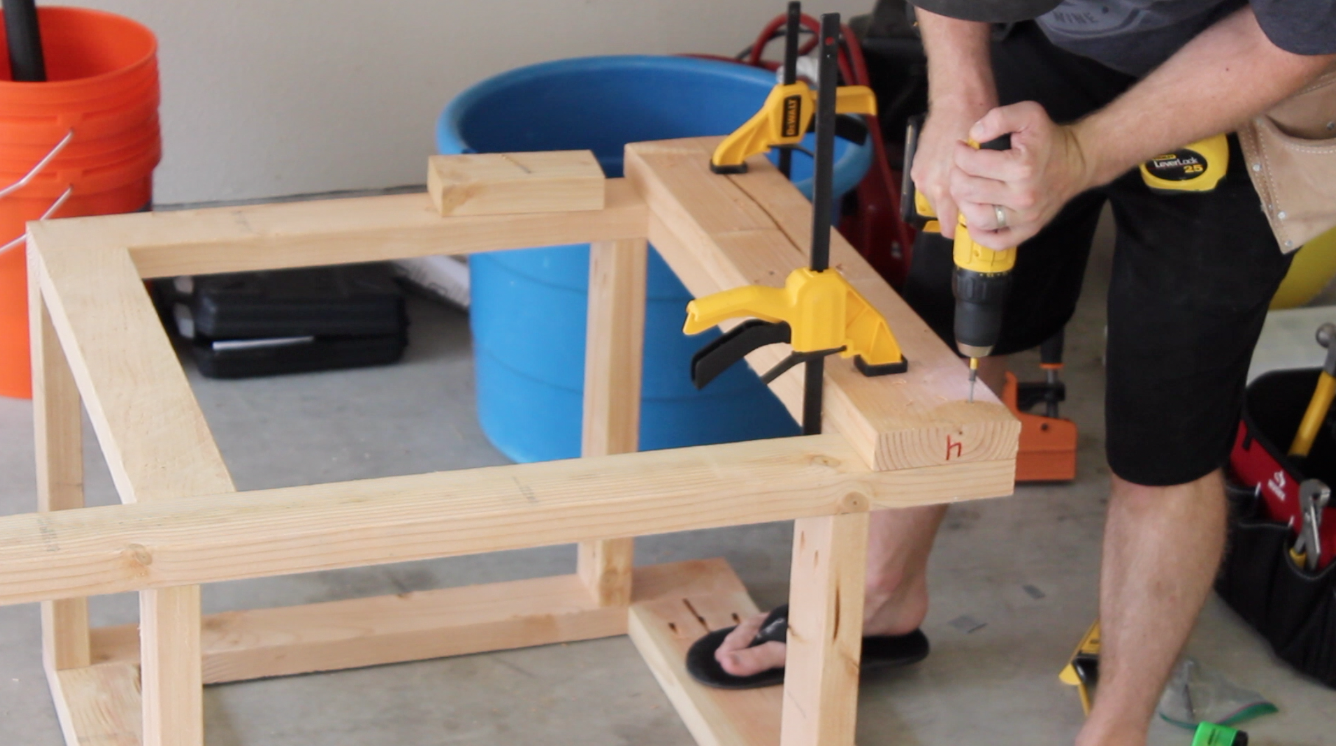
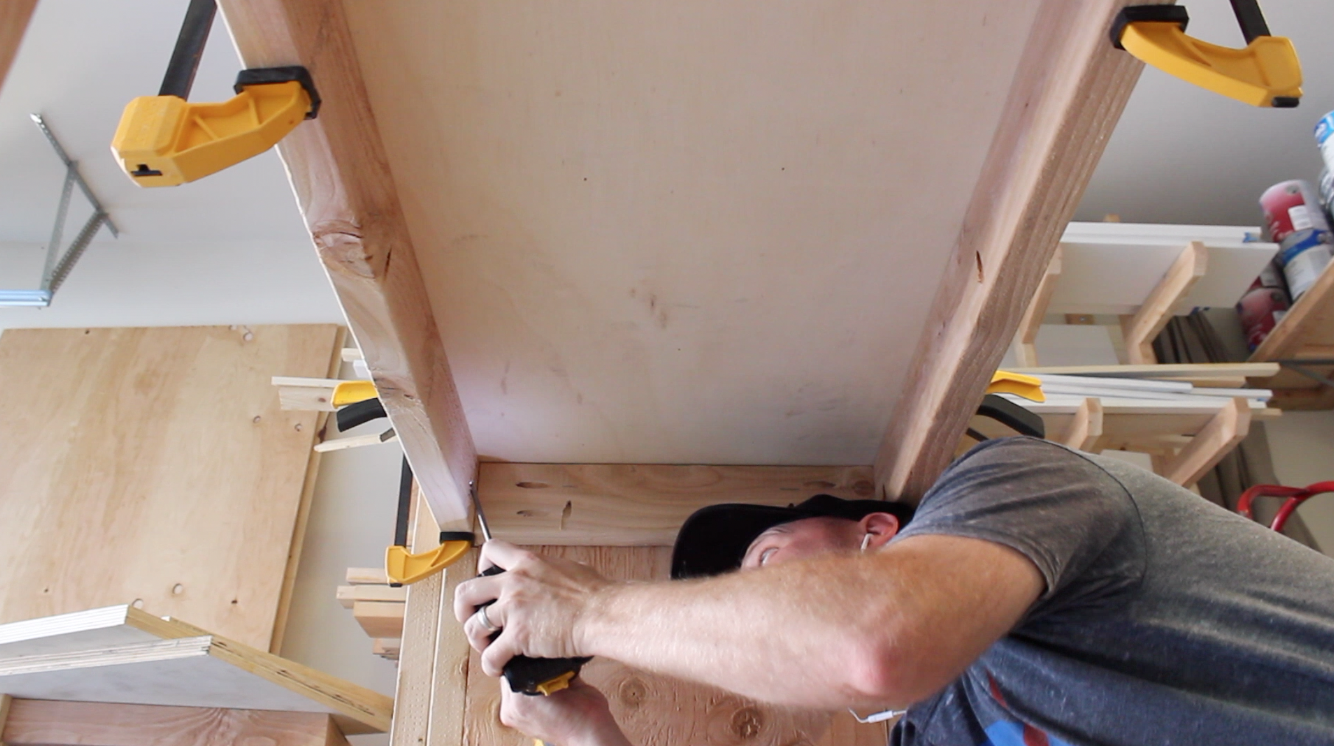
With all the pocket holes drilled, join the frame with 2 1/2-inch Kreg pocket holes screws. Be sure to clamps the boards together while joining them.

The frame is essentially comprised of two long sides while being joined with shorter boards that span the width of the table.

Once the frame for both benches were assembled, I added a 2×6 to the outside of each side to create the “legs” for the workbenches. This adds extra rigidity to the frame and creates a wider base for attaching casters at the bottom of each workbench. Note that the length of the extra 2×6 is the entire height of the workbench.
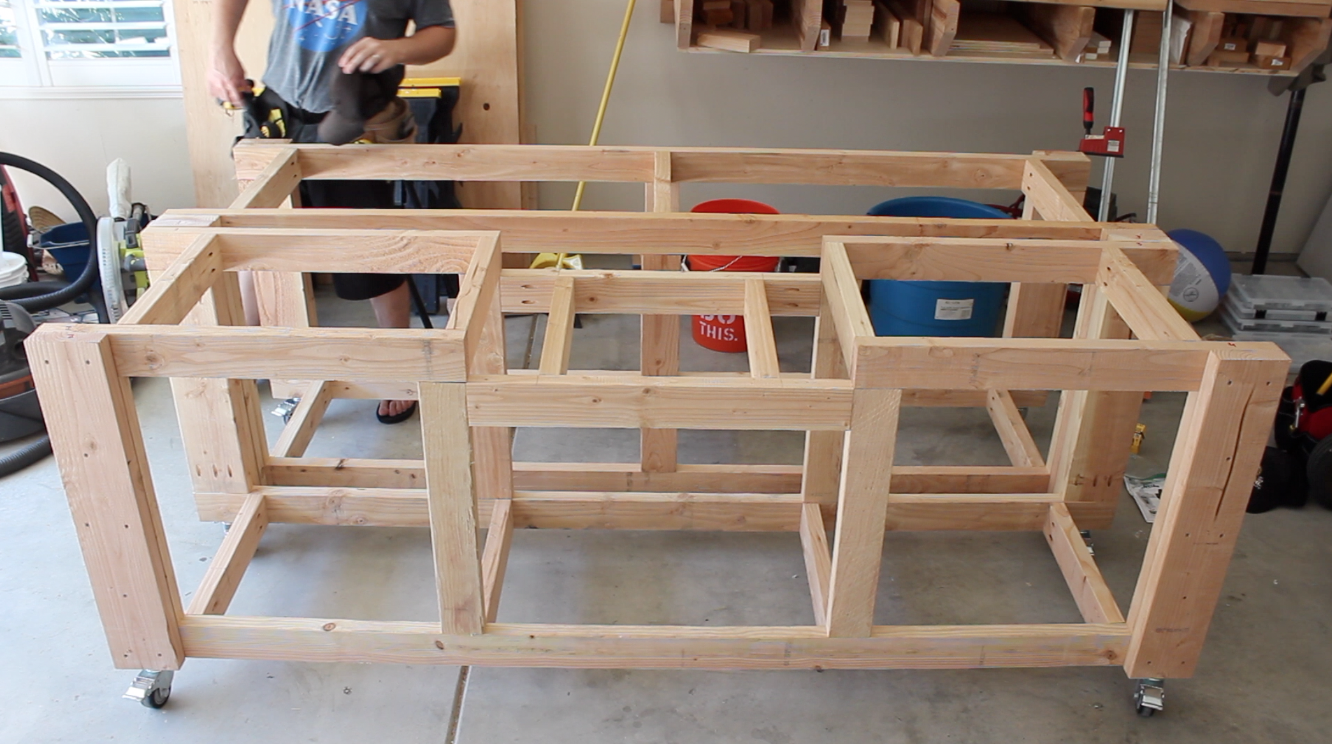
Once the legs are fully in place, add casters to the bottom of the bench. This makes moving the project much easier as you continue to build it. Use locking casters so the workbench will stay in place when the time calls for it.
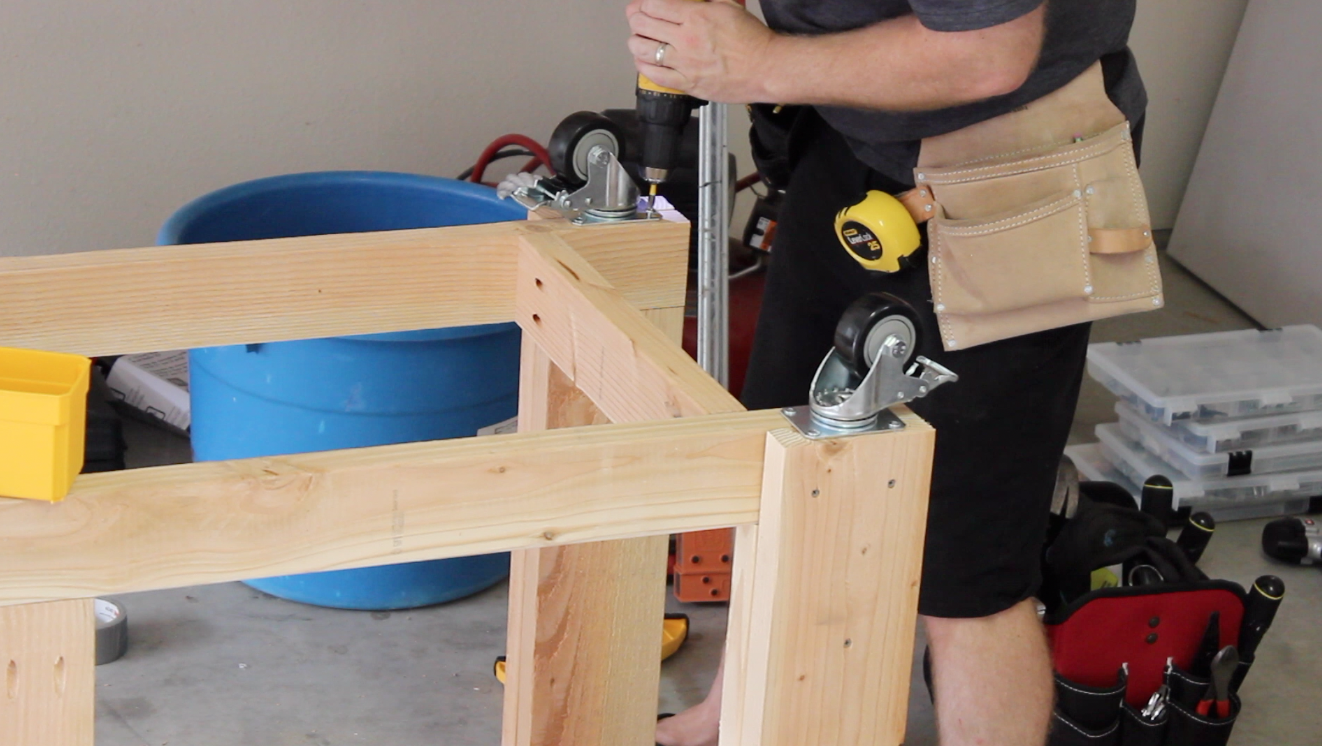
I caught this later in the build, and the issue is unique to this workbench design where two casters sit next each other, but you’ll have to account for their rotation range. Initially, I had the two inside casters sitting next to each other, and because of this, they would bind up and block one or both from moving freely. This results in a workbench that is very difficult to move and maneuver.

To correct this, I moved the casters further apart. This lets them rotate freely while the workbench is pushed around. This also added to the height of the workbench.

2. Build and Attach the Workbench Top
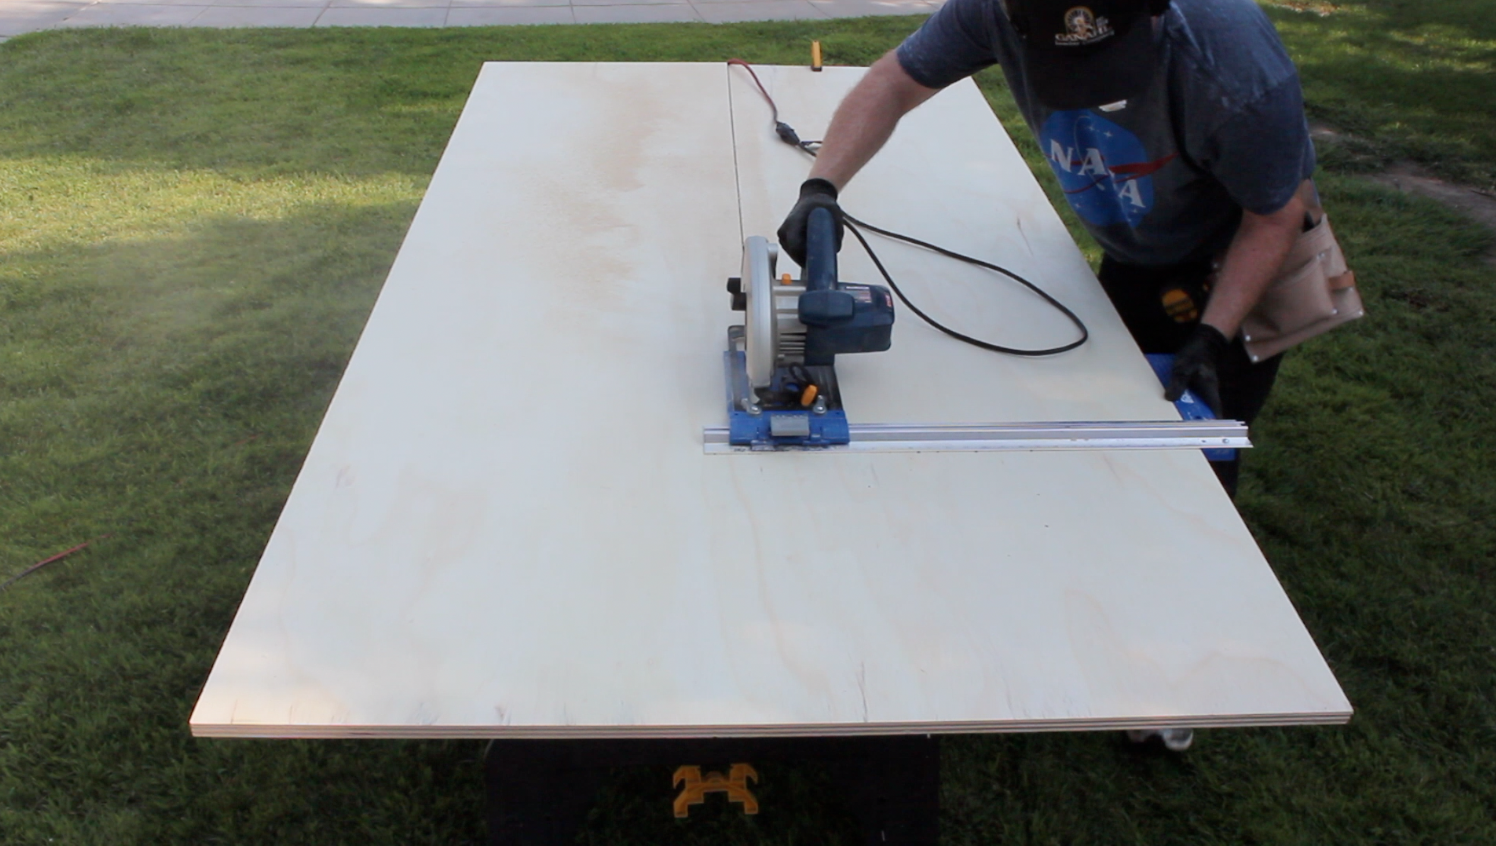
Most of the workbenches I saw online were constructed with top made of 2×4 glued together by their face grain. This makes for a super-strong work surface, but it used quite a bit of material, takes more time and can be challenging to ensure that it’s completely flat. Instead, I opted for 3/4-inch cabinet-grade plywood. I made the top strong by lamenting two layers with glue.
To create the bench top, start by cutting the plywood sheets right up the middle with a circular saw or table saw. Using the Kreg RipCut (pictured below), I was able to make long, straight cuts.
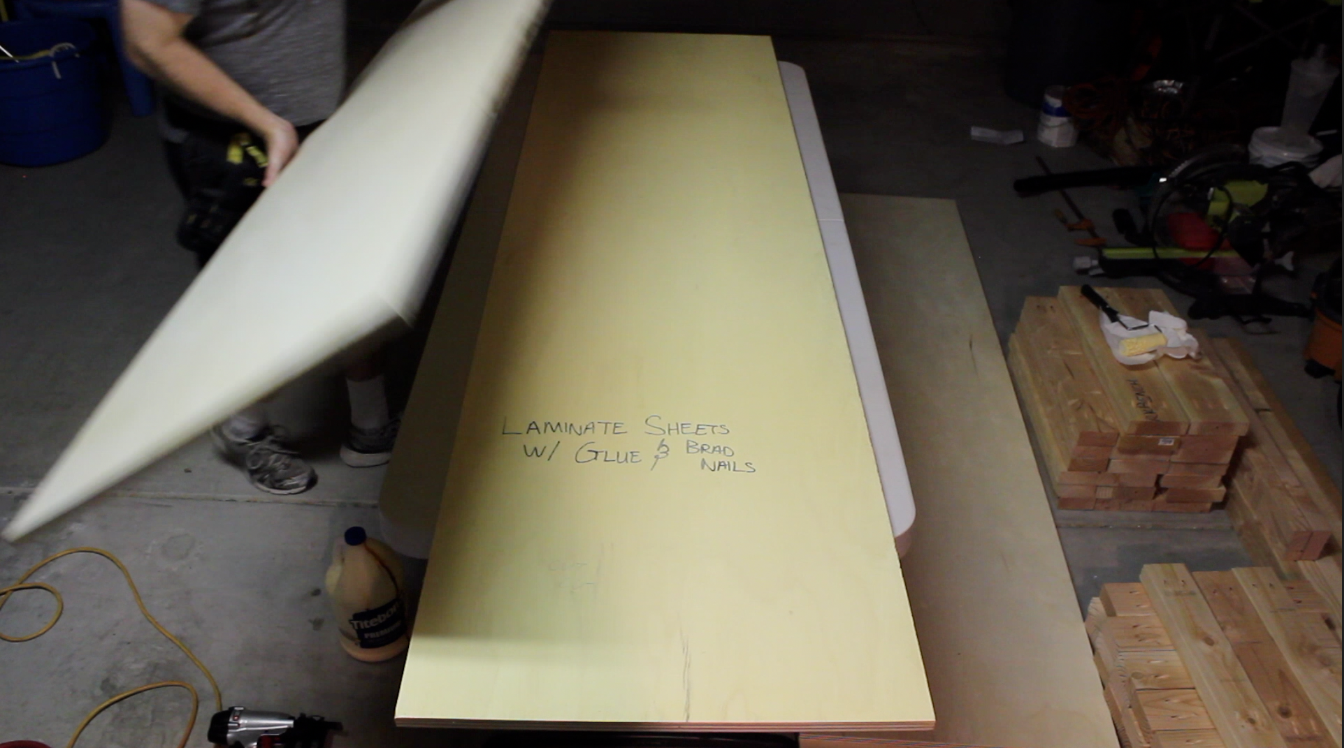
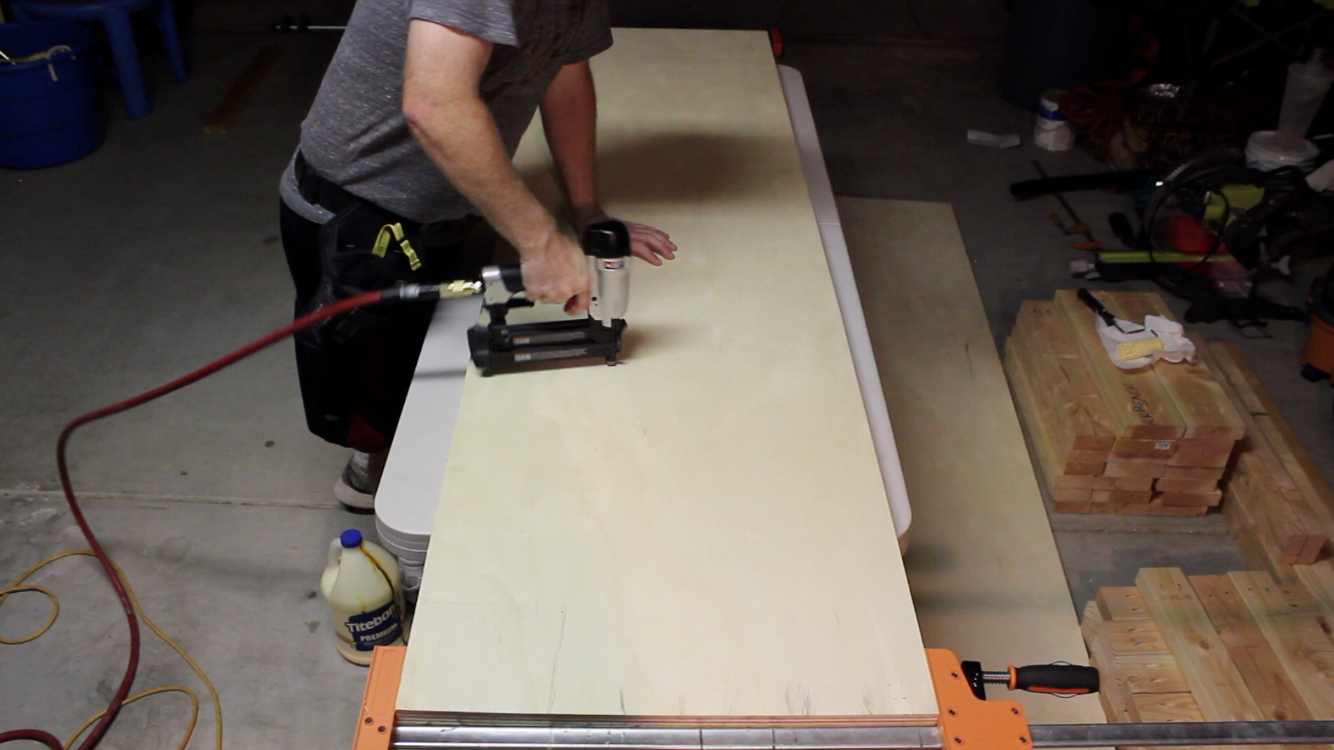
Laminating these layers of plywood will create a very sturdy and strong work surface, and it starts by liberally brushing on wood glue to one layer of plywood and then placing the other on top of it. To provide clamping pressure while the glue dries, attach brad nails while pressing down on the plywood layers. Be sure to make sure the edges of the plywood line properly.
To attached the table top, I drilled pocket holes on the inside of the workbench frame. You can chose to attach the top by simply using screws through the top of the bench top, but that means screw heads will be visible on the workbench. That’s not a huge deal for most, but since I have a pocket hole jig, (in this case a Kreg Mini Picket Hole Jig) I used pocket screws to attach the table top. Whatever you decide to do, be sure to attach the top in a way that allows you to easily remove it down the road in case it needs to be replaced. This workbench is going to get plenty of use and abuse so you can image that the top will need to be replaced at some point in time.
3. Attaching the Tables With Magnets
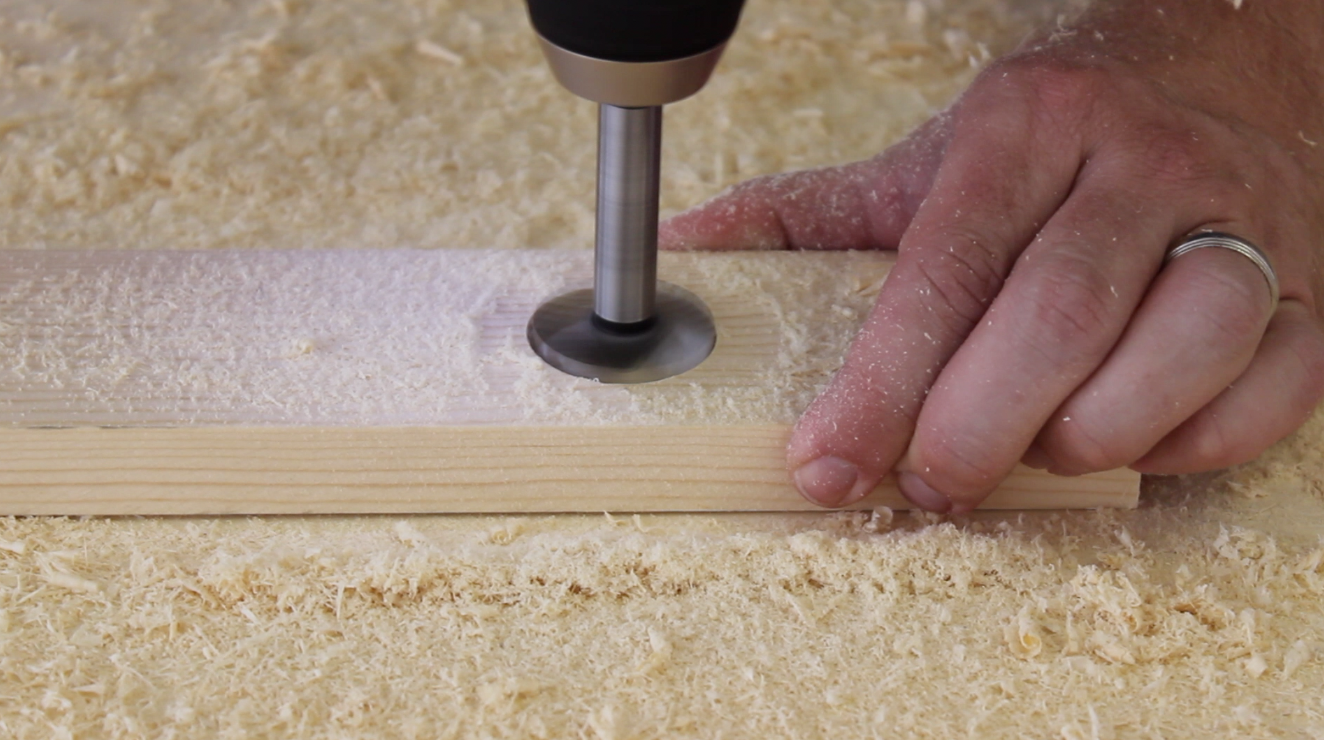
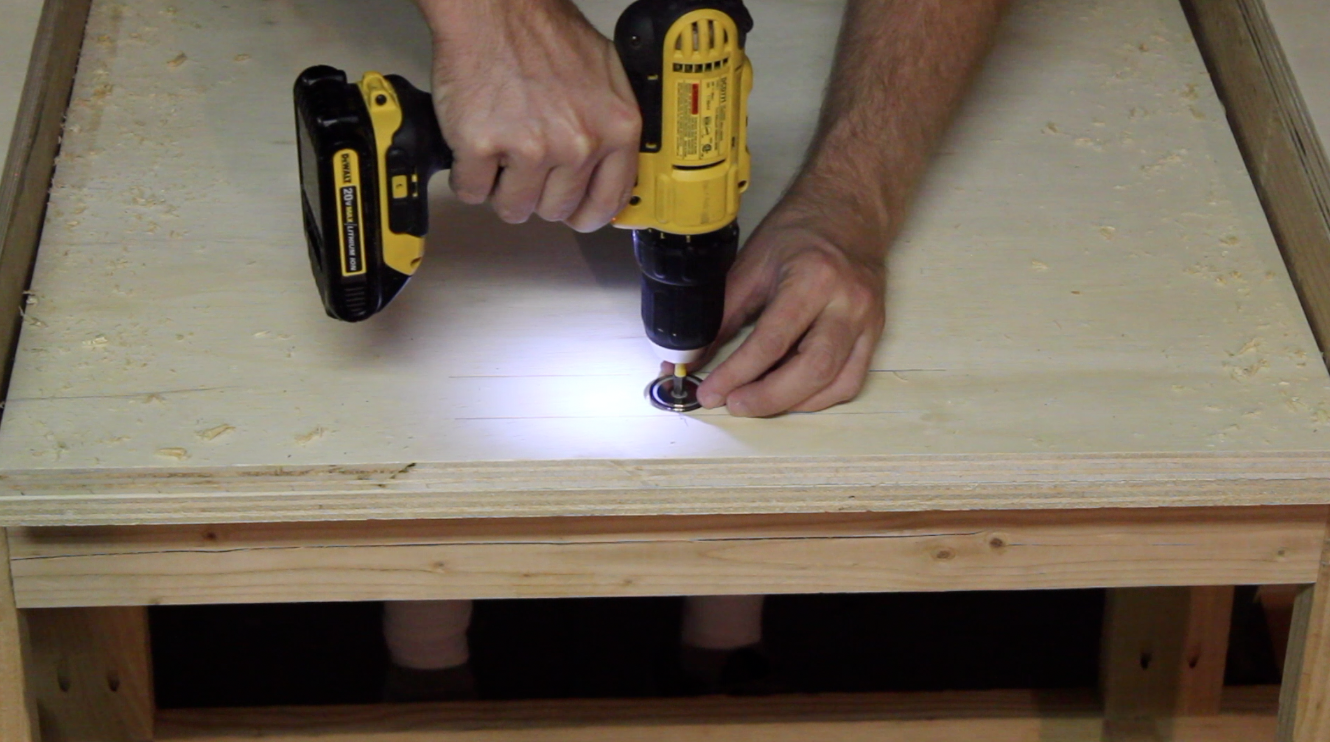
Using the of idea of attaching modular workbenches with magnets, I drilled circular slots into 3-inch strips of pine using a forstner drill bit. These slots fit the circular neodymium magnets that would help clamp the workbenches together.
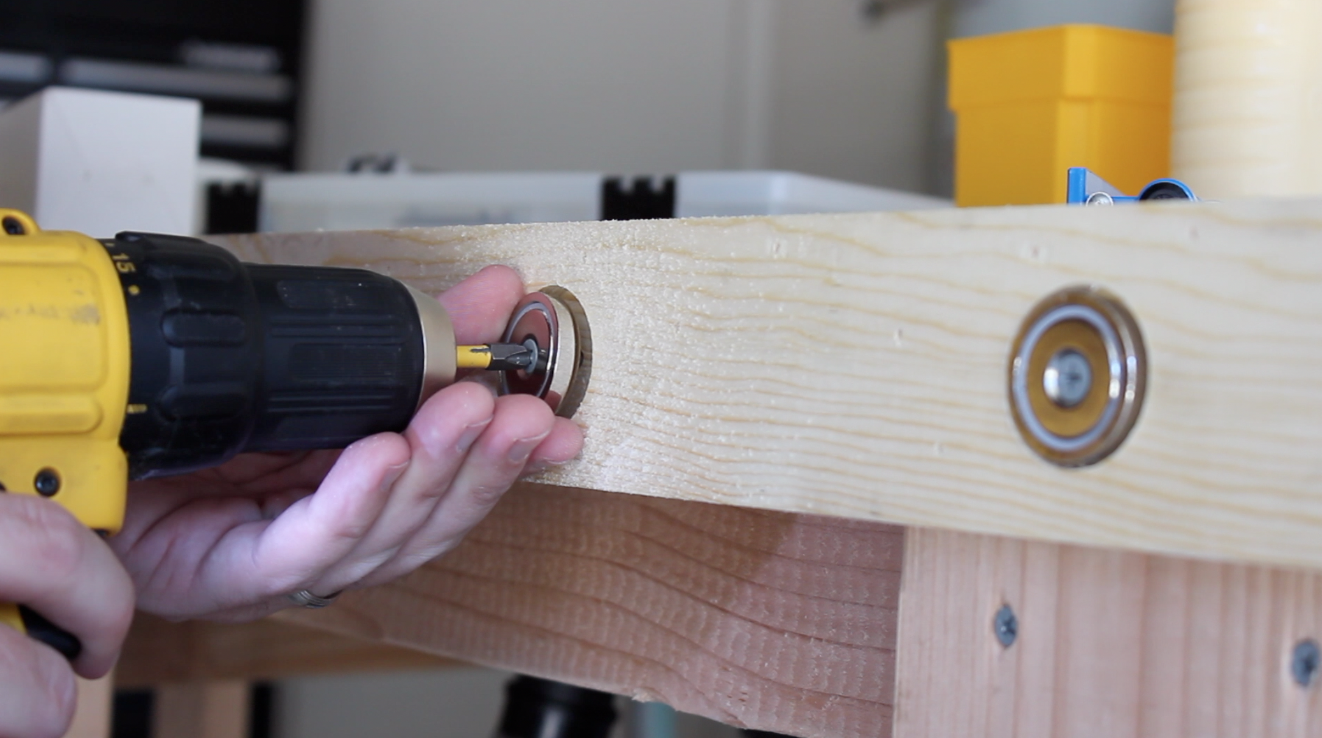
The wood strips that hold the magnets are wider than the actual thickness of the plywood top. I did this for two reasons: 1) The magnets are wider that then thickness of the workbench, and it was easier to drill the slots on separate pieces of wood than attached them directly to the plywood top. 2) With the top edges of the pine strips flush with the plywood table top, this left a slight over-hang that acted as a handle all the way around the bench top, and moving the workbench became much easier.

As I mentioned in the build video, it’s recommended to have the magnets stick out a bit from pine board edging. This allows the magnets to make better contact and form a tighter bond when moving both workbenches together. I highly recommend these neodymium magnets on Amazon. I ended up using 6 pairs to attach my workbenches, and I would maybe even recommend using 8 pairs to make an even tighter bond.
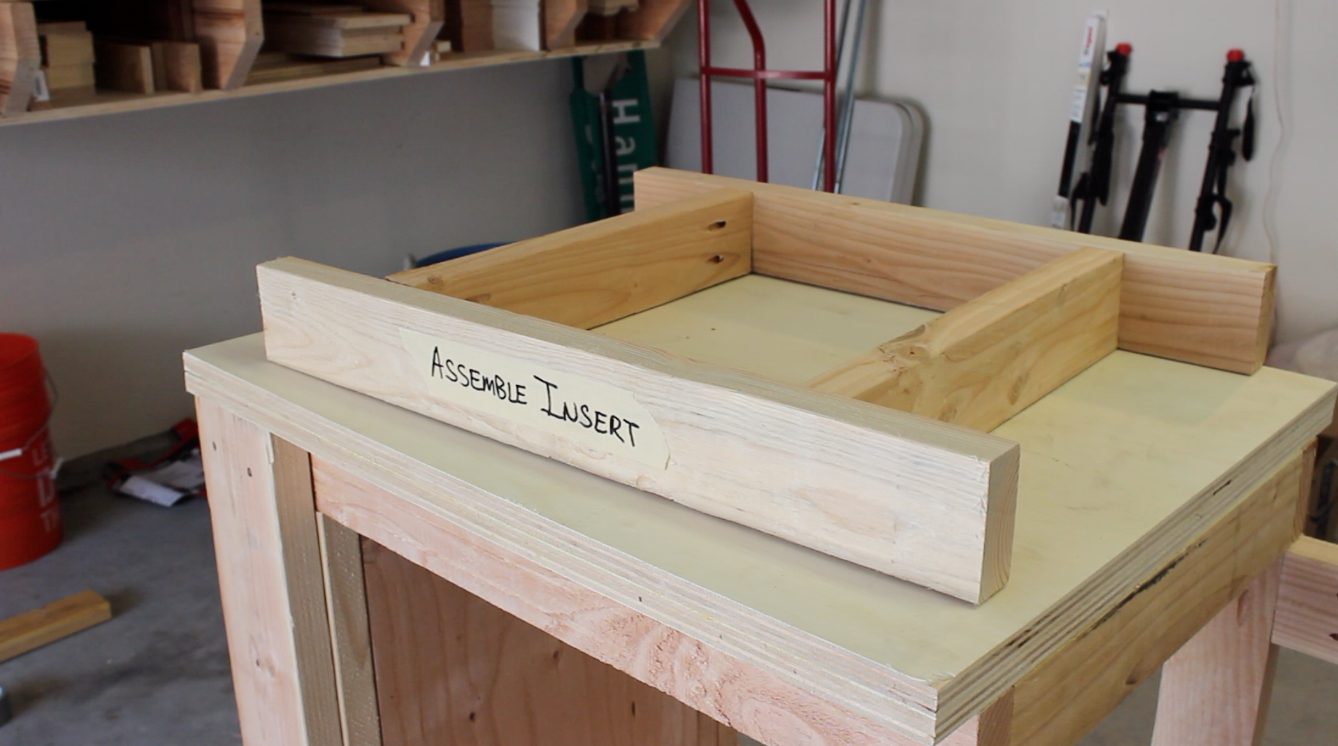
4. Completing the Miter Saw (or Multi-tool) Slot
Of all the features of the workbench, this is the one I have found to be most handy. Turning the workbench into a miter saw station is so convenient, and fortunately, making a small variation to this basic frame design allows you to build this in.
One of the workbench halves has a 3 1/2-inch-deep slot built-in to accommodate a drop-in for a miter saw. This requires additional framing, but the design is simple enough. The boards are 2x4s joined by pocket screws. It just worked out that the height of my miter saw’s work surface is 3 1/2 inches. Carefully measure the dimensions of any tool you want to “drop-in”, and remember to account for the additional height of a table top that will be added later to the workbench.
For times when I didn’t need my miter saw in the drop-in and/or I wanted a completely flat work surface, I created an insert for the drop-in.
Before I made the platform for the miter saw, I first made the insert of the slot using 2x4s and two laminated layers of plywood. I build this so the insert would be level with the rest of the workbench. I also used magnets (the same ones used to connect thee sides of the two workbenches) to secure the insert on to the workbench frame.
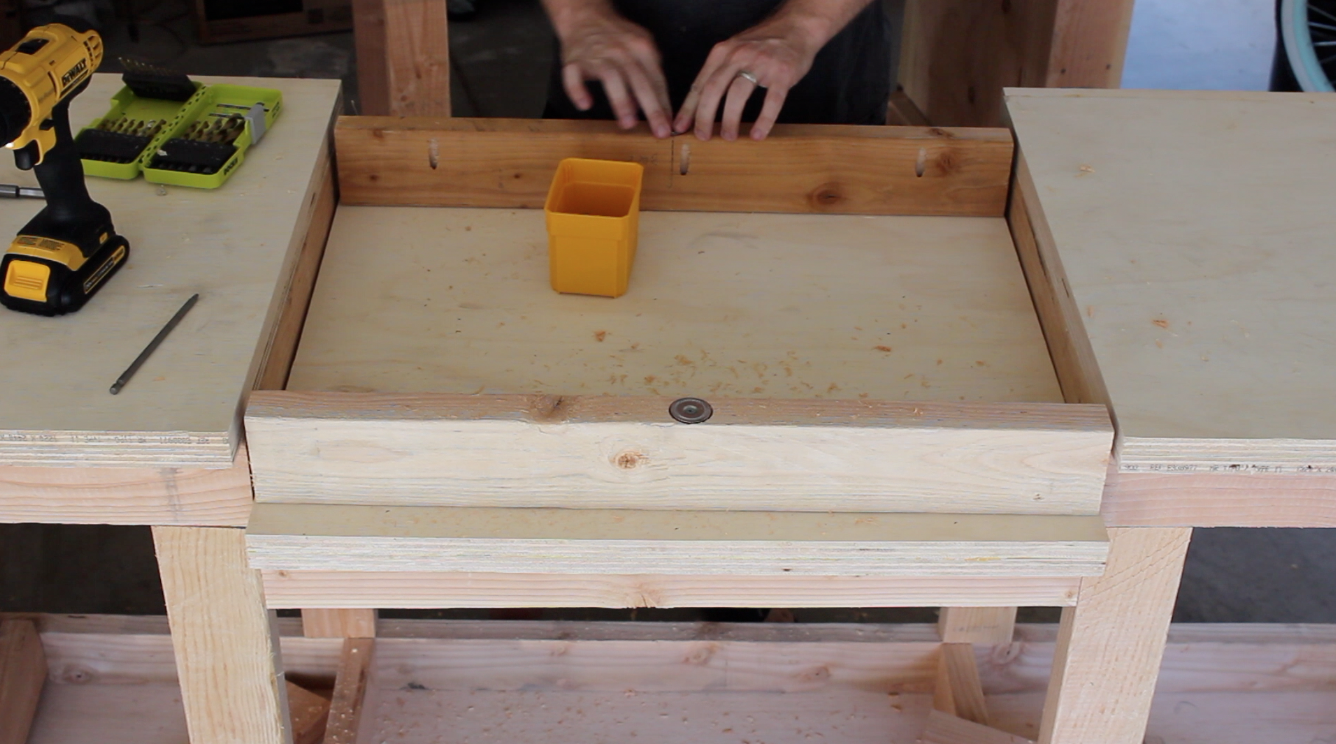
For the miter saw insert, I also used two layers of 3/4-inch plywood, laminated together with glue, and secured it to the workbench frame with magnets.
I carefully lined up my miter saw to make sure it was in the center of the insert. If you have a compound miter saw, be sure to test its rotational range in all configurations to make sure the insert will accommodate it. The last thing you want is to attempt to adjust your miter saw for 45-degree cut, only to have it not fully rotate because the workbench slot is not wide enough. With the saw is set in place, attach it to the plywood insert with screws. My miter saw has 4 screw holes for this purpose, but you may need some washers to completely attach yours.
5. Finishing Touches
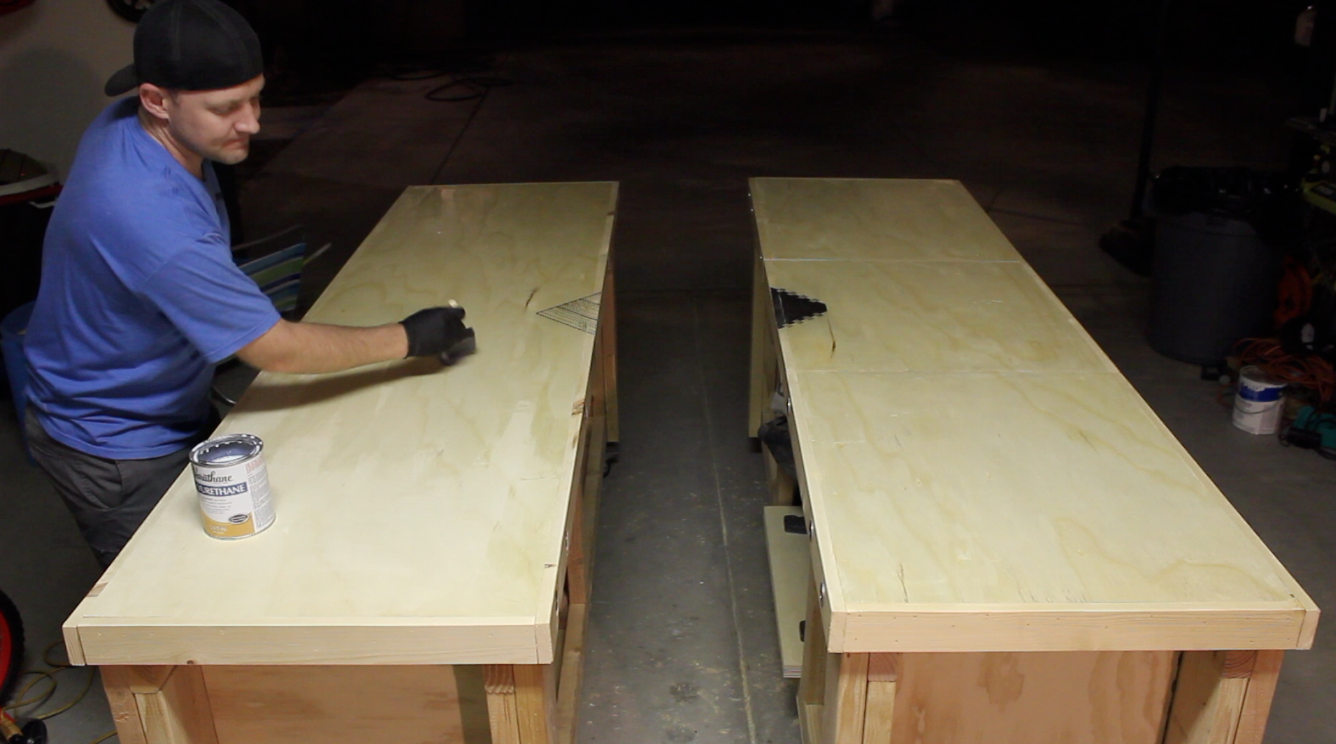
You may want to consider applying a few coats of finish on the workbench tops to provide an extra level of durability. This also leaves the workbench feeling silky-smooth, and it makes clean-up a little easier. I also added my logo to the center of the workbench using my trusty inkjet-to-waxpaper transfer method.
Final Thoughts
I am so happy with this design, and I hope this was helpful for as you plan to build your own workbench. I spent a long time sketching this plan on paper, but after actually using this workbench design for 5 months, here are the top aspects that for me:
- Setting up for woodworking is so much easier when all my tools are on a rolling workstation. I would spend a good 20-30 minutes getting out all the tools I needed for a project, and now this is down to a matter of seconds.
- The miter saw insert is big a time-saver. Also, since the workbench top is level with the miter saw platform, cutting long boards is much easier. And when I’m not using the miter saw, I can easily store it under the workbench and re-gain a large, flat work area.
- Having a workbench also creates a lot more storage for your shop. So as you’re working on your design, think about the tools and materials that you want to store.
- I thought that I always wanted a giant workbench that would sit in the middle of my garage – I mean workshop. But given my set-up, that’s just not practical. Most of the time, there is a car parked in my garage, so splitting the workbench into two lets me store it out of the way. Also, it’s nice to have two smaller workbenches at times, depending on the kind of work I’m doing.
So what do you think of this design? I’d love to hear your thoughts and suggestions I how to improve it. And let me know if you build one of your own – I love seeing photos of your projects. I’m happy to answer any questions and don’t forget to subscribe to Gadgets and Grain on YouTube.
Links to Tools I Used
If you’re curious about some of the products I used on this project, check them out on Amazon. When you click on the links below, Gadgets and Grain gets a little commission when you check out – I would greatly appreciate it!
- Kreg Jig K4 Pocket Hole System
- Kreg Pocket Hole Screws
- General Tools Digital Sliding Bevel Gauge
- Kreg Face Clamp
- Dewalt Trigger Clamps
- Dewalt 20V Cordless Drill
- Kreg RipCut Circular Saw Guide
- Titebond II Wood Glue
- GluBot Glue Applicator

Your diy modular work bench gets 2 thumbs up from me. For a while now I have been searching for a work bench to build and this is the one. Thanks for sharing it.
LikeLike
Thanks, Rob! Much appreciated!
LikeLike
Fantastic work bench. I noticed it’s 7.5ft wide. Wouldn’t it have easier to keep it at 8ft wide for fewer cuts. Was there a specific reason you shortened it a bit? Thanks.
LikeLike
Yes – I had in my mind that I would line up these benches end-to-end in my garage, and I have a 15-foot space that would accommodate that. It ended up that I store these benches in a different configuration, and I could have just gone with the 8-foot length – oh well.
LikeLike
I would love to build your workbench. do you have dimensions of all lumber used and I want to build a shelf to mount my table saw to end of workbench tabletop. Thank You.
LikeLike
Hi Michael. I just updated the blog post to include plans and a cut list. Let me know if you have any other questions.
LikeLike
Hello, this is a great table. Where can I get the cut list and supply list? Thanks in advance
LikeLike
Hi Audrey. I just added plans and a cut list to the blog post. Take a look and let me know if you have any other questions.
LikeLike
I think this is a great setup, perfect to make use of my garage space. Do you have any downloadable plans for this bench that you could share?
LikeLike
Hi Brian. I just added plans and a cut list to the blog post. Check them out and let me know if you have any questions.
LikeLike
I think that your workbench design is awesome. Just one thought is to also use it as an out feed table for the table saw. I don’t think it would be too difficult to incorporate it in your design. Also do you have a material list and a cut list?
LikeLike
I used this as an outfeed table all the time. I just added plans and a cut list for this workbench. Check it out and let me know if you have any questions.
LikeLike
What are the dimensions of this? I’ve cut my 2×6 for centers but did you do 2” or 3”
LikeLike
I just posted plans and a cut list for the workbenches. Hope that helps.
LikeLike
Do you have a drawing set for your workbench It is the best one I have seen! Great job!
LikeLike
Thanks! I just added plans and a cut list for this workbench on the blog. Take a look and let me know if you have any questions.
LikeLike
This is by far the best looking design and functionality that I have seen in a workbench. Any chance you could provide a link for the neodymium magnets. I would like to build one for my shop and I’m shopping for the hardware parts before I start. Thanks.
LikeLike
Thanks for the kind word, Jorge. The magnets I used can be found here: https://www.amazon.com/gp/product/B072K586ZW/ref=as_li_ss_tl?ie=UTF8&psc=1&linkCode=ll1&tag=gadgetsand0c3-20&linkId=0abdb00e000834d5df3709f05e9addcf
LikeLike
Do you have any plans or the measurements for your workbench ?
LikeLike
Yes – I just added plans and a cut list to the blog post. Let me know if it’s what you were looking for.
LikeLike
WHAT A GREAT DESIGN!! GREAT JOB!
LikeLike
Any written plans for this? Lengths etc.
LikeLike
Hey Richard – sorry it took so long, but I finally posted plans and a cut list for this workbench. Check it out and let me know if you have any questions.
LikeLike
I totally love this workbench! And your video is awesome! Your design gave me an idea I’d like to share. I’ve never done this so can’t claim it really works but if you or anyone else is interested, you might give it a try. You have made your bench with modular parts. Why not add another part? Do you ever work with bench dogs? If so, you could make another component that included two pieces of 3/4″ ply cut to the same size. One piece, the bottom, would remain solid; the top piece would be the one with the dog holes cut thru it. The top is then glued to the bottom. It could be made the full size of one of your bench modules. Using magnets, recess the washer portion on, say, the 4 corners of your bench top so that the washer is flush with the bench surface. Attach the magnet to the under side of the bench dog component at its 4 corners with the magnets protruding slightly, just enough to make contact with the washers. That way you wouldn’t have to clamp your bench dog surface to your bench, freeing up your clamps for your work piece. When the bench dog addition was not in use, you could hang it on your wall on hooks screwed into the studs. Just drill maybe 3 holes all the way thru your bench dog component stud distance apart. Just a thought.
LikeLike
Fantastic idea and build. Would you be willing to share all the measurements and cuts you used to replicate what you did?
LikeLike
Yes – I just posted a cut list and plans for the workbenches. Let me know if you have any questions.
LikeLike
Fantastic build!!! Would you share your cuts and plans so I could try to replicate it?
LikeLike
Hey Scott. I just added plans and a cut sheet to the blog post. Check it out and let me know if you have any questions.
LikeLike
Very good job, this looks like it would be a good fit for my garage.
Do you have overall dimensions and a cut list availabel?
Thank you,
Scott
LikeLike
Hey Scott. I just updated the blog post to include plans and cut list. Let me know if you run into any questions along the way.
LikeLike
I love this design. Great functionality. Would you happen to have a breakdown of the total materials and/or the cuts you made? I am an amateur wood worker and I am having difficulty figuring out all you did for the frame. I mainly want to make sure I am able to duplicate the height so I can park my table saw next to it.
LikeLike
Hey Randy. I just added a materials list, cut list and plans to provide more clarity. Sorry I’m 5 months late with this, but hope it helps.
LikeLike
Love the design. It is simple but very functional. Would like the dimensions or cut list so to speak. Would make a couple of minor changes like the storage for the miter saw would be on a rolling shelf to make it easier to get in and out.
LikeLike
I like the idea of the rolling shelf, Glenn. I just added plans and a cut list to the blog. Sorry for getting back to you so late, but hope it helps.
LikeLike
Wow! This is crazy I sketched up a design very, very similar to this just a couple days ago. Mine has hinges between the two halves, but I like the magnet idea. I might change things up to use that idea. Nice write up and video. Thanks!
LikeLike
Thanks!
LikeLike
This is an awesome bench! I’ve been searching and building the perfect bench, “in my mind anyway “, and this one fits right in. I love the modular miter station. I want mine to also have an end station for my portable table saw. Great job!
LikeLike
Really like this one. Do you have cuts and material list?
LikeLike
Just updated the blog post with a cut list. Sorry it took so long. Let me know if you have any questions.
LikeLike
Great design for a workbench and it looks like it would suit the space I have. Would you happen to have a cut last for the materials?
LikeLike
Hey Sam. I just updated the blog post with a materials list, plans and a cut list. Let me know what you think and if you have any questions.
LikeLike
This is an awesome workbench, and exactly what I’ve been looking to build for my garage shop. Any chance you have a material list and dimensions you could post?
LikeLike
I just added a materials list with links along with plans and a cut list. Let me know if that’s what you were looking for – and sorry it took me so long to get back to you.
LikeLike
Jeremy. I really like your design. I looked at the other ones your referenced, and really like Paulk’s too…but I don’t really need a portable system, as I will only use my table at home. I did like the way Paul made a way to attach a table saw at the end of his bench. Do you have plans available for the rolling base?
LikeLike
Hey George. Sorry it took so long to get back to you, but I just added plans and a cut list to the blog post, so take a look and let me know if you have any questions.
LikeLike
Bench looks awesome! Do you happen to have a materials list? Thanks
LikeLike
Yes – I just added a materials list along with plans and a cut list. Sorry it took so long to get back to you.
LikeLike
Great project and a great video, thanks for sharing.
LikeLike
Awesome design. Would you have a plan available or a cut list?
LikeLike
Hi Boyd. I just added plans and a cut list to the blog post. Let me know if it helps and if you have any questions.
LikeLike
What were the overall dimensions of each individual table. These looks like they would fit in my garage perfectly.
LikeLike
Hi Keith. I just added plans and a cut list to the blog post. Take a look and let me know if it helps.
LikeLike
This looks great, do you have a list of the boards and their measurements, this is a lot of wood but no dimensions. I take they are 24″ wide and 8′ long, but the 2 X 4 and 2 X 6 dimensions is what I am after. This would work great in my garage due to space.
LikeLike
Hey Roger. Sorry it took so long to get back to you, but I just added plans and a cut list with exact dimensions. Let me know if you have any other questions.
LikeLike
This is exactly what I’ve been looking for. Is there a list of materials used somewhere?
LikeLike
Hi Mike, I just added a materials list, cut list and plans to the blog post. Let me know what you think and if you have any other questions.
LikeLike
Very well written article with full information. Thank you for sharing this great info. It’s nice to know and read about this stuff. I would definitely try to follow these suggestions.
LikeLike
My only idea for a possible improvement, albeit a costlier one, is to use a laminate top finished in marker board white. Something like this https://www.homedepot.com/p/FORMICA-4-ft-x-8-ft-Laminate-Sheet-in-Markerboard-White-with-Gloss-Finish-009491290408100/303069216. Comes in 4×8 sheets and only requires a little more prep and care when cutting. And it doubles as a white board for jotting down quick notes or measurements.
LikeLike
Cool idea.
LikeLike
What a great design! I searched the Internet over and couldn’t find anything like your table. Very nice job!!! I too need my garage for other things as well. Any chance you might have a cut list for this table laying around or was it all done as you built it?
LikeLike
Hi Bob. I just updated the blog post to include a cut list and plans. Let me know if you have any questions along the way.
LikeLike
Thank so much for the cut list. Awesome!
LikeLike
This is excellent! Clean, simple, practical and very chic for a garage or shed. By any chance do you have a cut list?
LikeLike
Hey Eddie. Thanks for the feedback, and sorry it took so long to reply to you. I just updated the blog post to include plans and a cut list. Let me know if you run into any questions along the way.
LikeLike
great description and bench, well done and thanks for the inspiration
LikeLike
Love you design! Do you have a cut list that you could post? Thanks, Sandra
LikeLike
I just updated the blog post to include plans and a cut list. Let me know if it helps – and sorry it took so long to get back to you!
LikeLike
Great build!! I’ve been watching your channel and the modular benches you referenced by Bob at ILTMS. This is pretty close to what I’ve been trying to design, with almost the exact same garage layout and needs. Do you think I could swap out the Miter insert for a flip top? I have to work out the dimensions with the pull saw slide rails and inserting stop block channels on the top.
LikeLike
You could try. I saw this flip-top design that might work: https://www.youtube.com/watch?v=Tc-dw_C-ajQ&t
LikeLike
Hey, this is a great design! Thanks for sharing. Do you have a material list?
LikeLike
Yes – I just added a materials list, plans and a cut list. Let me if you have any other questions.
LikeLike
Great looking table and awesome video. I was wondering if you have a materials list available for the lumber you used. I’d like to give this a shot this weekend, but I’m new to the hobby and not quite sure what to buy when i gey down to the local limber yard
LikeLike
*lumber
LikeLike
Thanks! Yes – I just added a materials list, plans and a cut list for the workbenches. Let me know what you think and if you have any more questions.
LikeLike
Do you happen to have a cut list or pdf plans for this bench? I am good at following directions ha!
LikeLike
Hey Cal. I just updated the blog post to include plans and a cut list. Let me know if that’s what you were looking for.
LikeLike
Any chance there is a cut sheet or plans for this bench
LikeLike
Sorry it took so long, but I just updated the blog post to include plans and a cut list. Let me know if you run into any other questions.
LikeLike
Do you have the measurements on the work bench side that has the miter saw insert?
LikeLike
Yes – I just updated the blog post to include plans and a cut list. Let me know if that helps.
LikeLike
is there a cut list for this workbench as I will have to take the cost list to a place that’s got timber & will have to get the to cut it for me there than I’ll be able to put it together when I get home ( Don’t Drive) so I’ll have to get a uber or a taxi to get the timber home from the timber yard
LikeLike
Hey Ken. I just added plans and cut list to this post. Let me know if that’s what you were looking for.
LikeLike
Hello!! This is a great idea my husband and I would like to try and build. Do you happen to have a shopping list for the materials needed for the project?
LikeLike
Hi LeAnne. I just updated the blog post to include a list of products from Amazon and Home Depot as well as detailed plans and a cut list. Let me know if you run into any questions.
LikeLike
Hi. Love the video and the article is exceptional. I am looking forward to building this, as I am in desperate need for a work area. Do you have a materials and cut list?
LikeLike
Thanks for the feedback, Alex. I just updated the post to include plans and a cut list. Let me know what you think and if you run into any questions. Good luck on your workbench.
LikeLike
Awesome build, I’ve been looking for a 2 section modular build. You sir, are my hero.
LikeLike
Thanks! Good luck on your build.
LikeLike
Love the design, and I plan to use it for my bench. Thanks so much for sharing! One addition I’d suggest is adding a tool box latch to lock the two tables together. Maybe it’s overkill, but you mentioned you might add a couple of more magnets for a tighter bond, maybe the latches along with the 6 magnets would assure tightness.
LikeLike
Great idea. Thanks!
LikeLike
Really nice workbench! Do you have the cut lists or overall dimensions of your build?
Thanks!
LikeLike
Yes – I just updated the blog post to include plans and cut list. Let me know if they are what you were looking for.
LikeLike
Do you have a cut list? Are the tables 36 inches tall before or after the casters? Thanks.
LikeLike
I just added plans and a cut list – let me know if they match what you were looking for. The benches are about 36-inches with the casters on.
LikeLike
Awesome design! I may have missed it, but what are the demensions of each bench? I believe length is 7.5, height 36” but did not see a width.
Thanks!
LikeLike
The width of each table top is 24″. I just added plans and a cut list to provide more clarity. Let me know if that helps.
LikeLike
The pics did not show up.
LikeLike
Sorry to hear that Tom. I just updated the post with some new images, including plans and cut list. Let me know if the photos still are not showing up for you.
LikeLike
Great job! I was thinking of something similar to remodel my kitchen, but I have no garage… I would make it between 2 rooms INSIDE the house and cut out areas for a Bosch table saw, either at one end (notches in both halves to set the saw down in) or maybe near the middle to use it as infeed & outfeed tables, though I’d have to figure a way to reach the power, fence and tilt… maybe make one side broken into 2 halves with magnets… Maybe make both sides break apart into halves to make the entire bench into quarters…
LikeLike